Bnk To The Future is pleased to announce that we have deeply integrated & partnered with privacy-centric Bitcoin & crypto tax platform Recap to simplify the complexities of Private Equity, public Shares as well as Bitcoin & Virtual Assets tax calculation, data collection & reporting to make your life easier.
Recap has integrated with Bnk To The Future to simplify tax calculations for your virtual assets (Bitcoin, ETH, USDT, etc.), Public Shares, and Private Equity. Upon signing up for Recap, users can link their Bnk To The Future account to monitor each transaction securely, manage their virtual assets, Public Shares, and Private Equity data all while streamlining the tax reporting process.
* Disclaimer: The information provided in this content does not constitute tax advice and should not be taken as such. Both Recap and Bnk To The Future explicitly do not endorse each other for tax advice. If you have any uncertainties regarding financial or tax-related matters, it is strongly recommended to consult with a qualified tax professional. Additionally, Recap features allow for the sharing of information with accountants and professional advisors for further assistance.
Connecting your Bnk To The Future account to Recap is FREE of charge. Should you wish to connect your account, please use the following affiliate link: https://recap.io/integrations/bnktothefuture.
Recap offers you the option to upgrade to a paid account to unlock additional features. Your decision to upgrade is entirely voluntary, and we encourage you to explore the benefits at your own pace.
In the event that you decide to upgrade your account through this affiliate link, it’s important to note that Bnk To The Future will receive a commission, payable by Recap. This commission serves as a token of appreciation from Recap for the referral.
Your data is stored on your device and encrypted with your keys meaning Recap have no way to get your data and no way to read it.
Below is a step by step guide to get started:
Step 1: Visit Recap Website.
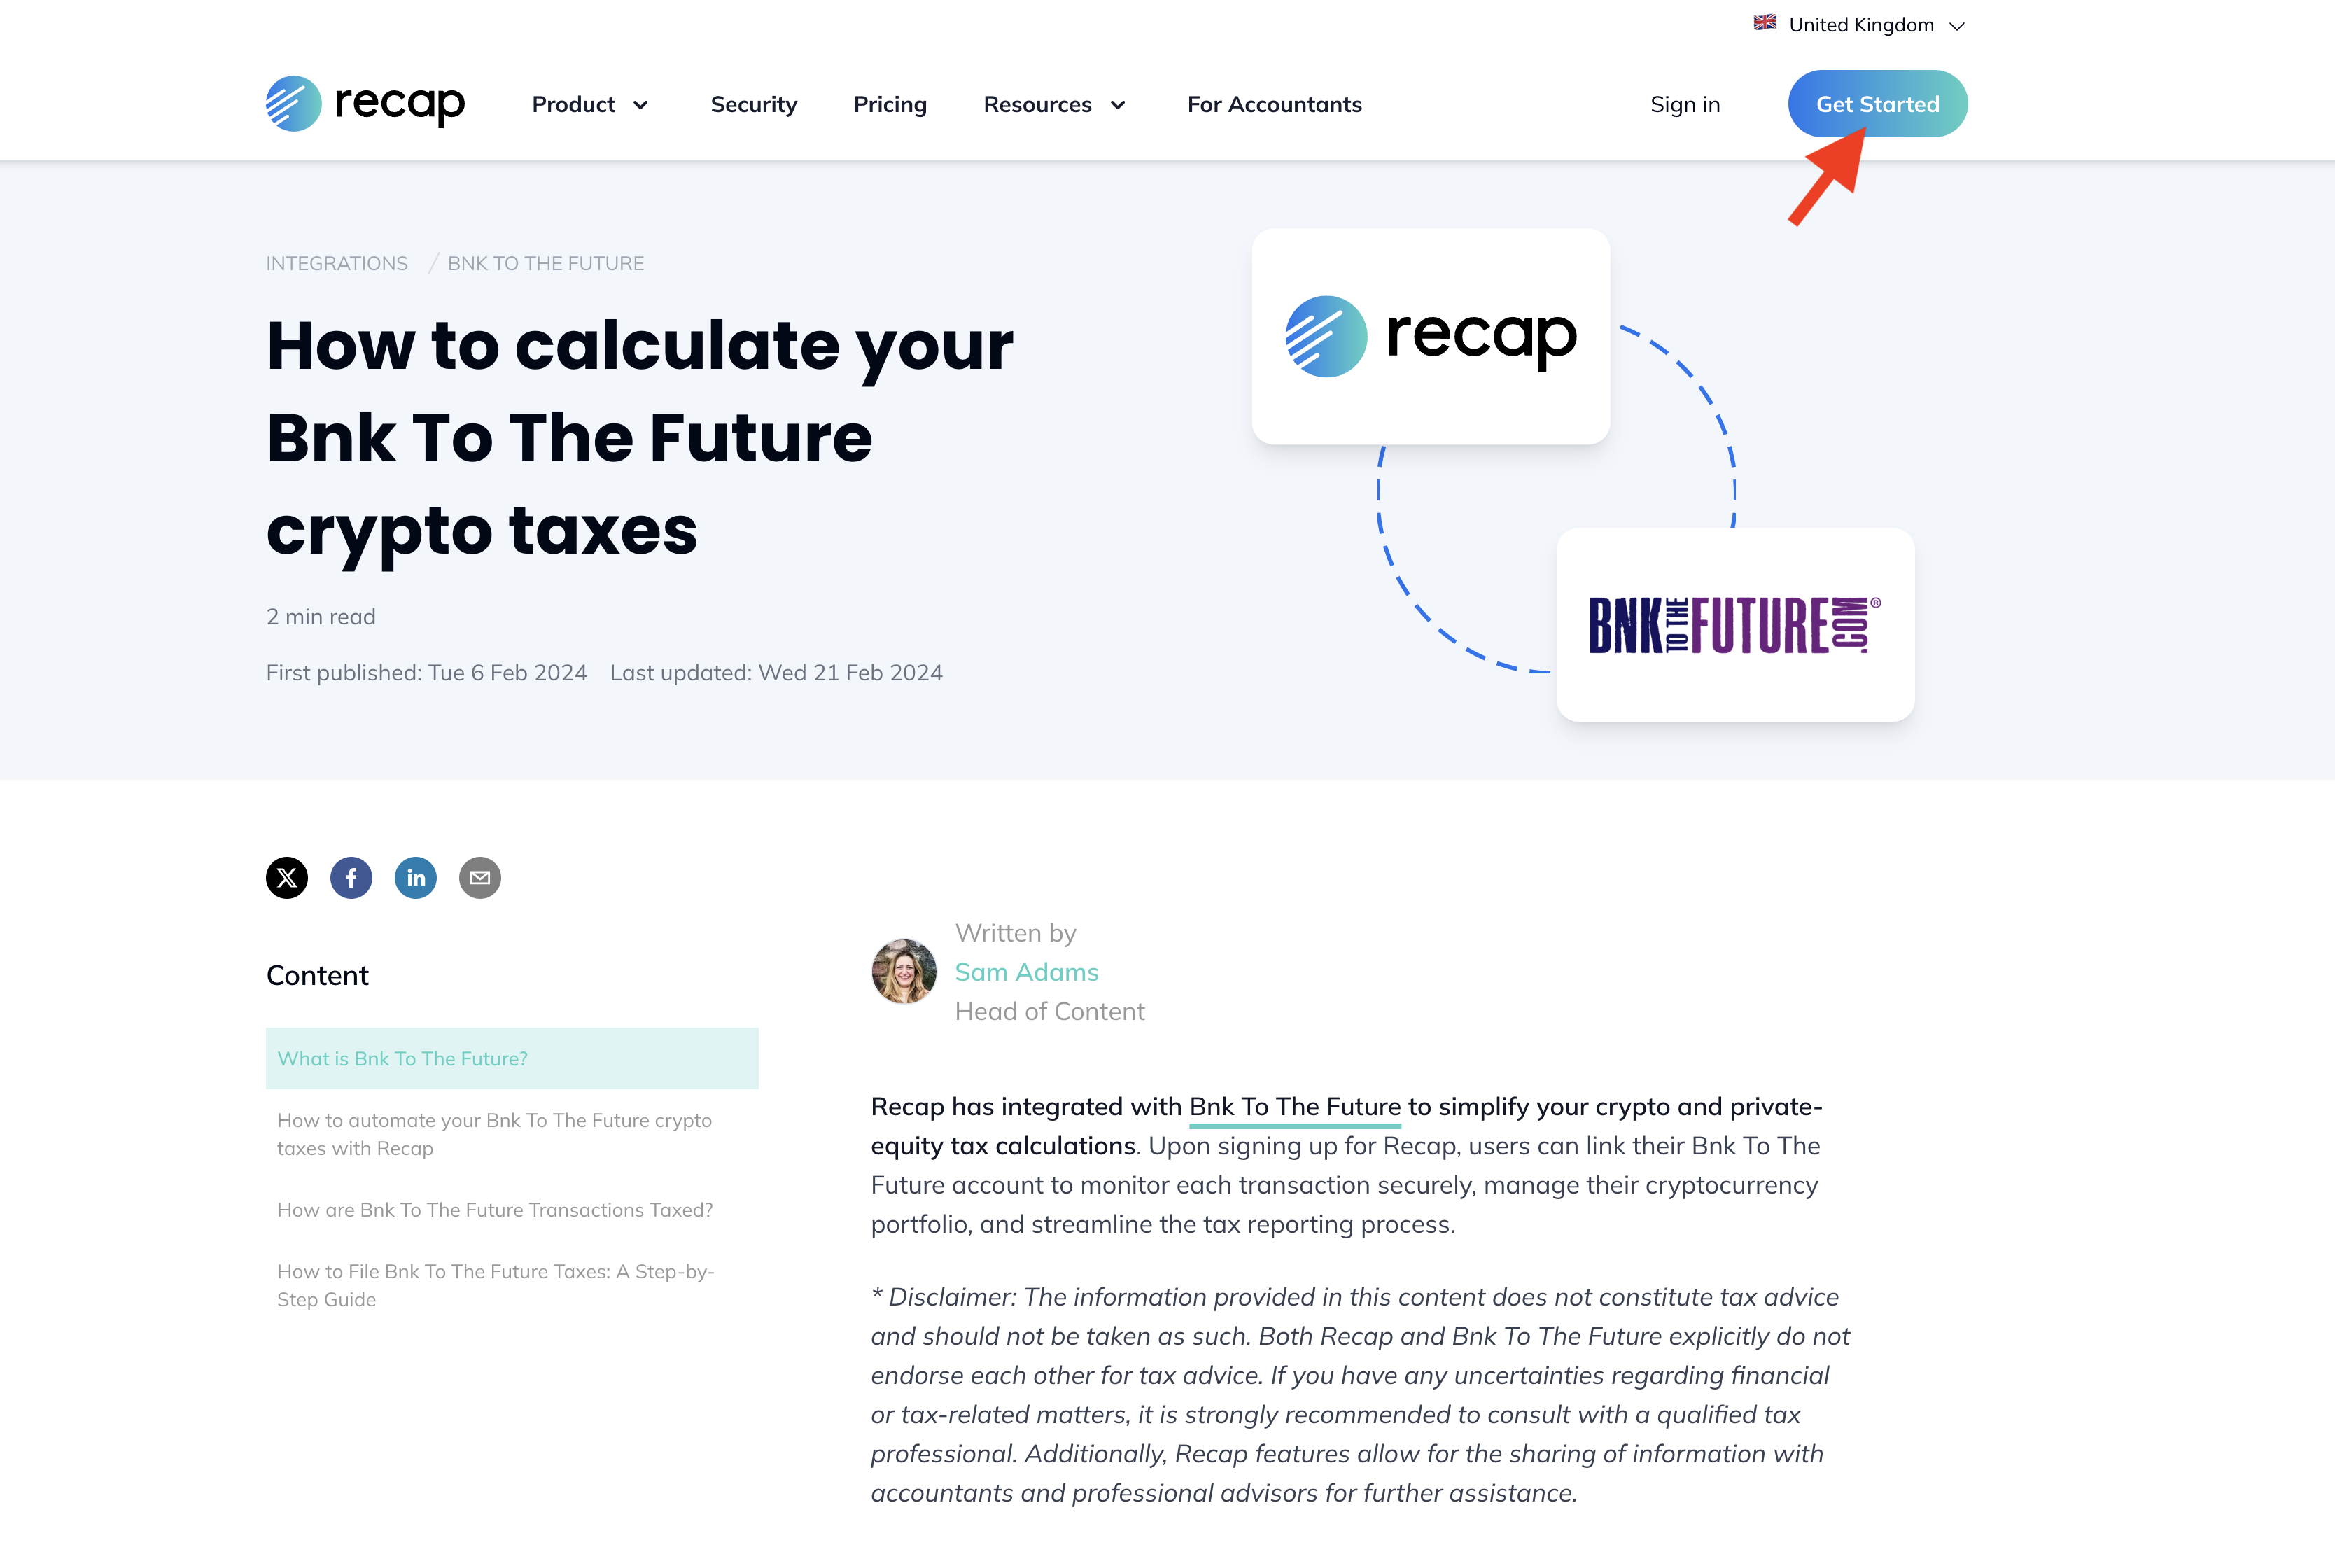
This URL will take you will take you to Recap’s webpage which is titled “How To Calculate Your Bnk To The Future Crypto Taxes”: https://recap.io/integrations/bnktothefuture
Locate and select the Get Started button.
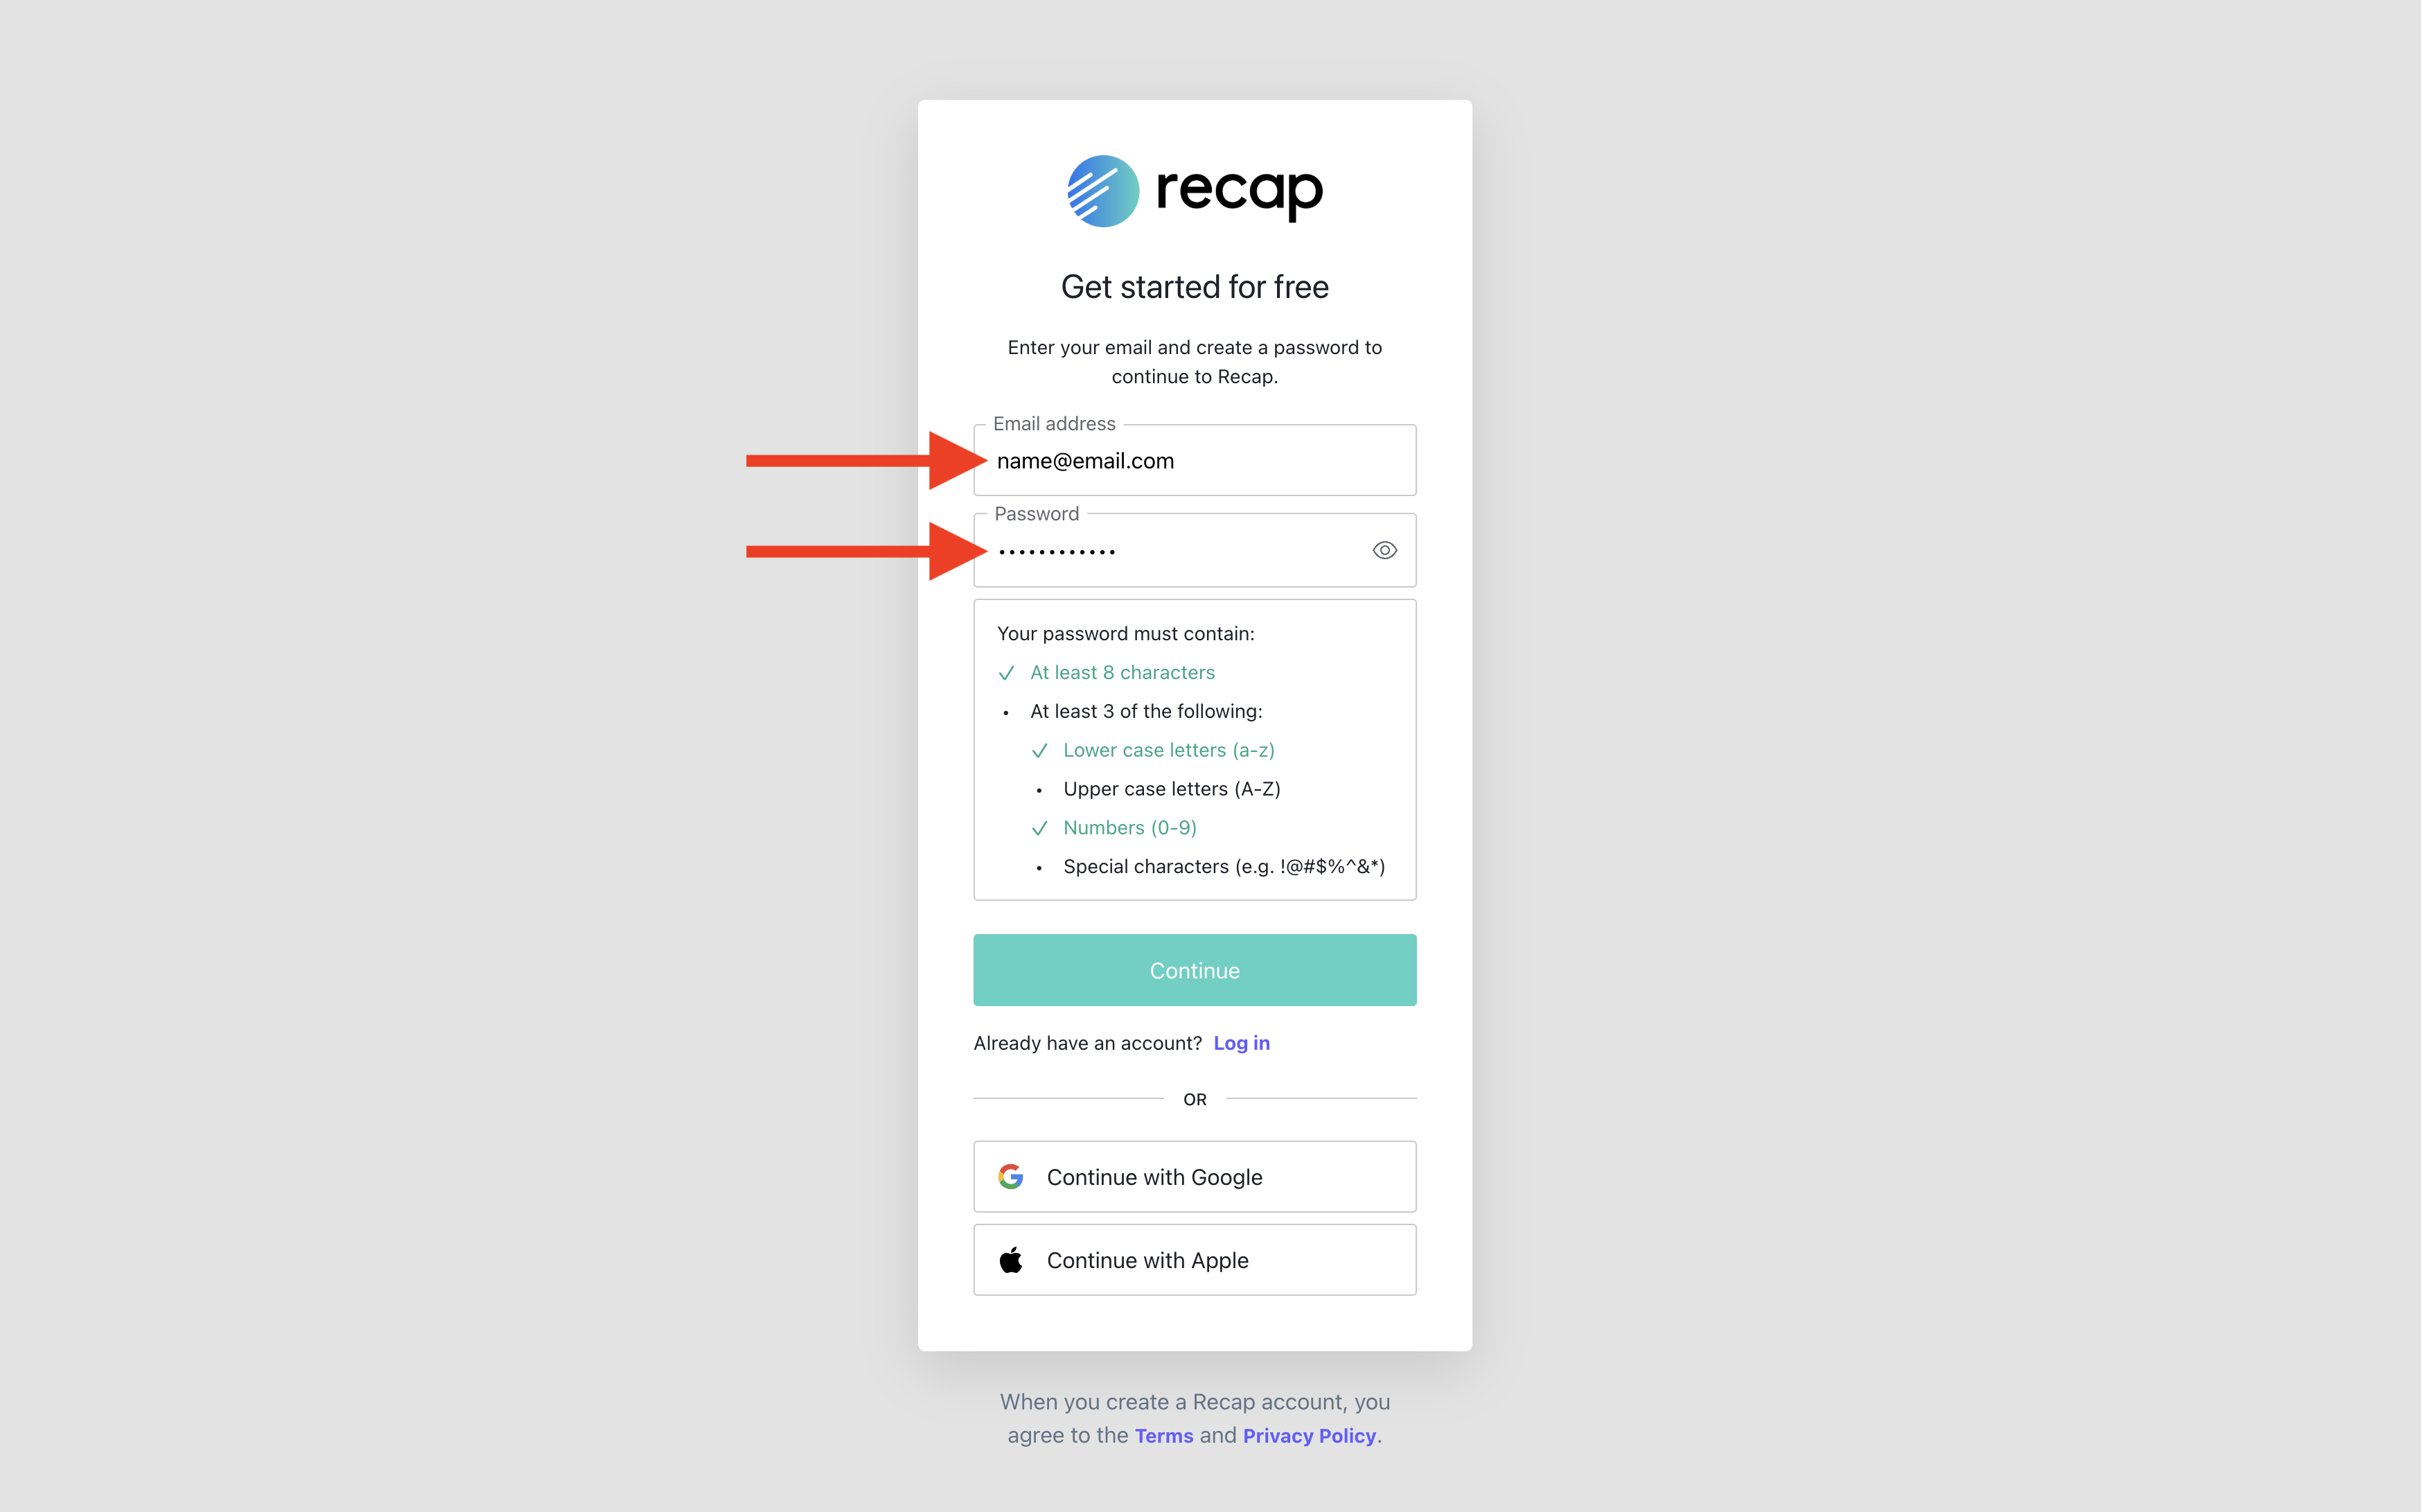
Step 2: Please Enter a Valid Email Address and Create a New Password.
To proceed, input a valid email address, then generate a password. Click “Continue” once finished. Please adhere to the password creation instructions provided. Refer to the screenshot below for guidance.
NOTE: It DOES NOT NEED to match your login email address on Bnk To The Future.
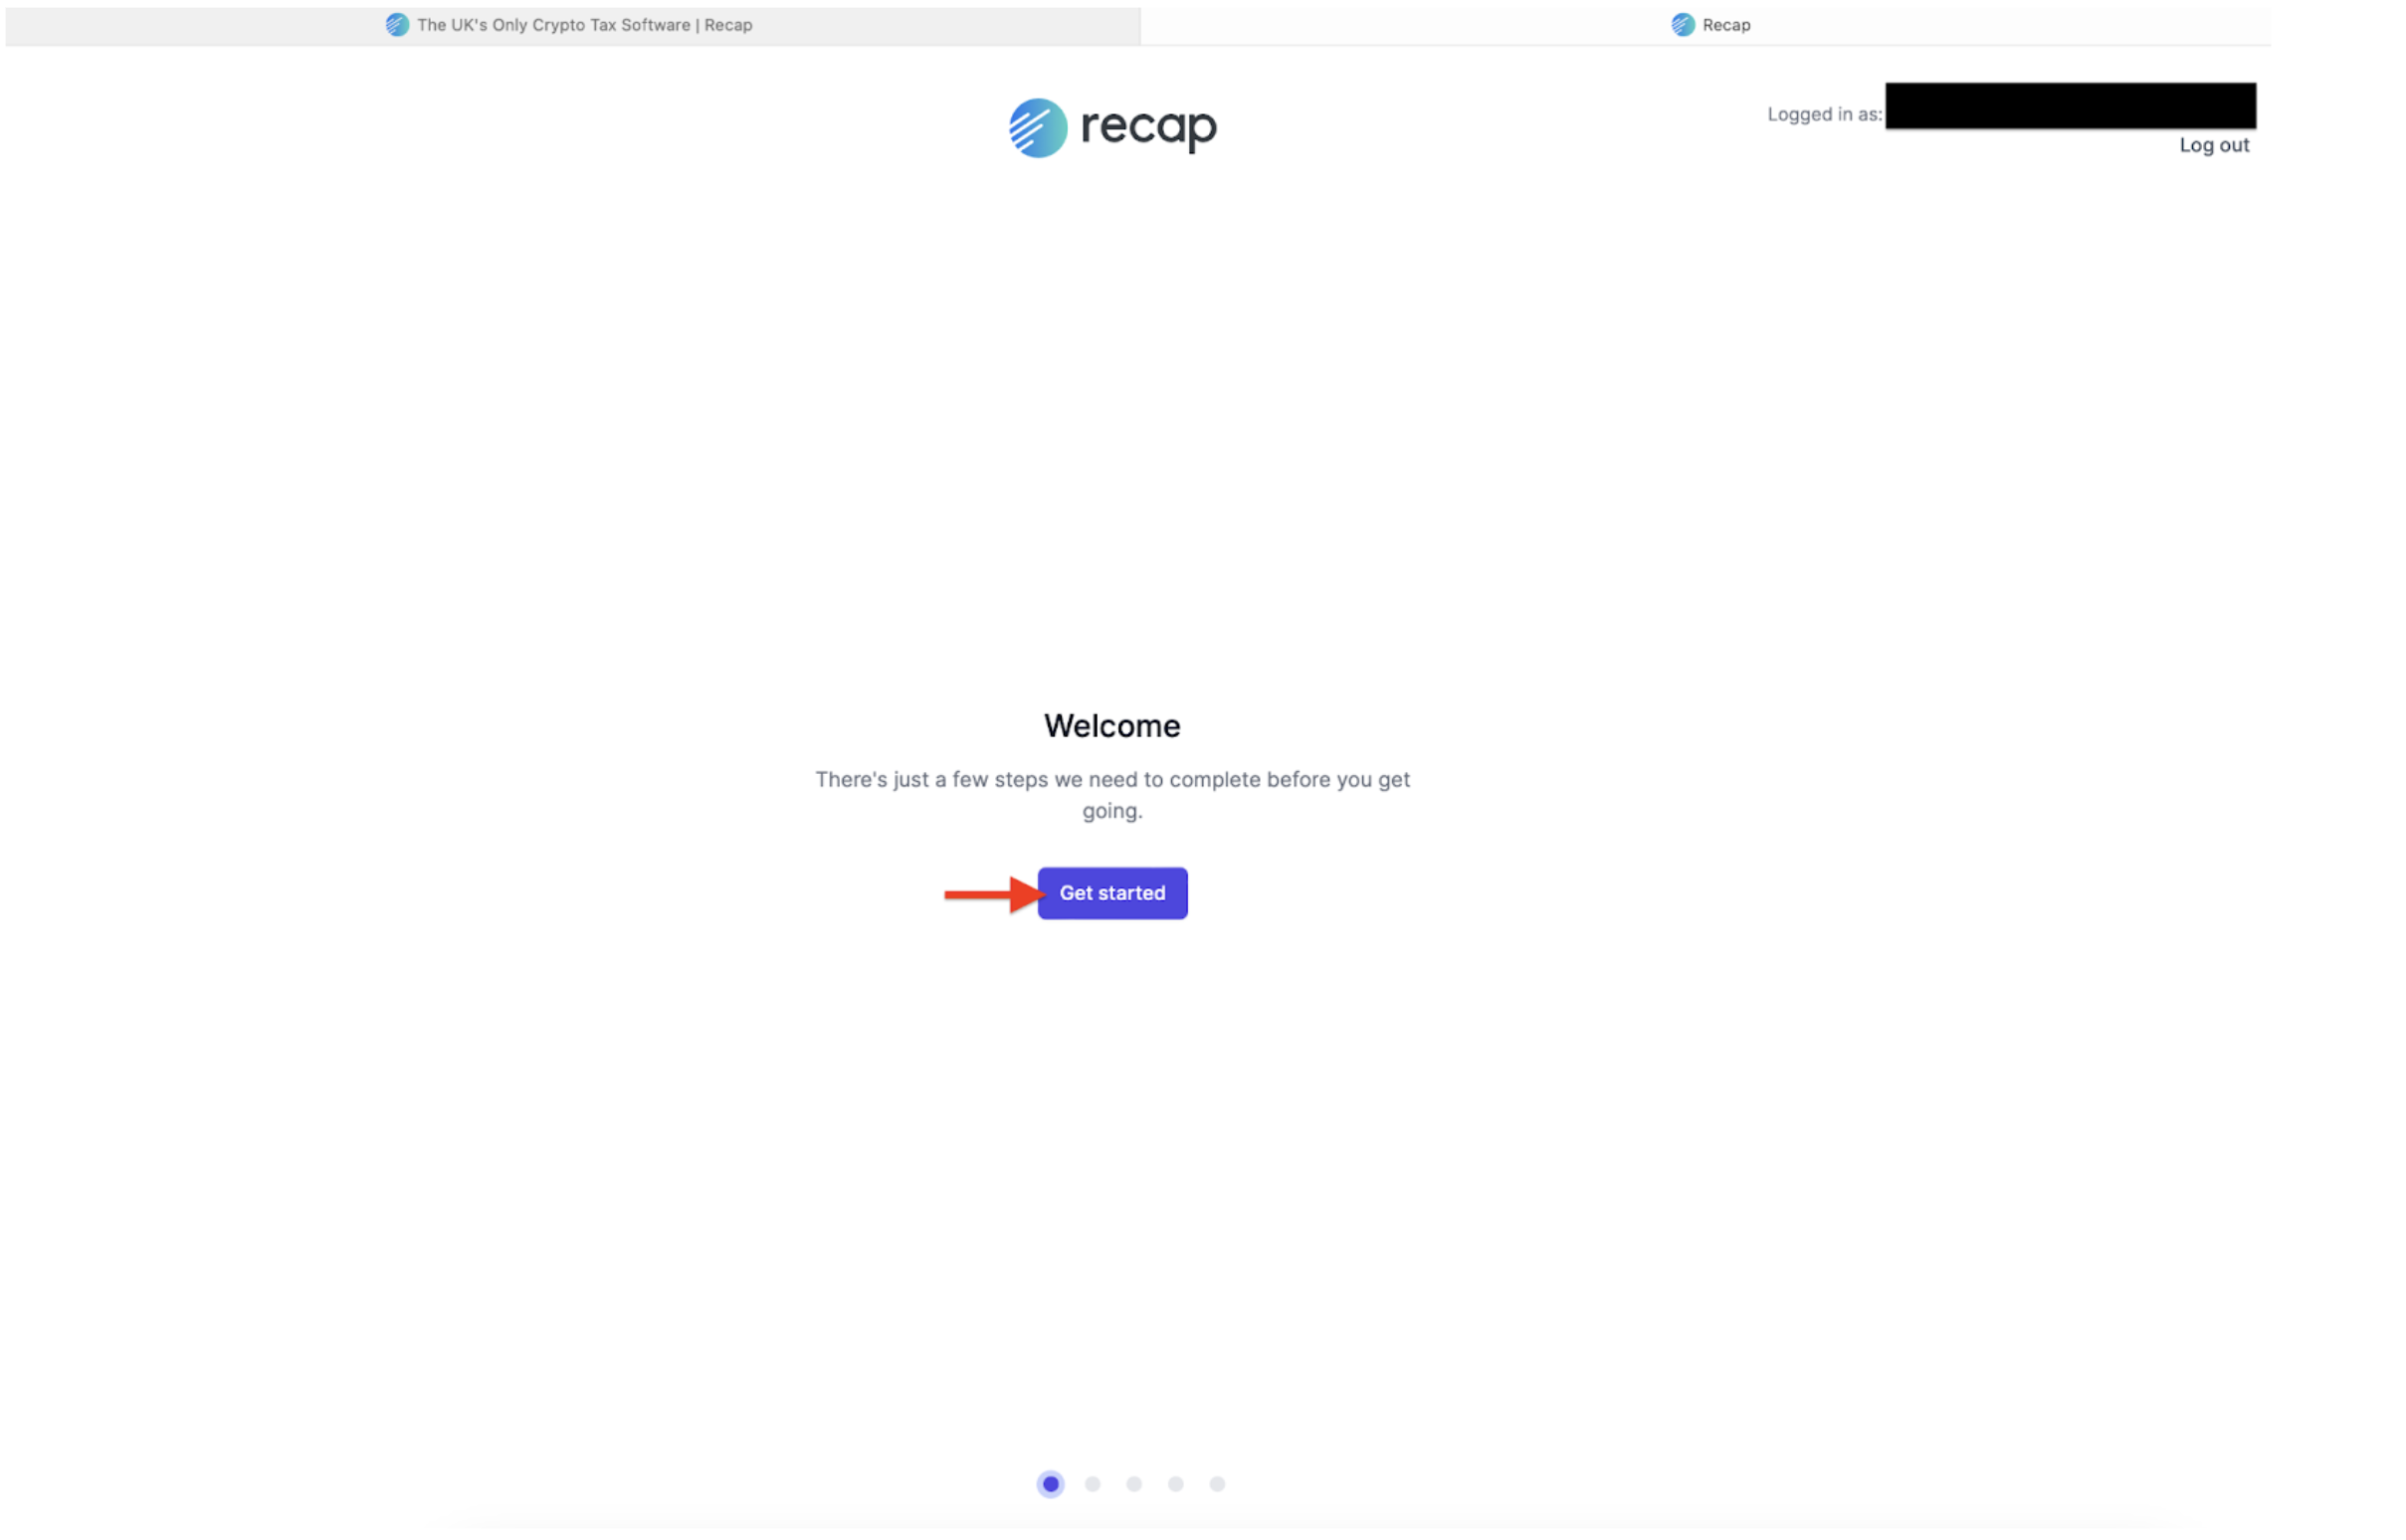
Step 3: Tap the “Get Started” Button on the Welcome Screen.
Upon reaching the Welcome screen, locate and tap the “Get Started” button. Verify your successful login by observing your email address displayed in the top right corner, accompanied by a logout link. Press the “Get Started” button when prepared to proceed.
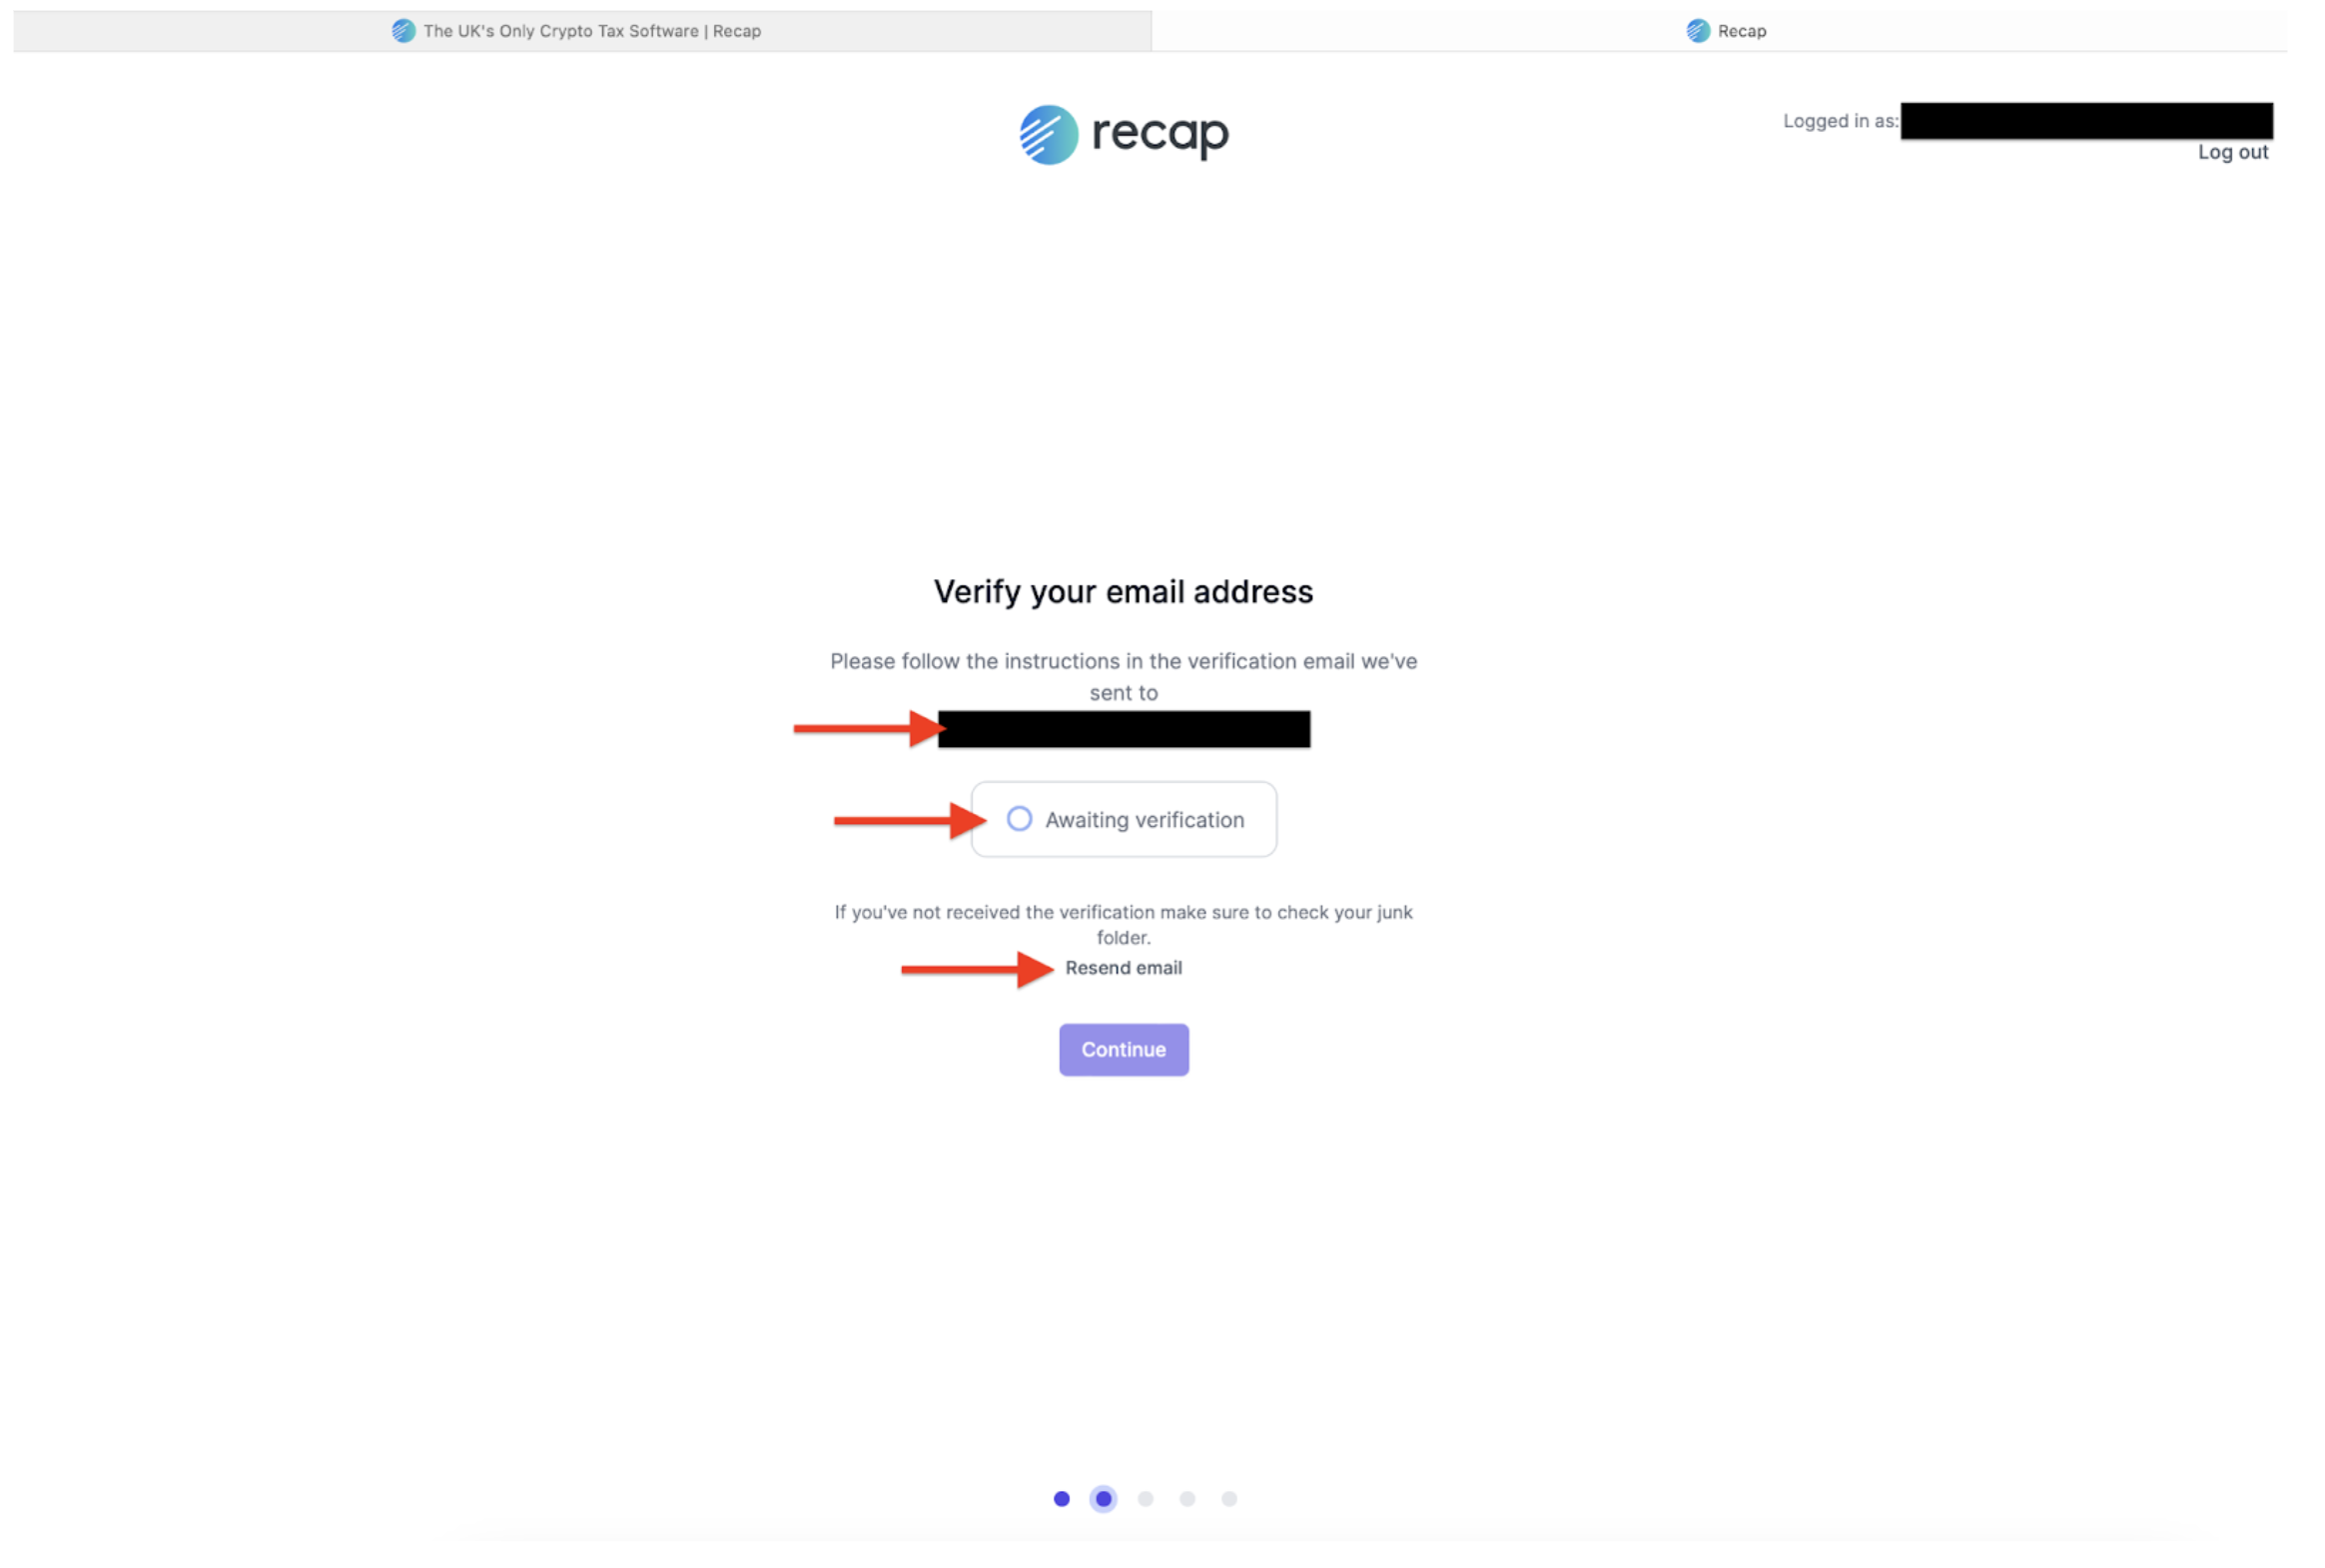
Step 4: Verify Your Email Address.
The next step involves verifying your email address. On the webpage, you will find the message: “Verify your email address. Please follow the instructions in the verification email we’ve sent to…”. Your email address will be displayed. Proceed to your email inbox to check for the email verification link from Recap. Additionally, note the “Awaiting Verification” graphic on the screen. If you cannot find the verification email, you can use the “Resend email” link located on the same page, as shown in the screenshot below with an arrow pointing to it.
4.1 Check Your Email Inbox for Two Emails from Recap.
Please go to your email inbox to confirm if you have received two emails from Recap. Look for the subject line that reads: “Please verify your email address.” Open the emails when you are ready.

The second email will have the subject line: “Welcome to Recap, the simple way to do your crypto taxes.” You can revisit this email once you have successfully created your Recap account. If you cannot find it check your Spam / Junk mail too.
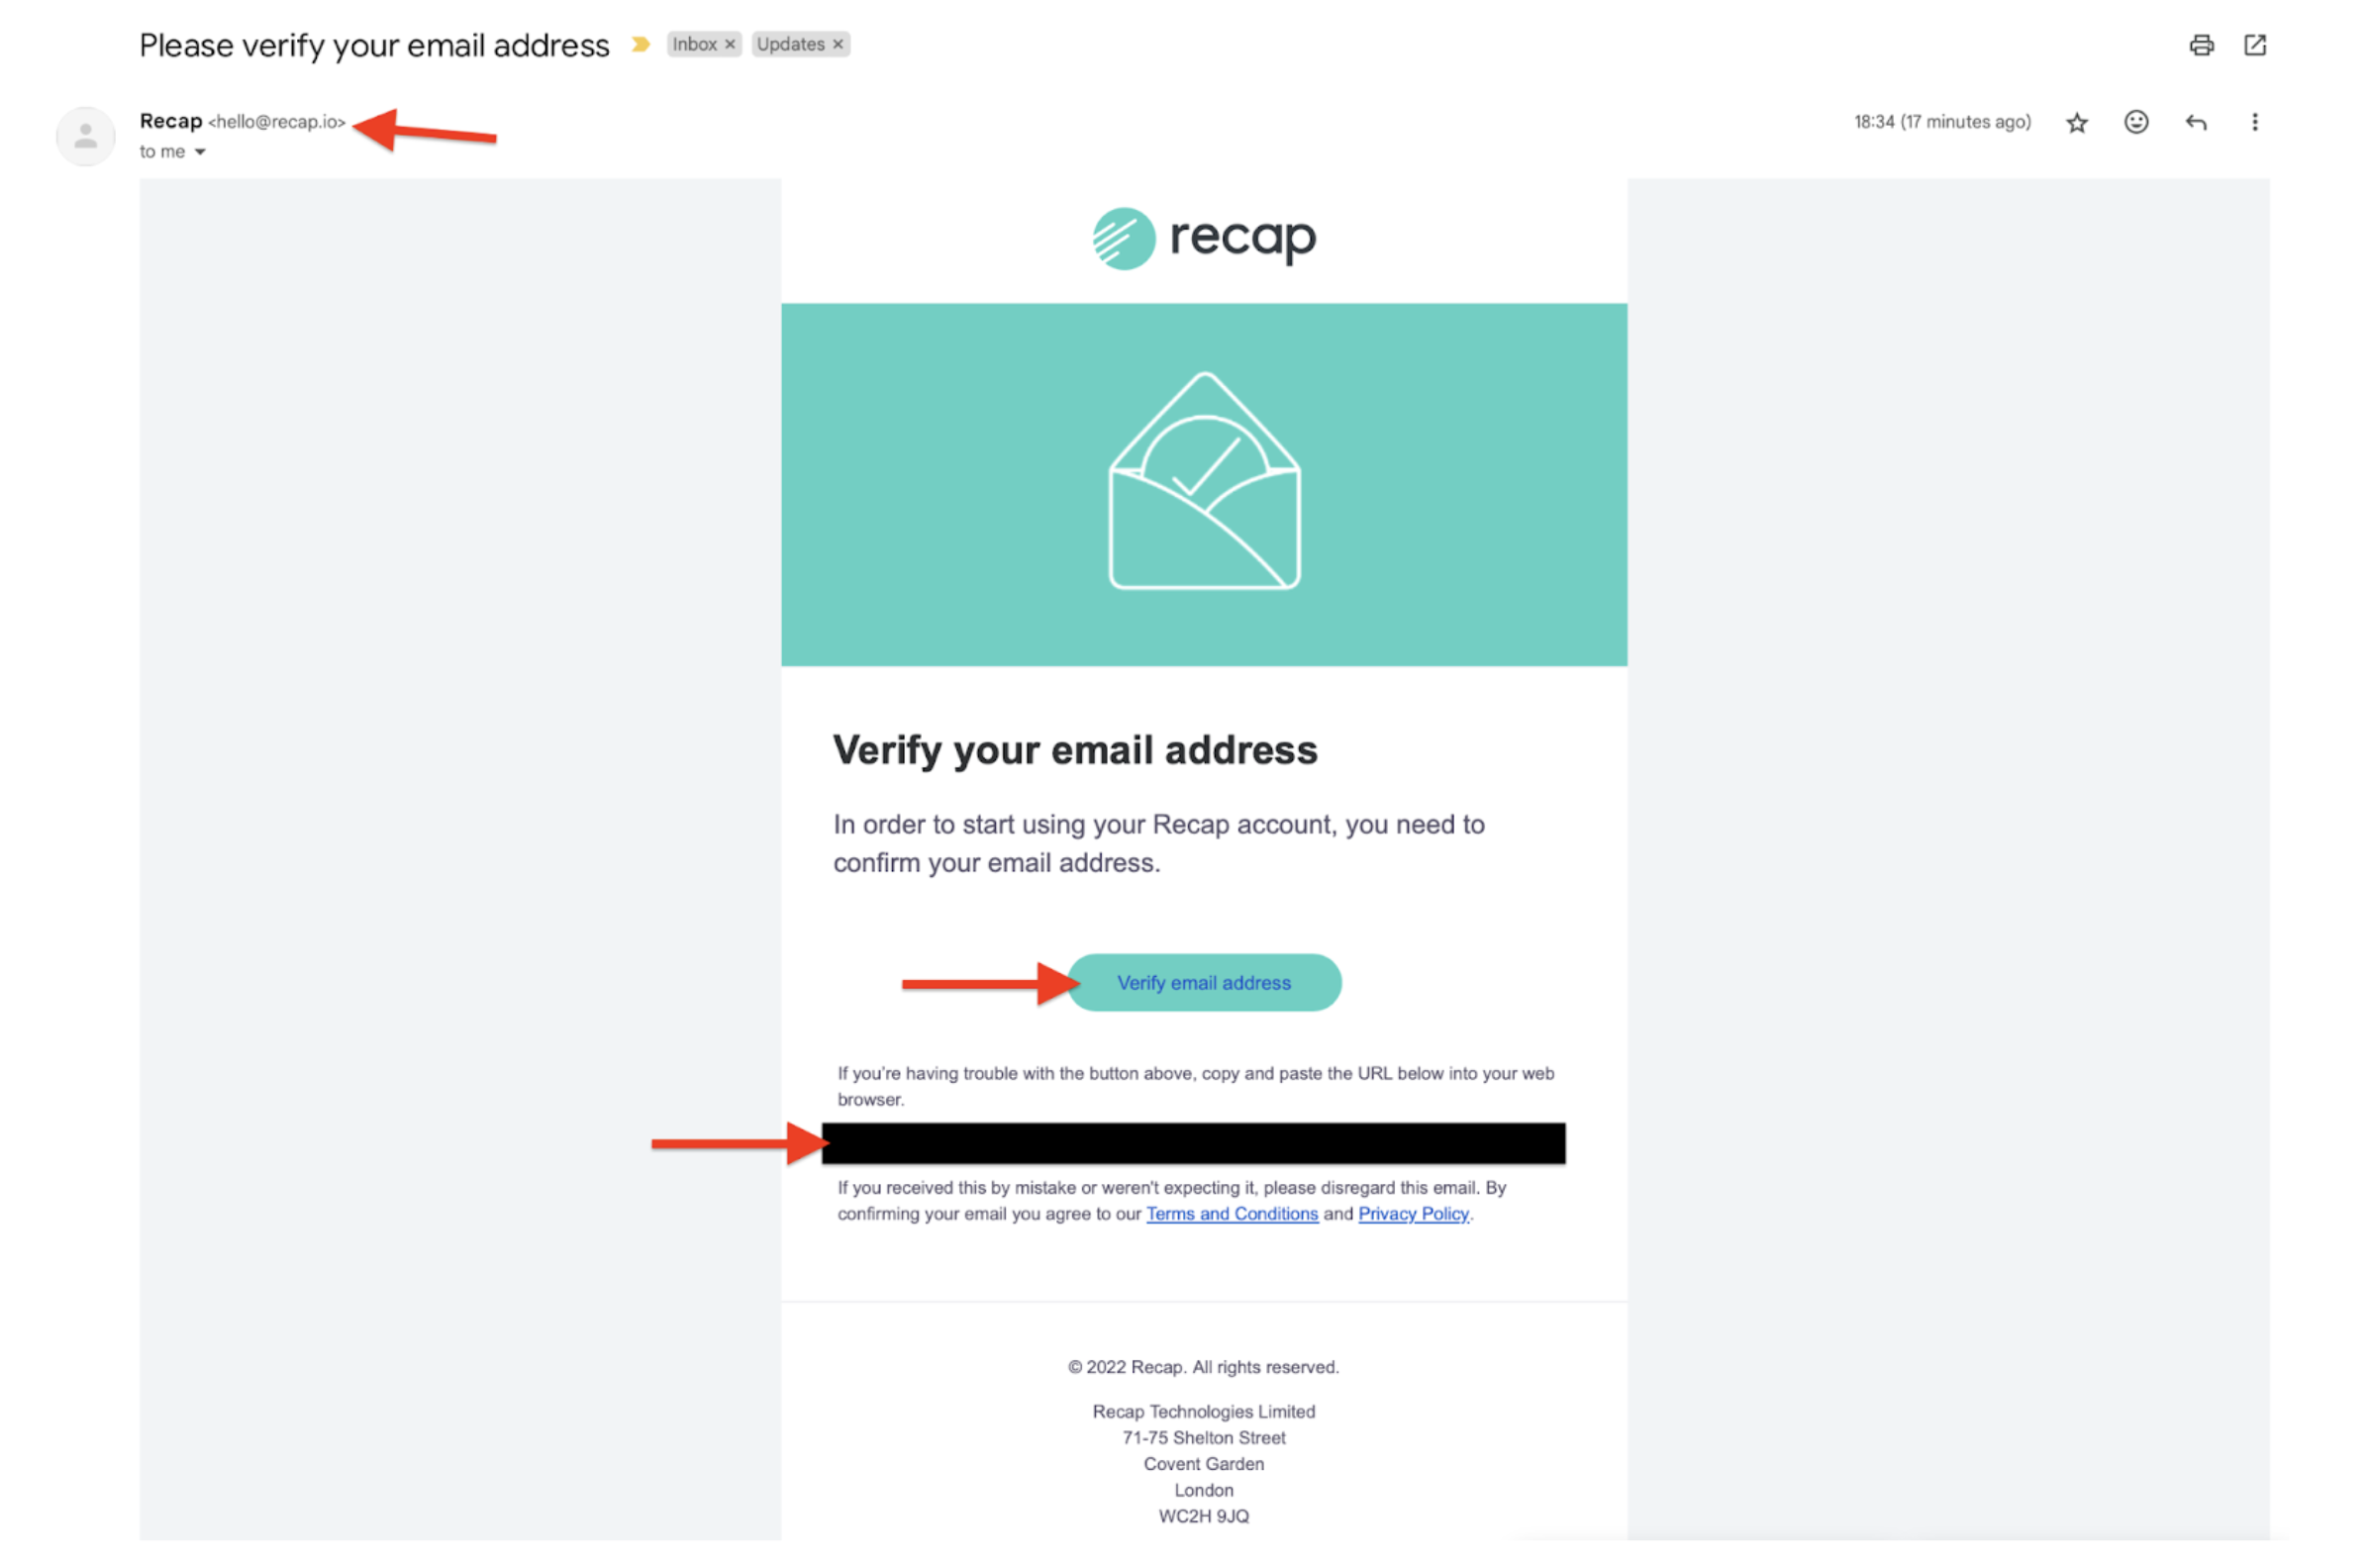
4.2 Click the “Verify Your Email Address” Button.
Look for an email sent from [email protected]. Its contents will include the message: “Verify your email address. In order to start using your Recap account, you need to confirm your email.” Within the email, you will find a button labeled “Verify Your Email Address”. Click on this button when you are prepared to verify your email address.
If you cannot locate the button, there will be a sentence that says, “If you’re having trouble with the button above, copy and paste the URL below into your web browser.” Following this sentence, you will find a unique link for you to click on to verify your email address.
Please refer to the screenshot below for visual guidance.
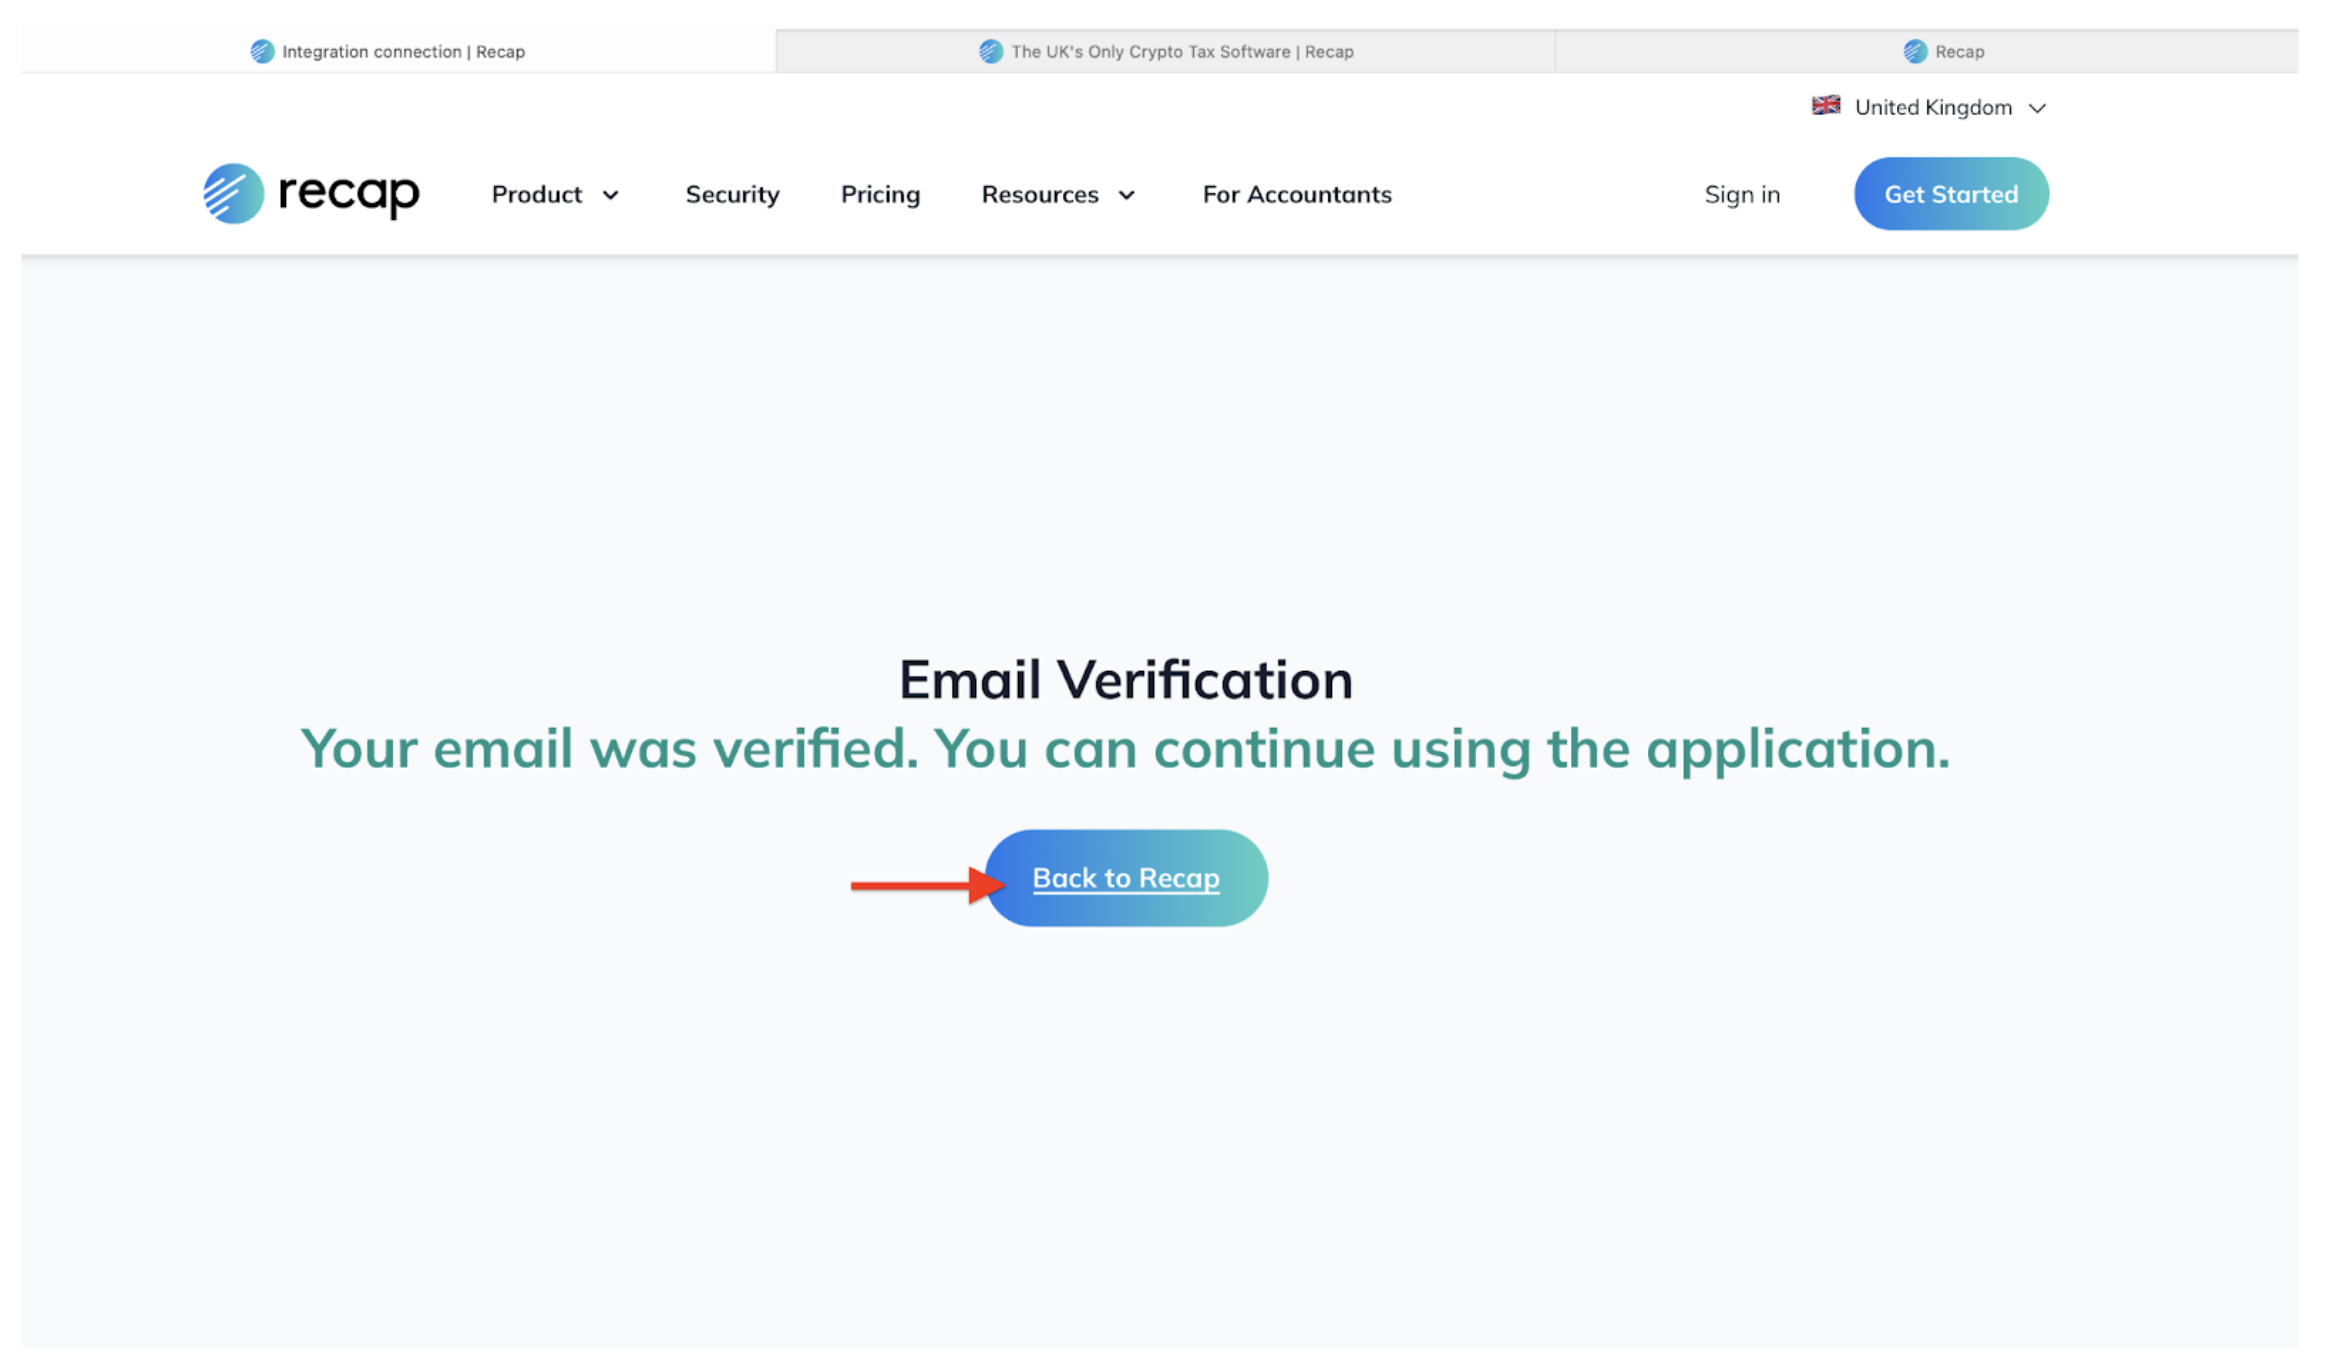
Step 5: Hit The Back To Recap Button.
Press the “Back to Recap” button after verifying your email address by clicking on the “Verify Email Address” button in the email sent by Recap. Upon doing so, you’ll be directed to a page confirming your email verification with the message: “Email Verification. Your Email was verified. You Can continue using the application.” Ensure your email address is valid to view this message.
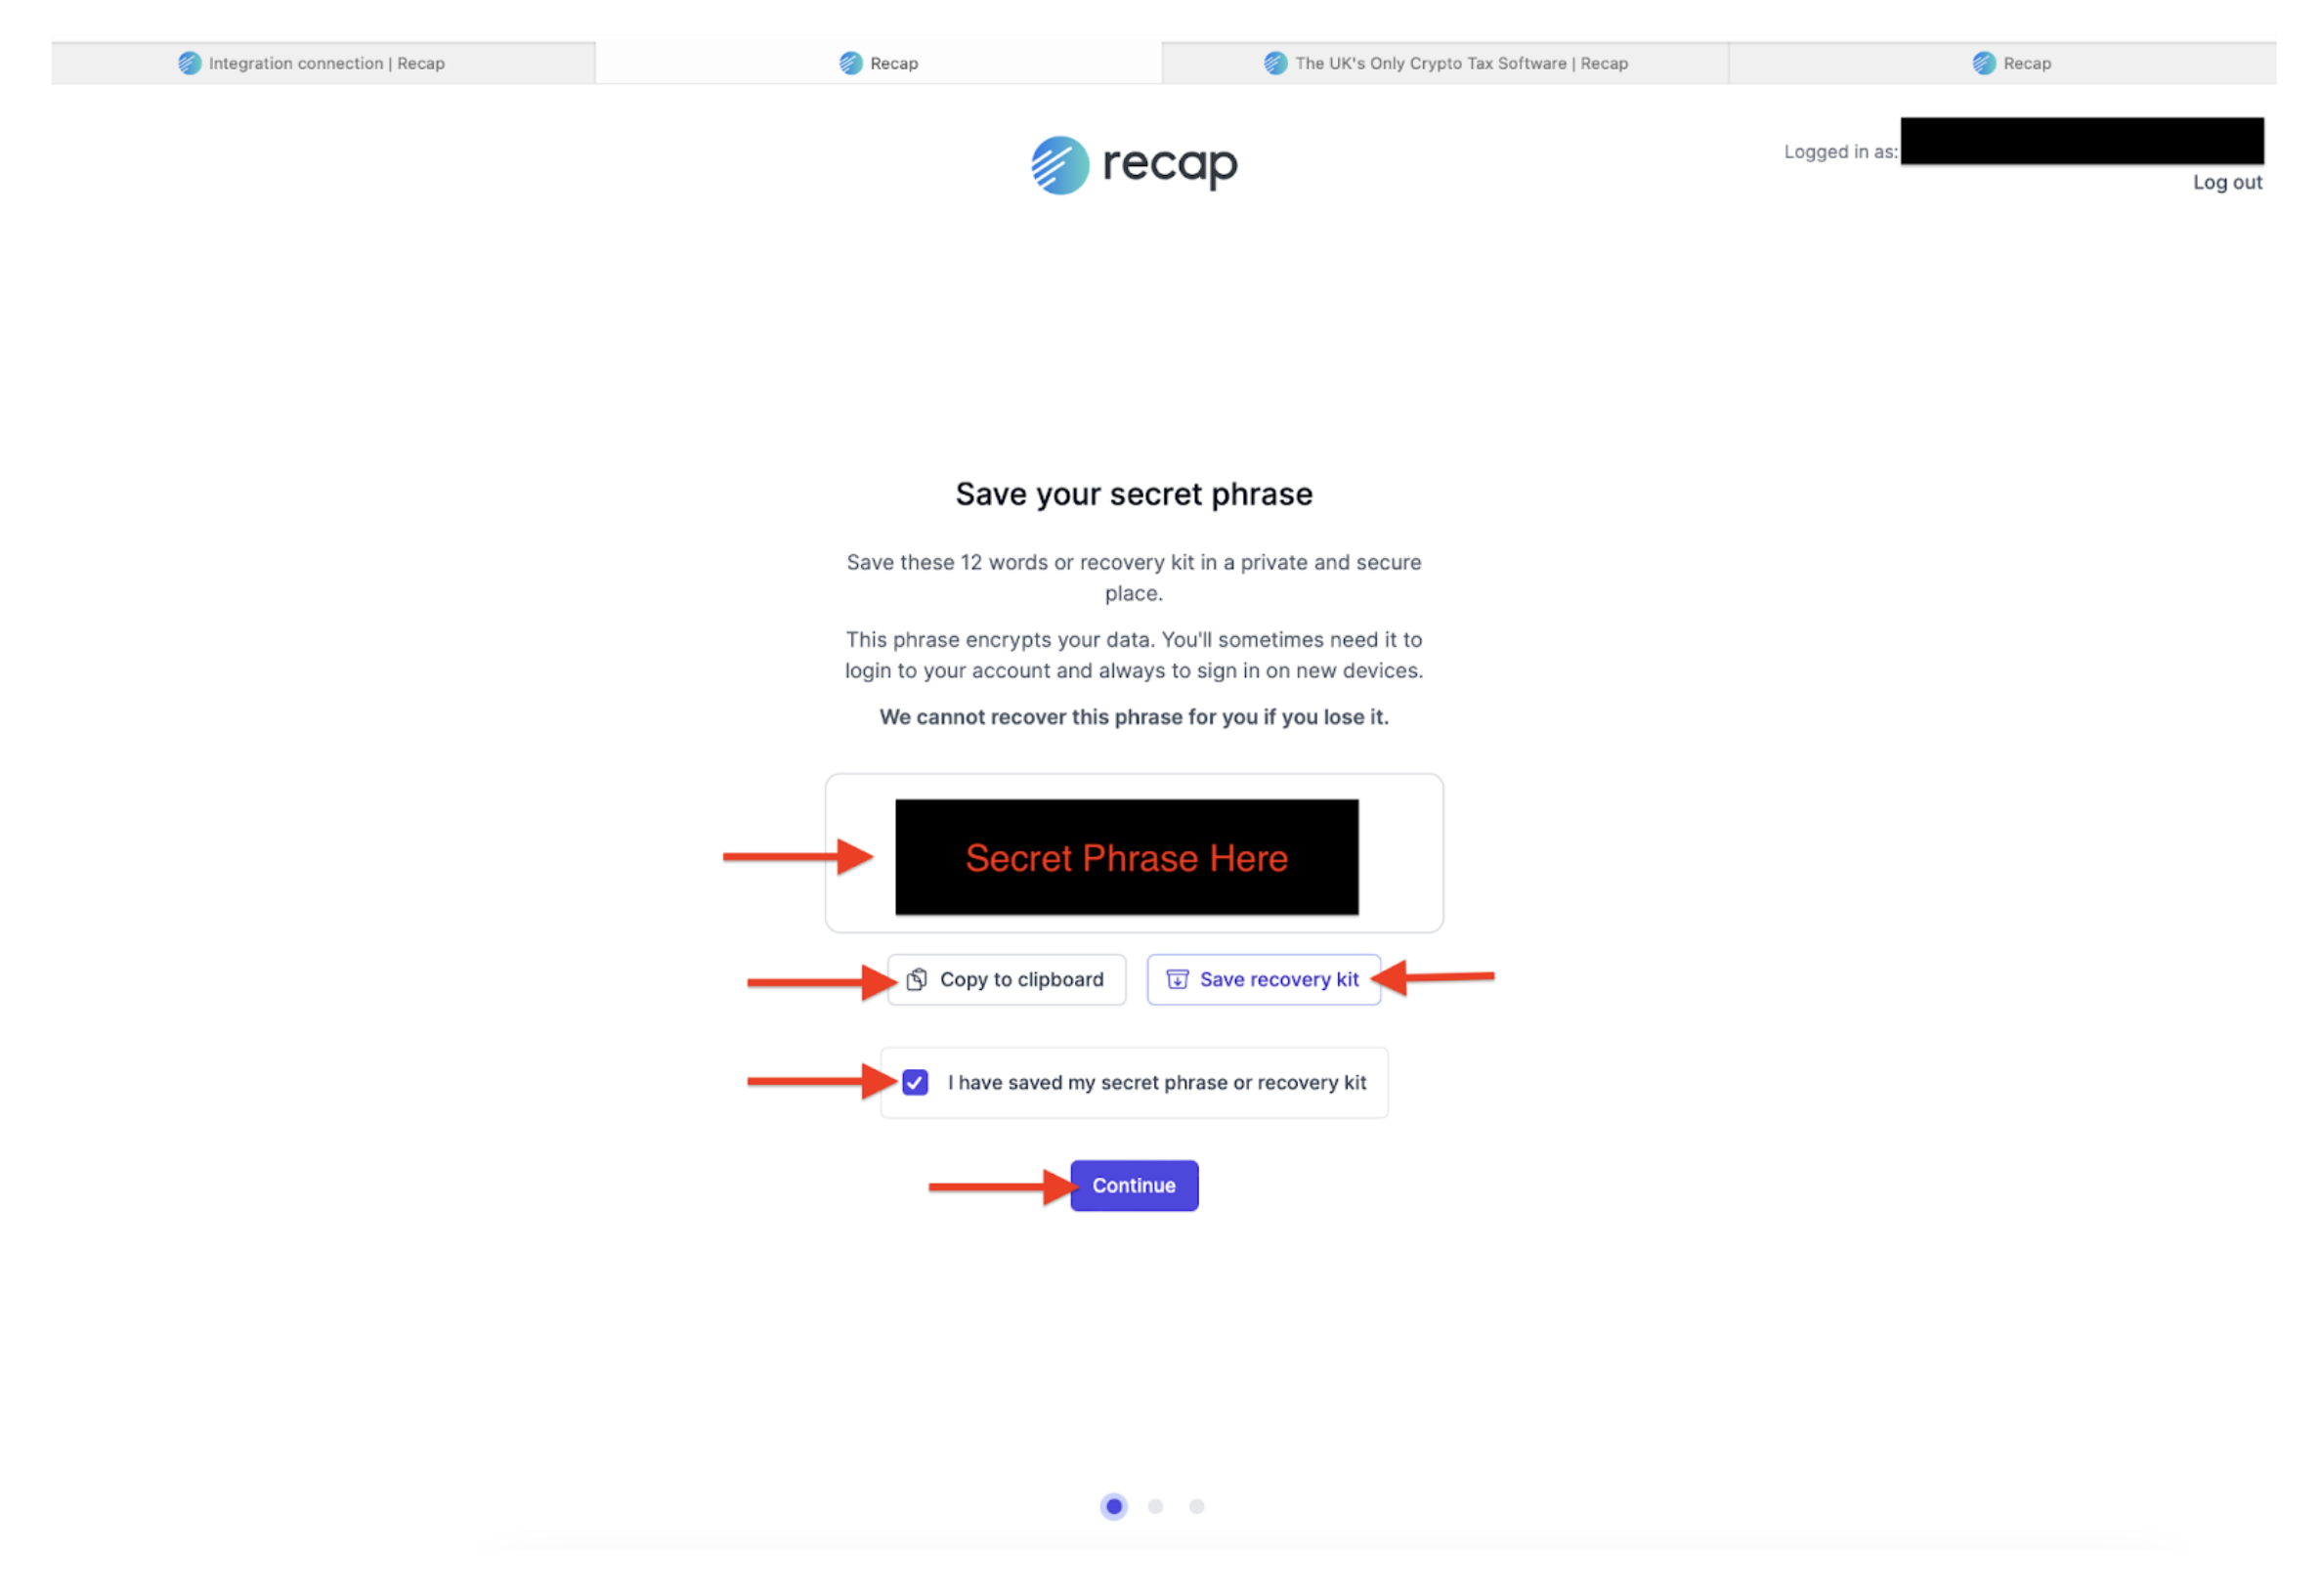
Step 6: Secure Your Secret Phrase.
Recap introduces self-custody features akin to those found in hardware wallets, granting you exclusive access and backup control over your accounting data.
To safeguard against future cyber threats, it’s essential to prioritize actions like preserving your secret phrase.
Upon verification, you’ll be directed to a page displaying your secret phrase. This page prompts you to store your secret phrase in a secure and private location. The message reads:
“Save your secret phrase. Keep these 12 words or recovery kit in a confidential and secure place. This phrase serves as the encryption key for your data. It may be required for logging into your account or signing in on new devices. Note that we are unable to
retrieve this phrase for you if it’s lost.”
Below the instruction, you’ll find a box revealing your secret phrase. Additionally, there are two buttons allowing you to either “Copy to Clipboard” or “Save Recovery Kit.”
Selecting “Copy to Clipboard” enables you to paste the phrase into any application, ensuring its secrecy. Conversely, opting to “Save Recovery Kit” may prompt a browser pop-up requesting permission to download the file from “app.recap.io.” You can either proceed by clicking “Allow” or decline by selecting “Cancel,” depending on your preference.
Once saved, check the box confirming, “I have saved my secret phrase or recovery kit,” and proceed by clicking “Continue” when ready.
When you click the “Save Recovery Kit” button, a file will be downloaded to your computer’s local drive. The downloaded file will resemble the screenshot provided below.

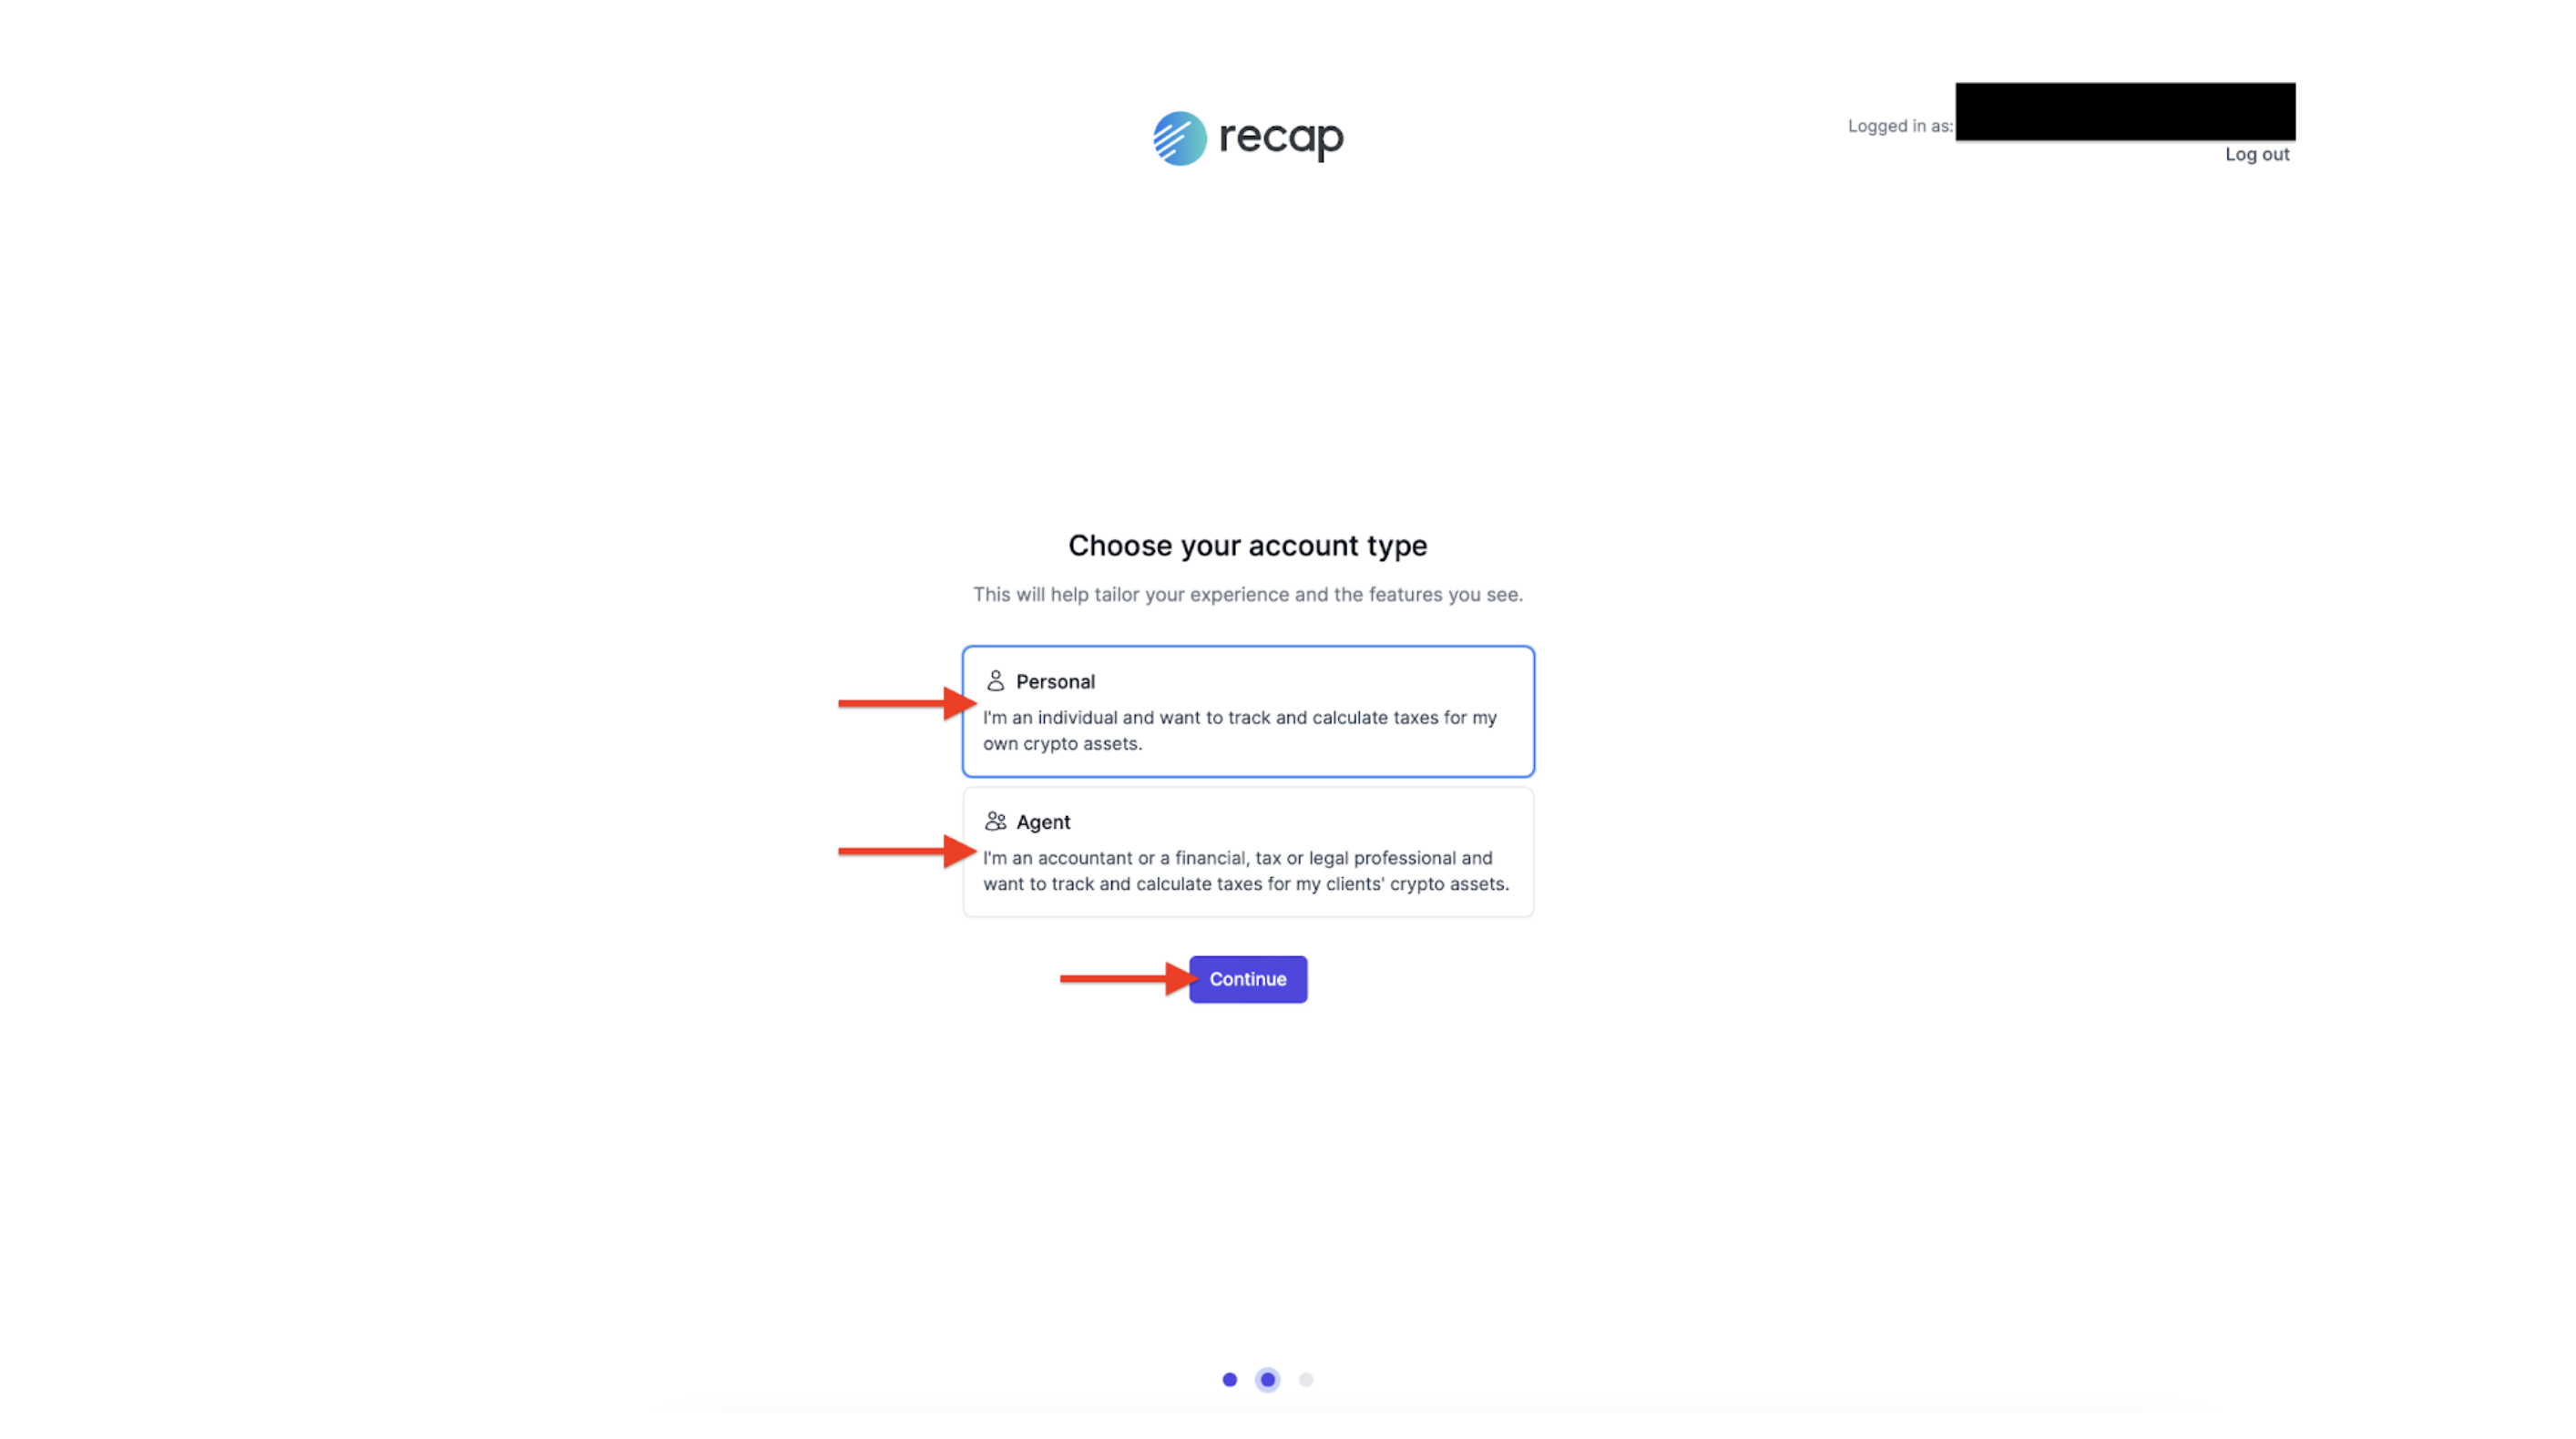
Step 7: Choose Your Account Type.
After proceeding, the following screen titled “Choose Your Account Type” will appear. You’ll encounter two options: “Personal” or “Agent.” The “Agent” option is typically chosen by accountants who handle tax matters for multiple clients. Conversely, “Personal” is intended for individuals or organizations managing their own tax affairs. Please choose the option that aligns with your situation and click “Continue” when ready.
It’s important to note that if you select “Agent,” Recap exclusively supports UK companies, meaning it adheres strictly to UK tax regulations. Currently, Recap does not comply with tax regulations outside of the UK. It can still be used to organize your data for tax in most major fiat currencies though.
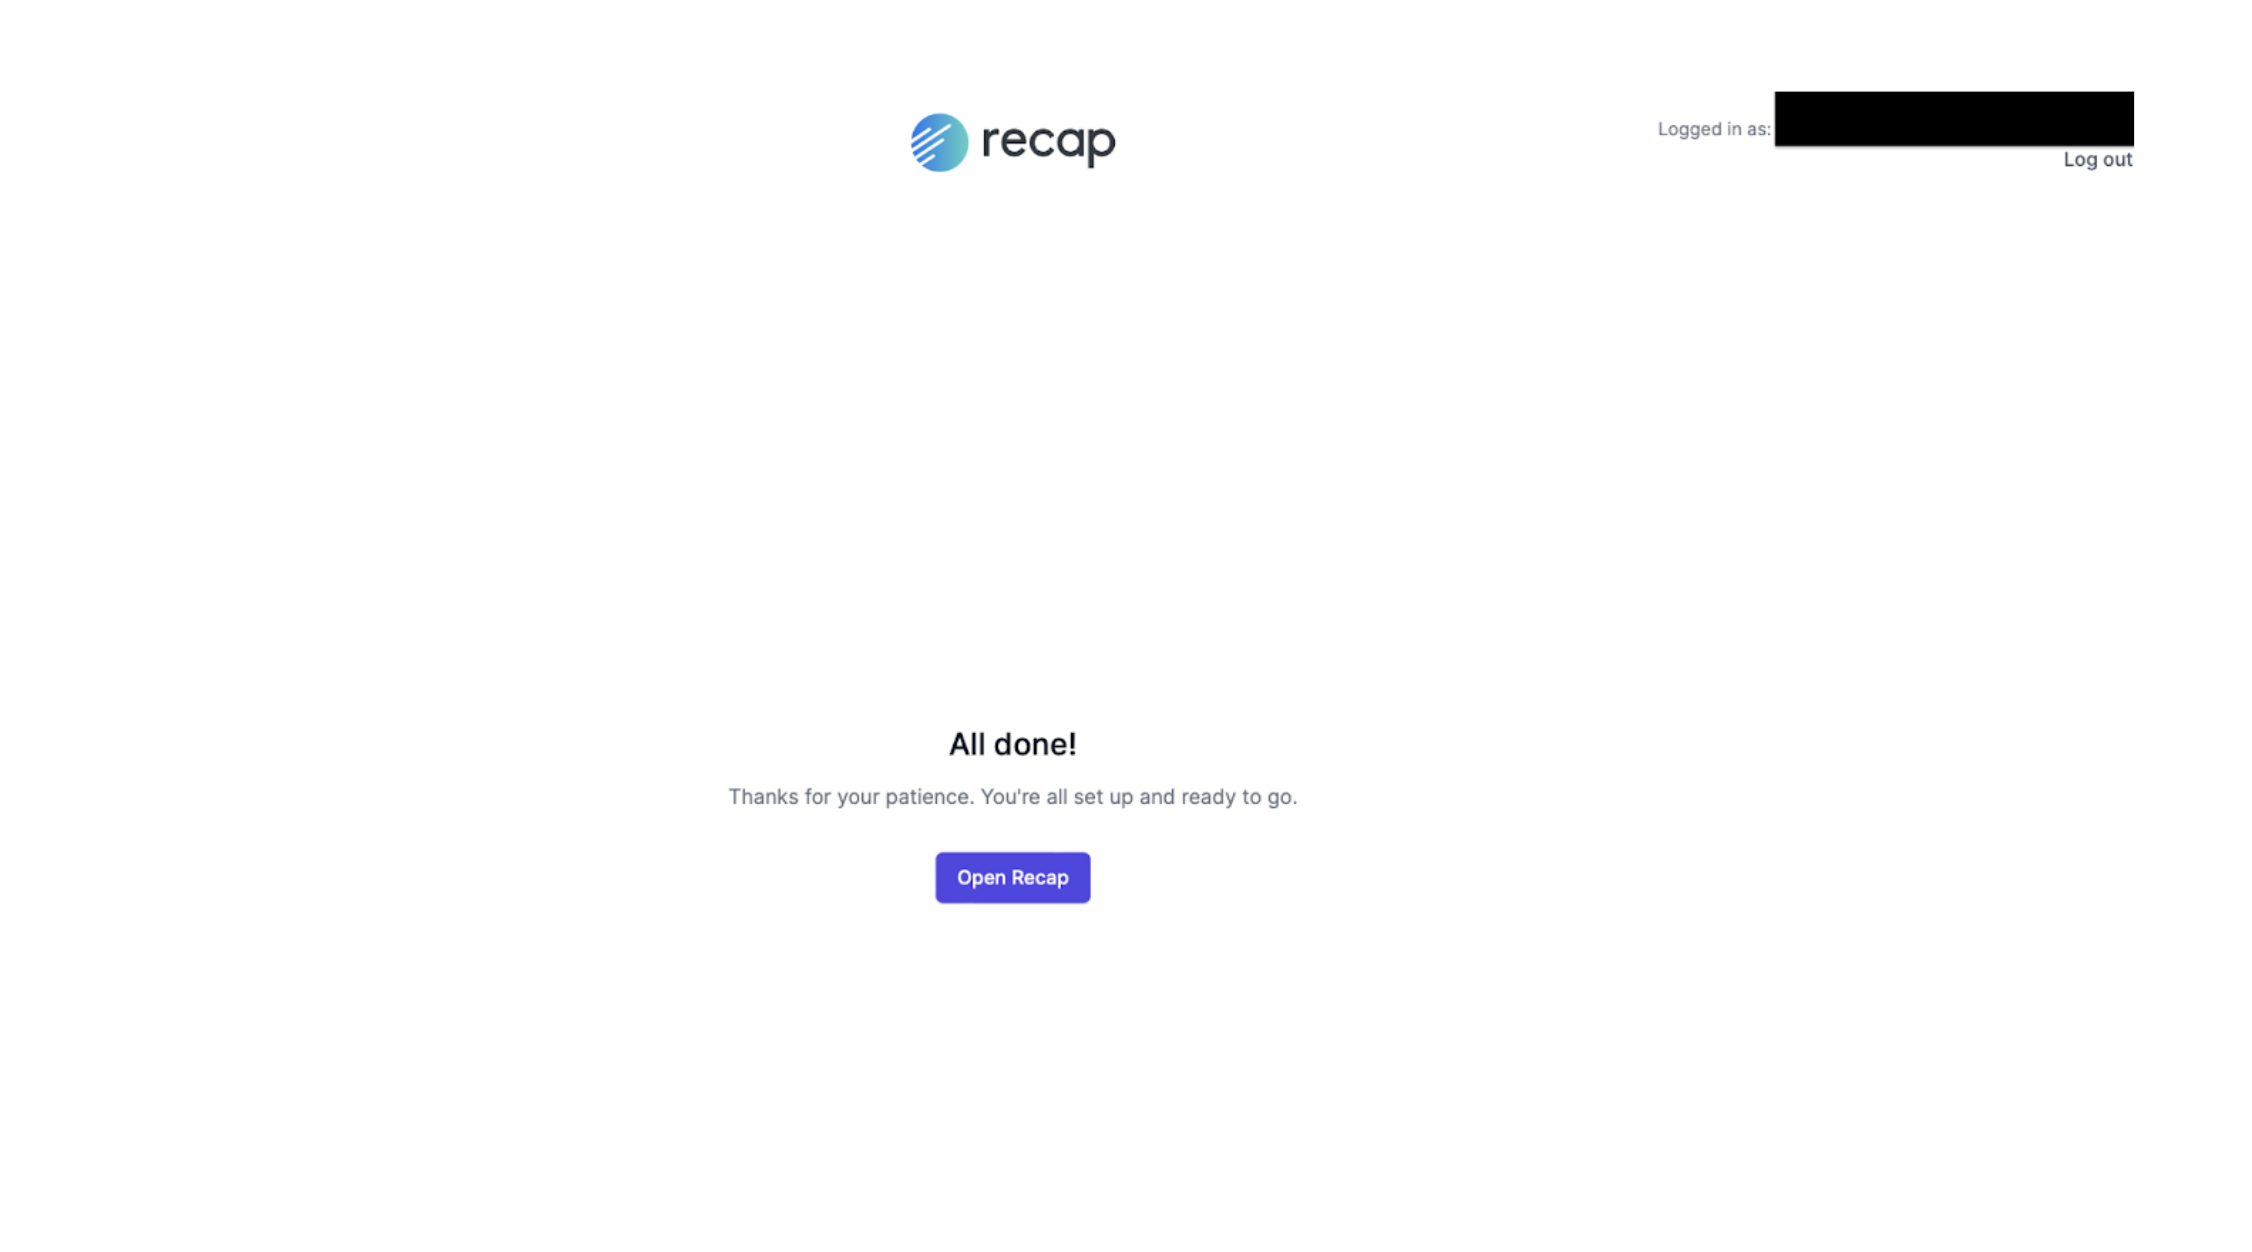
Step 8: Congratulations!
You’ve reached the final step. You’ll now be directed to a page confirming that your Recap account setup is complete. Simply click the “Open Recap” button to begin exploring your account.
Step 9: Connecting Your Accounts.
Upon clicking the “Open Recap” button, you’ll be directed to a page presenting a “Let’s Get Started” guide. You have the option to either proceed by clicking the “Let’s Get Started” button or skip this step by clicking the “X” button located in the top right corner. For now, we recommend clicking the “X” button to skip this step. (see screenshot below).

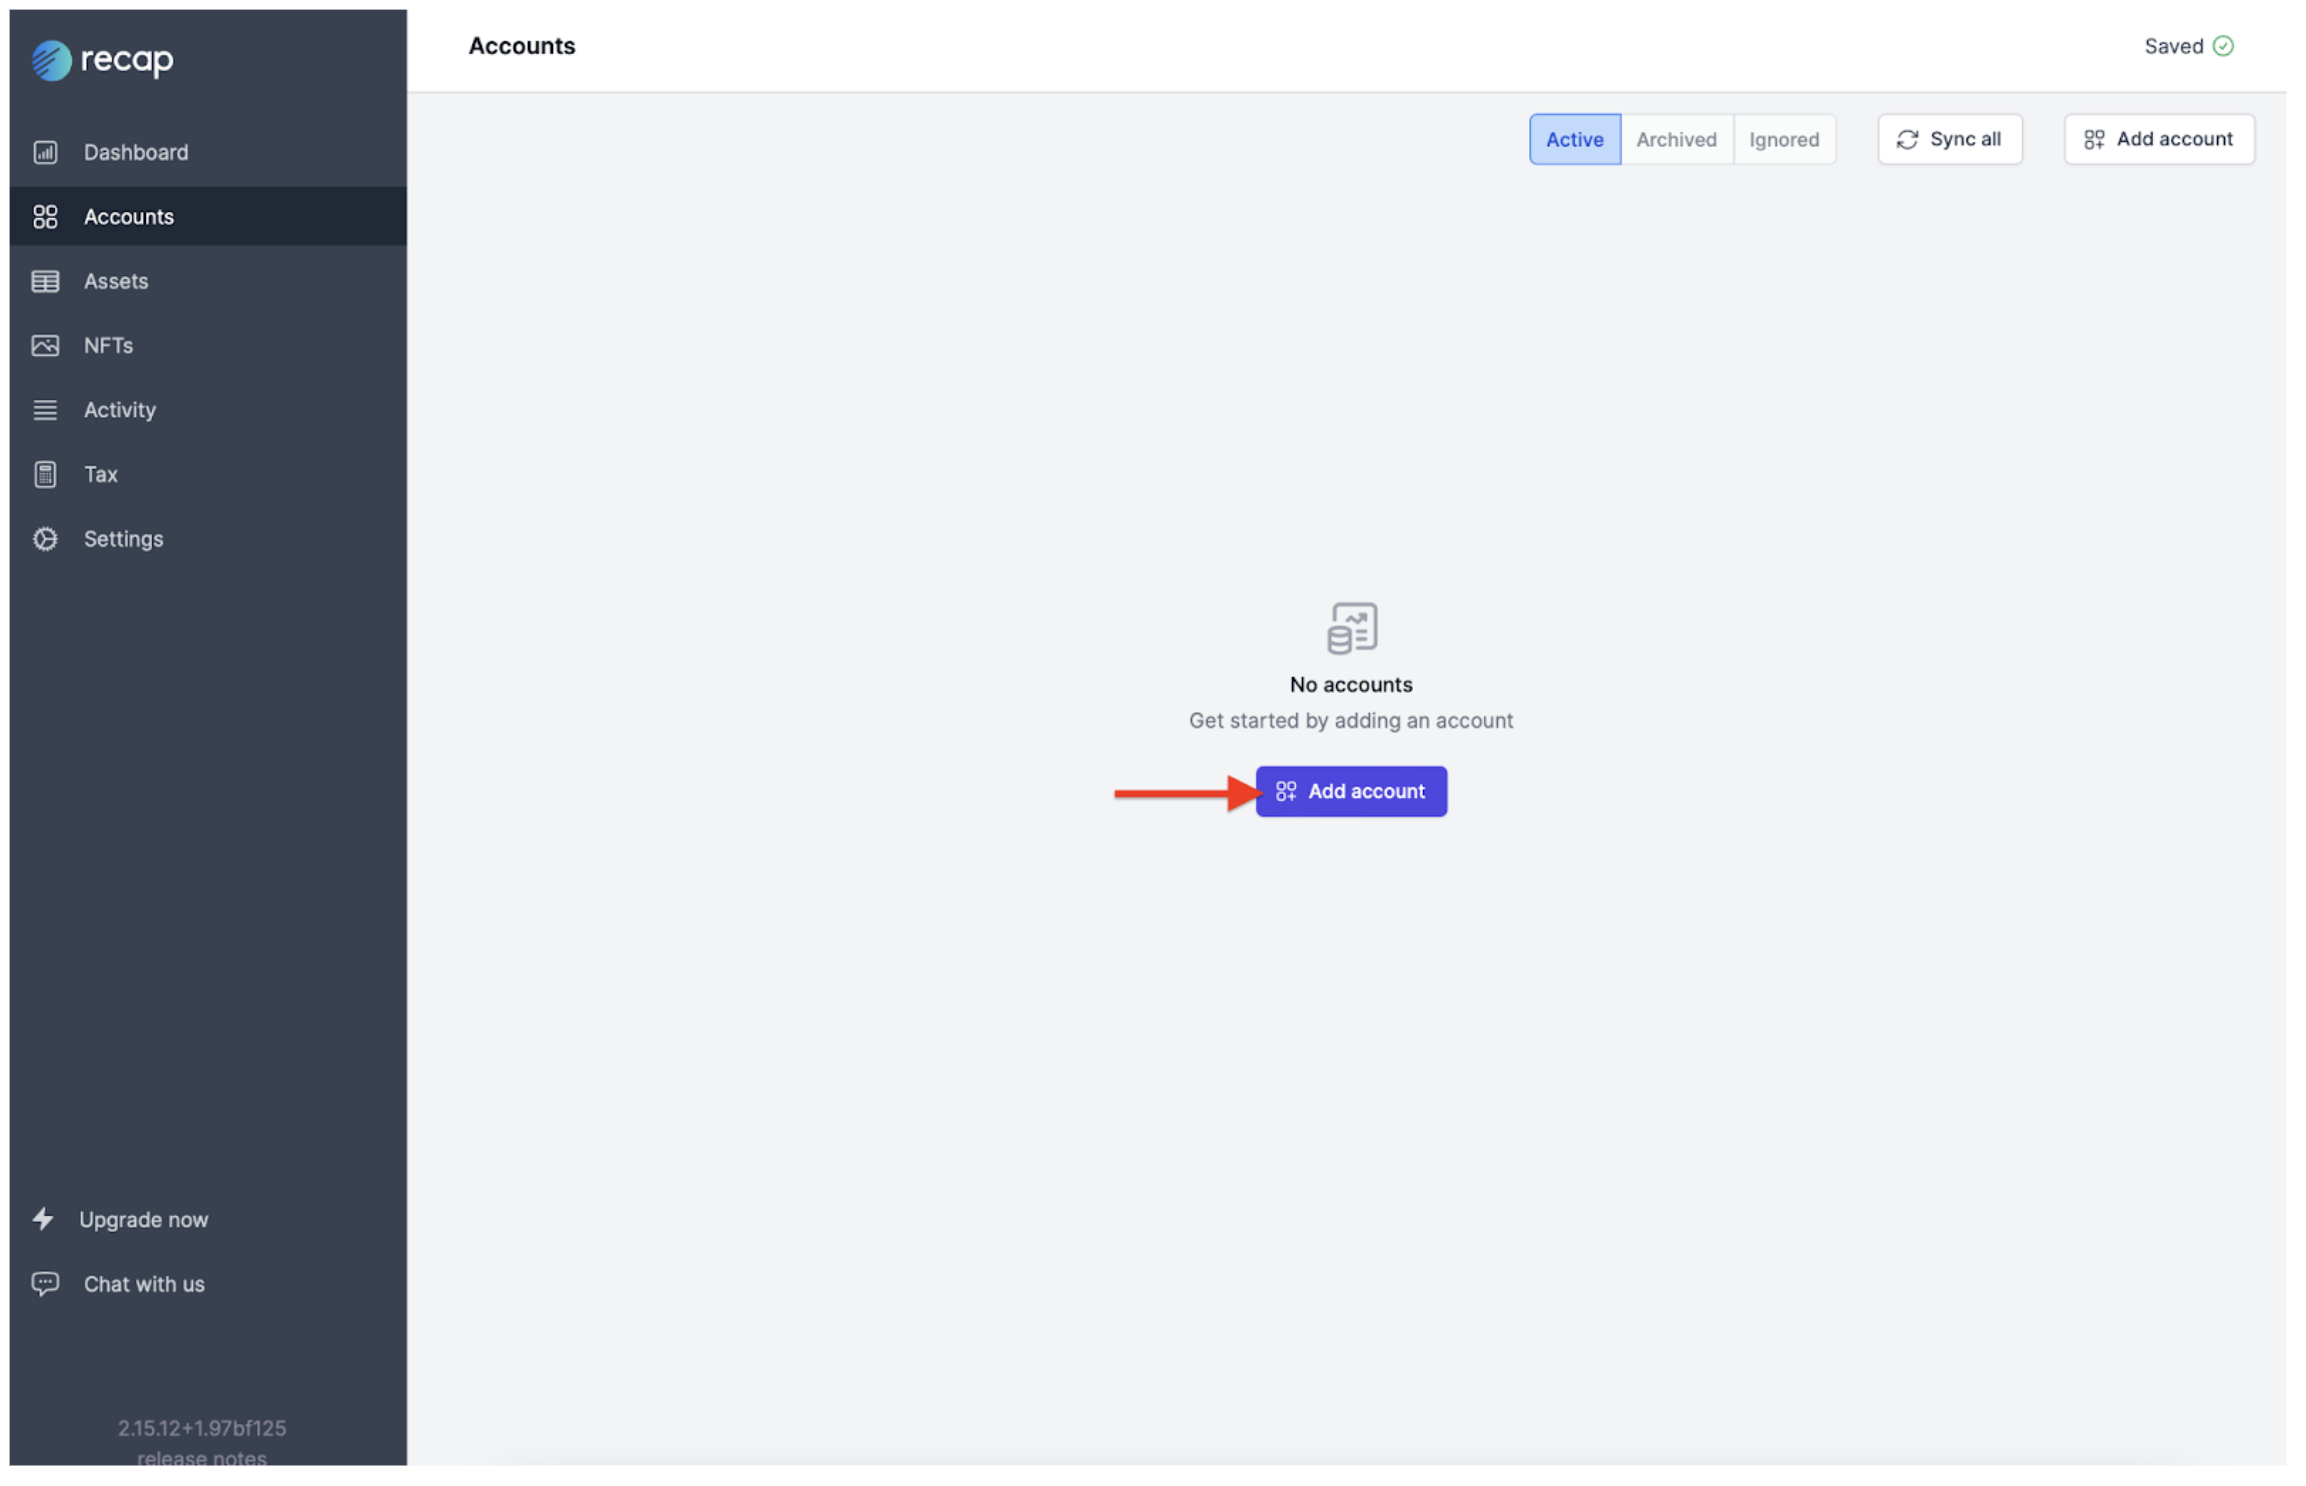
Step 10: Press the “Add Account” Button.
Upon creating your Recap account, you’ll notice that the screen displays “No Accounts – Get started by adding an account.” Recap needs access to all accounting information associated with your Bnk To The Future account. You can also add all your other crypto accounts if you choose. Recap has collaborated with Bnk To The Future to develop an automated integration, enabling you to seamlessly import all your Bnk To The Future transactions into Recap.
When you’re prepared, simply click the “Add Account” button to proceed.
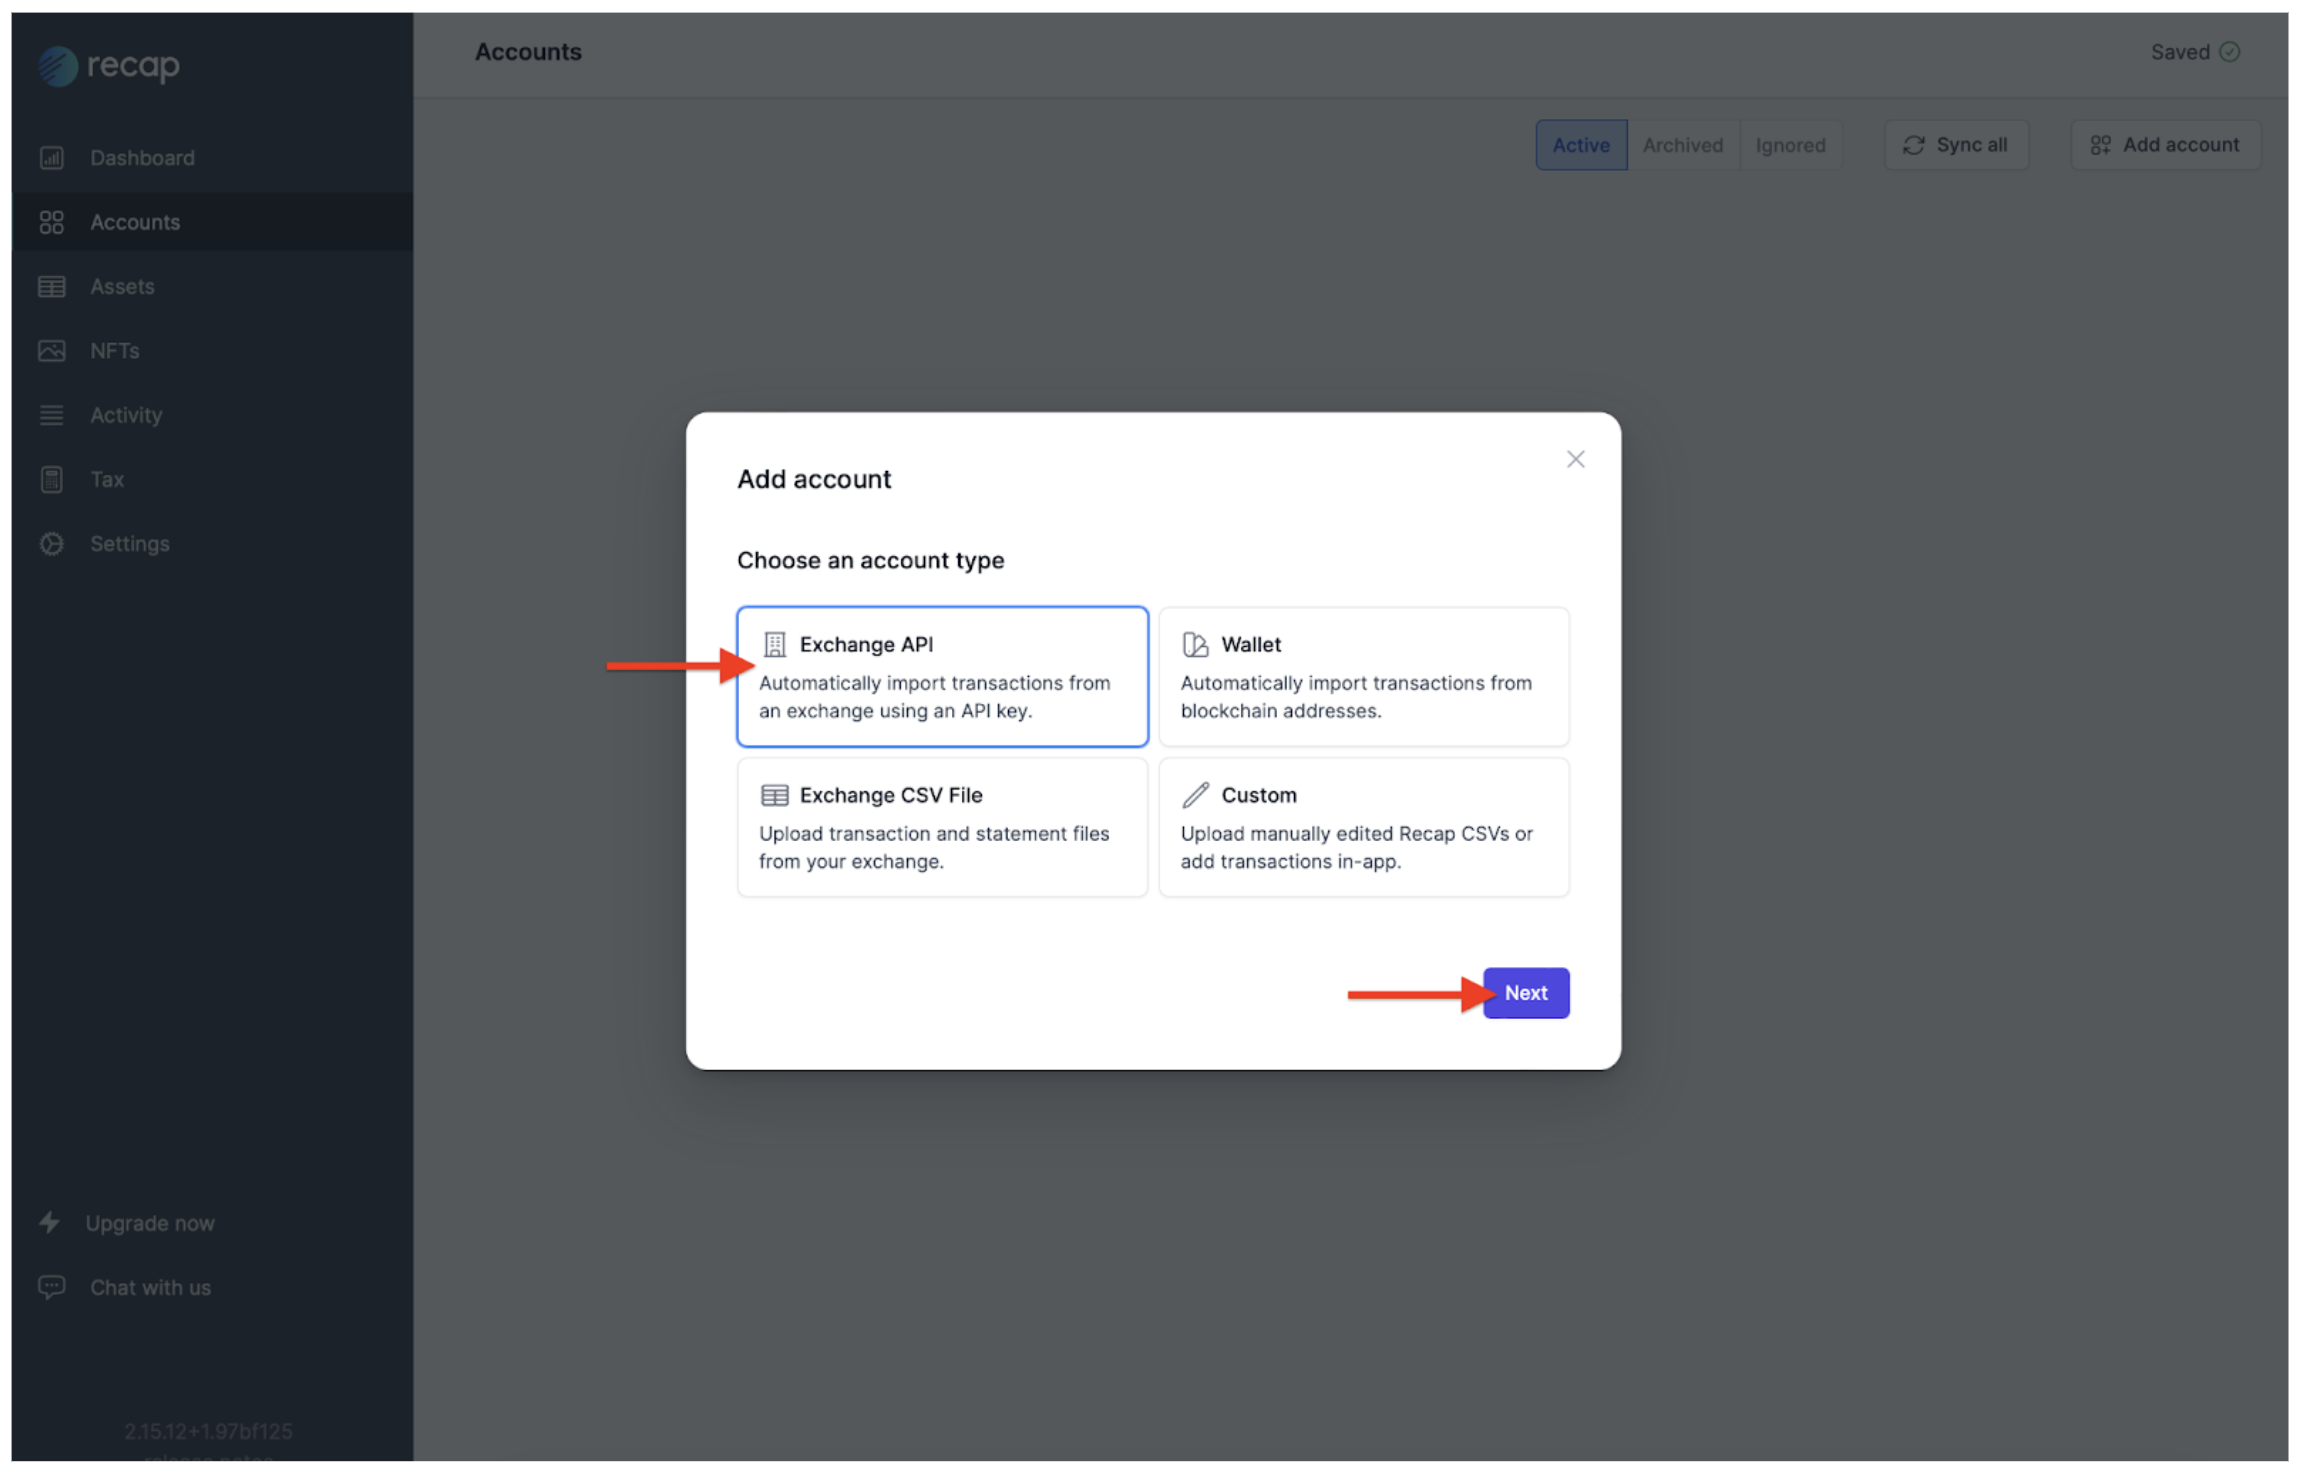
Step 11: Select Account Type: Exchange API.
Recap requires access to all accounting information related to your crypto accounts.
The next page will display four account type options. Please select “Exchange API” and click the “Next” button when ready.
Step 12: Add Exchange API Account: Bnk To The Future.
You are now presented with the option to “Choose an Exchange,” showcasing a list of APIs. Locate Bnk To The Future in the list, select it, and then proceed by clicking the “Next” button.
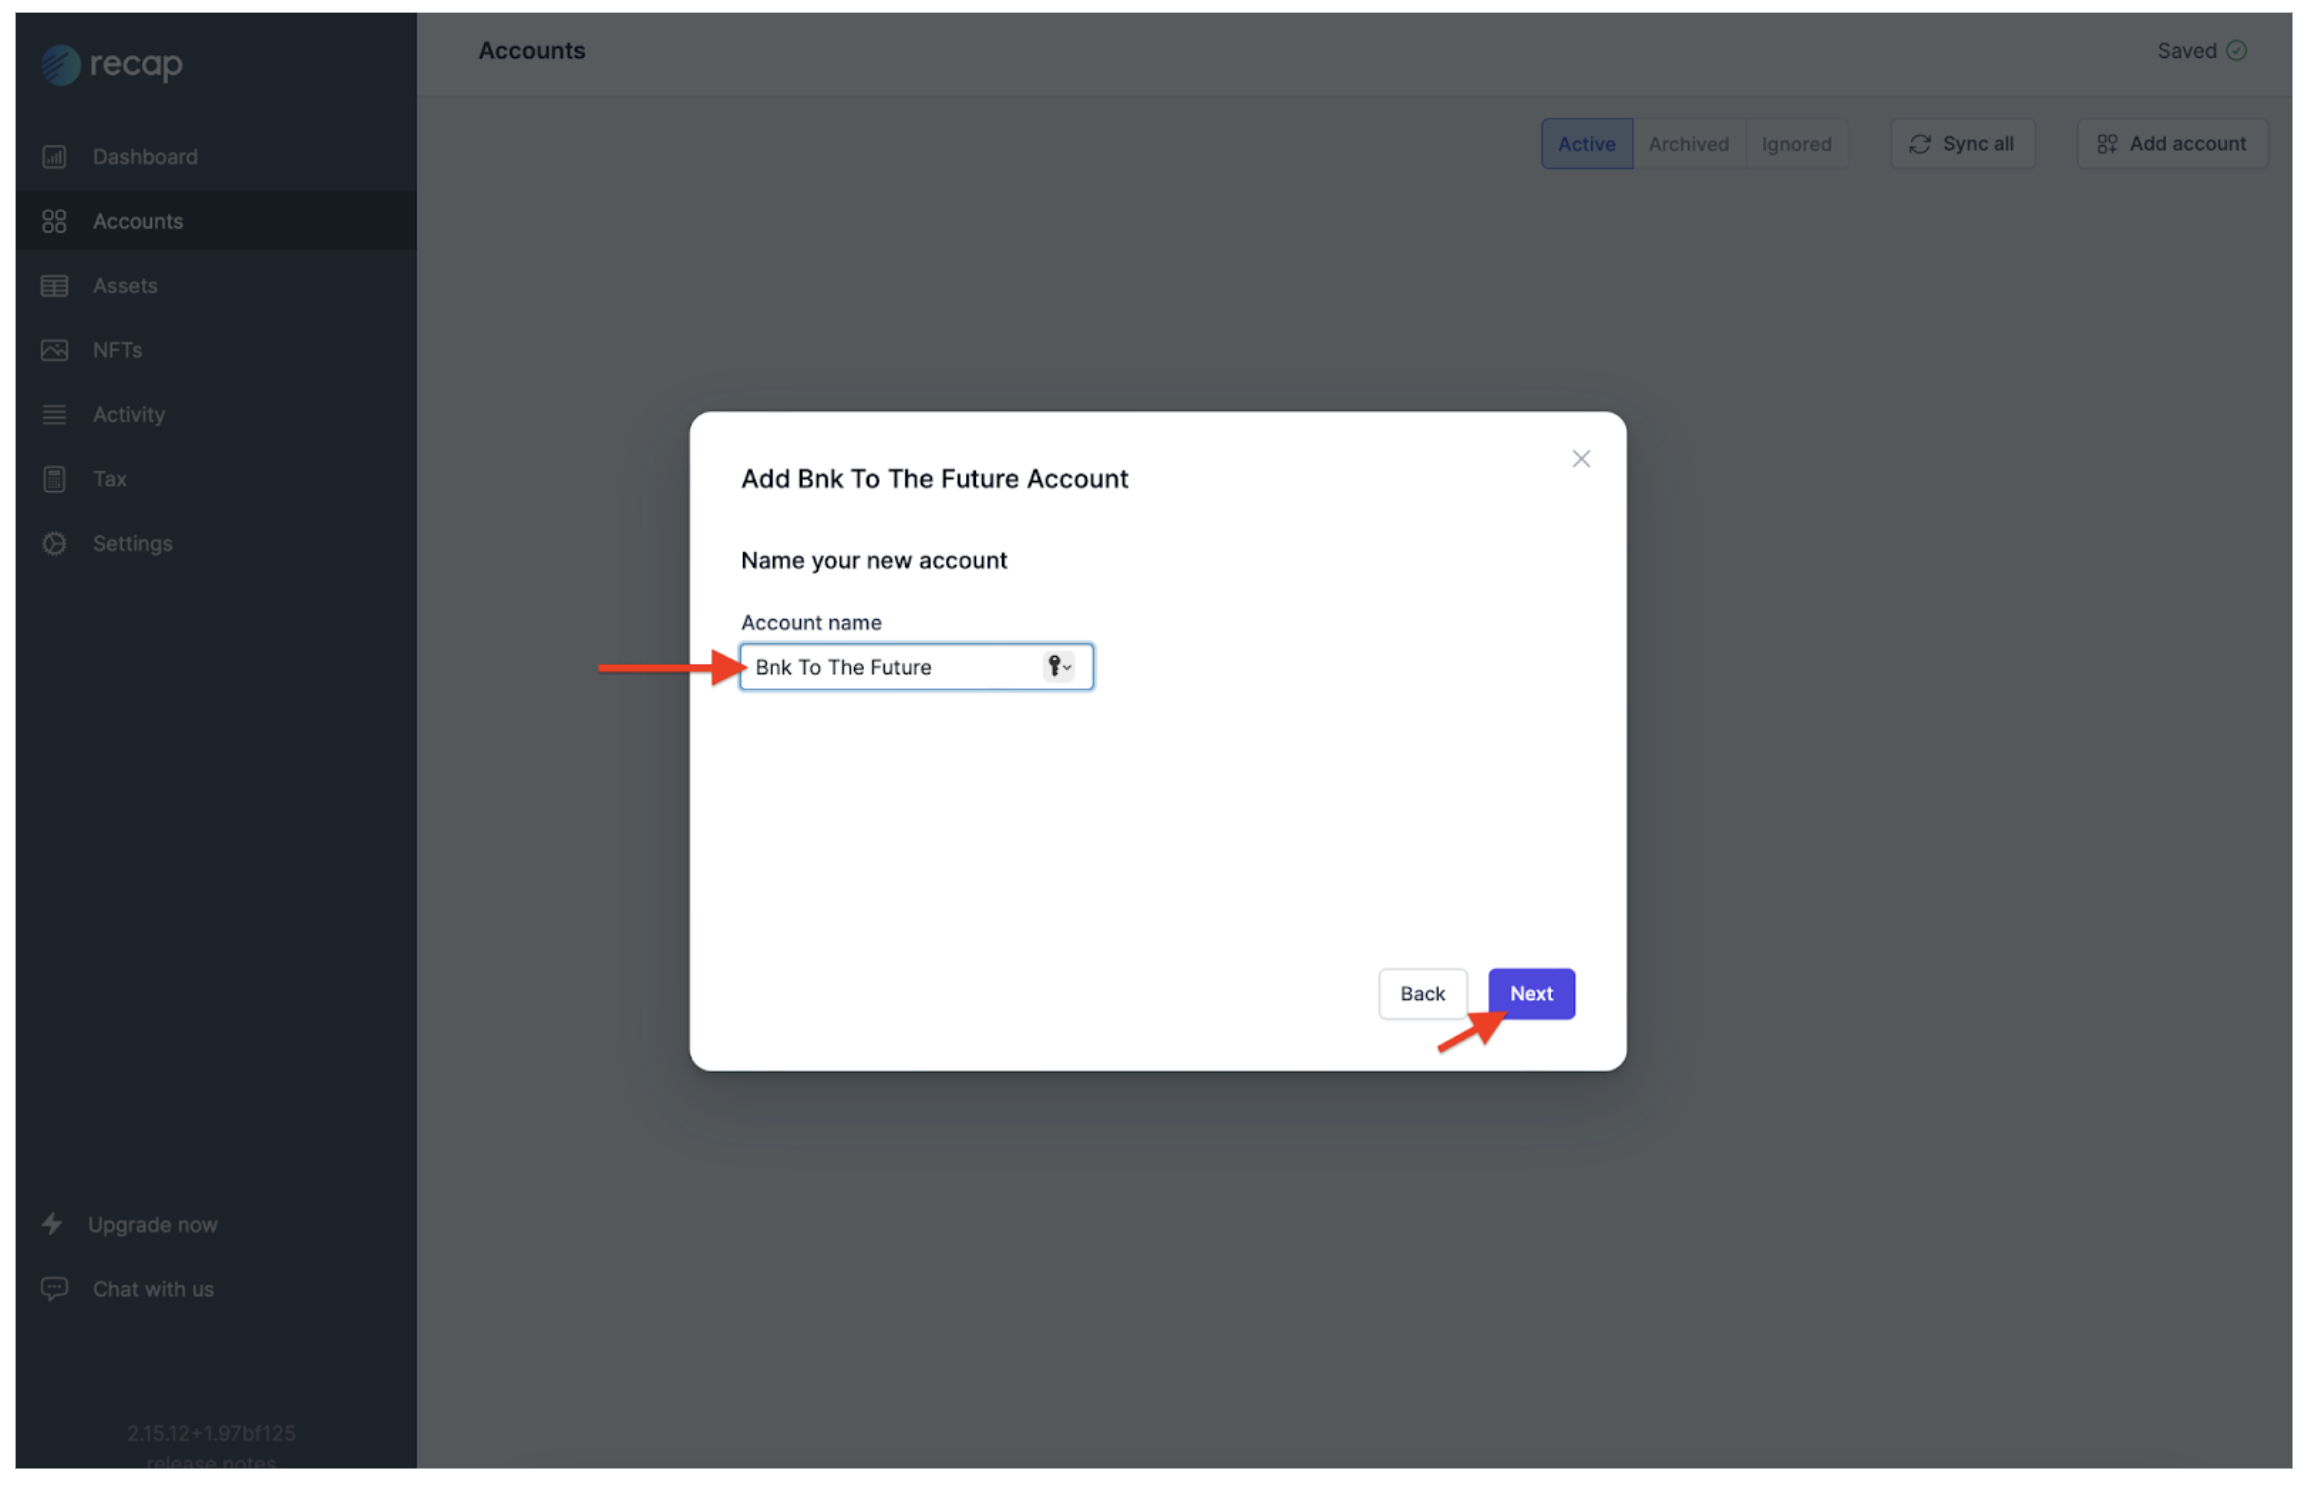
Step 13: Name Your Account: Bnk To The Future.
You can personalize your account by giving it a name. We recommend naming it “Bnk To The Future.” When you’re done, click “Next” to proceed.
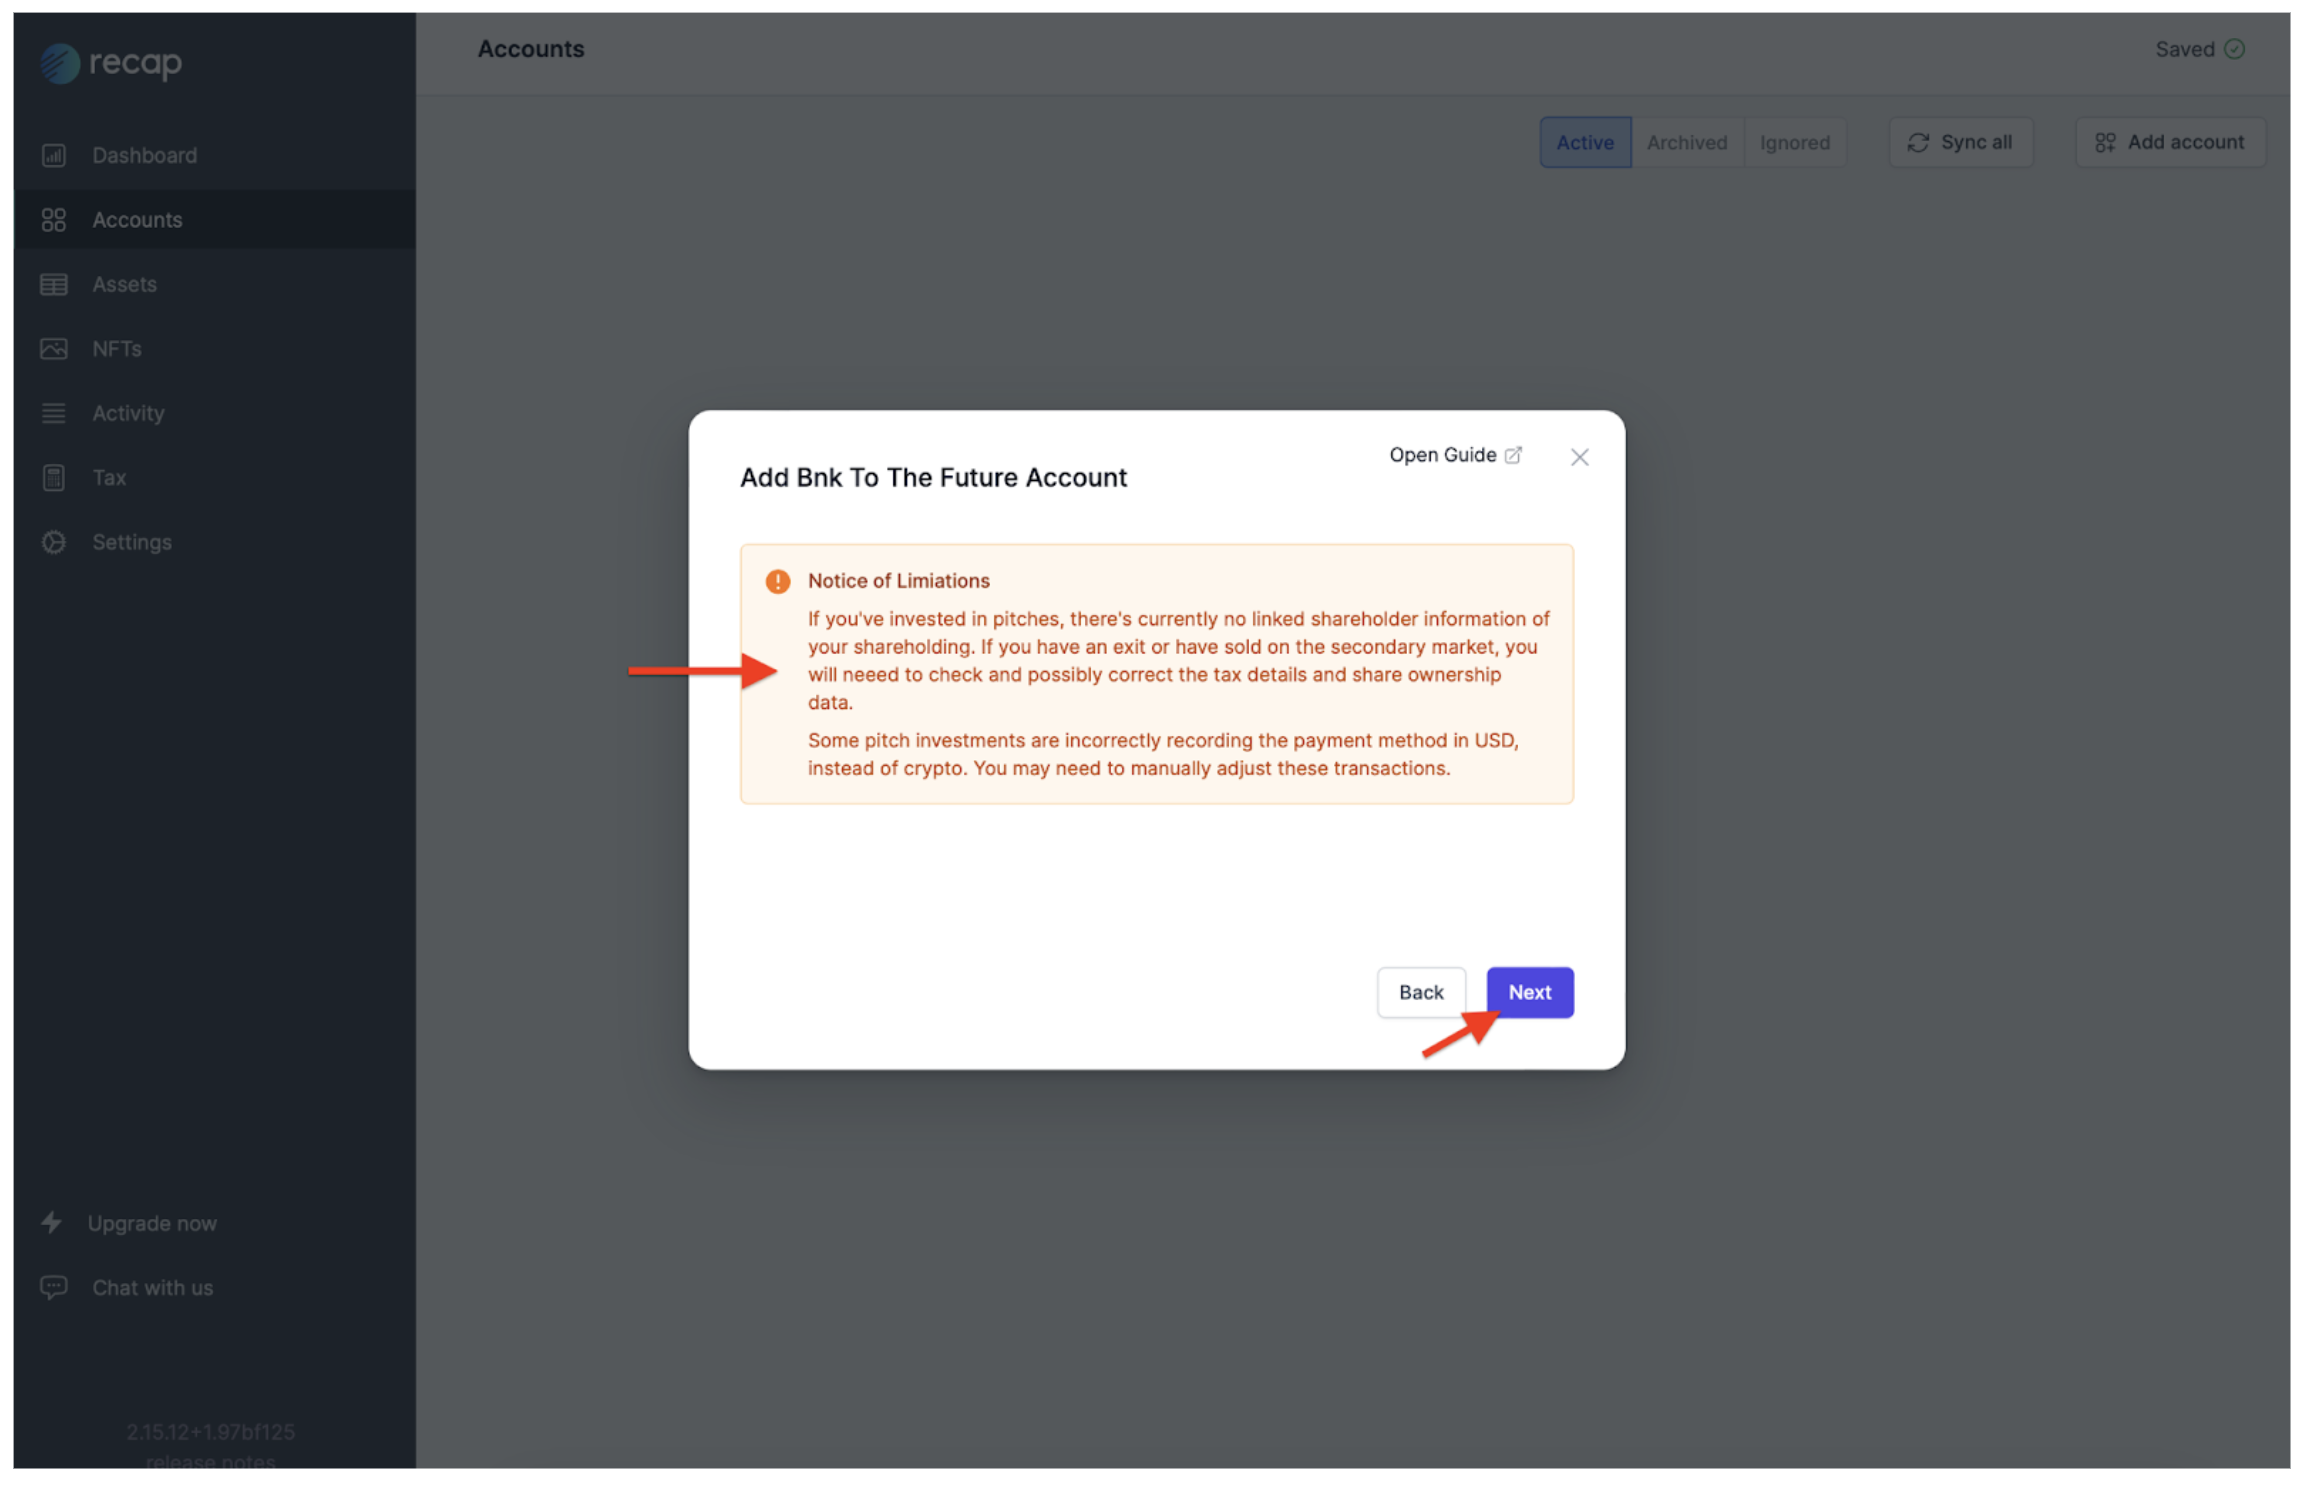
Step 14: Notice of Limitations.
You’re about to encounter a screen titled “Notice of Limitations,” which outlines how Recap processes data classifications. Please review this information carefully, and when you’re ready to proceed, click the “Next” button to advance to the next step.
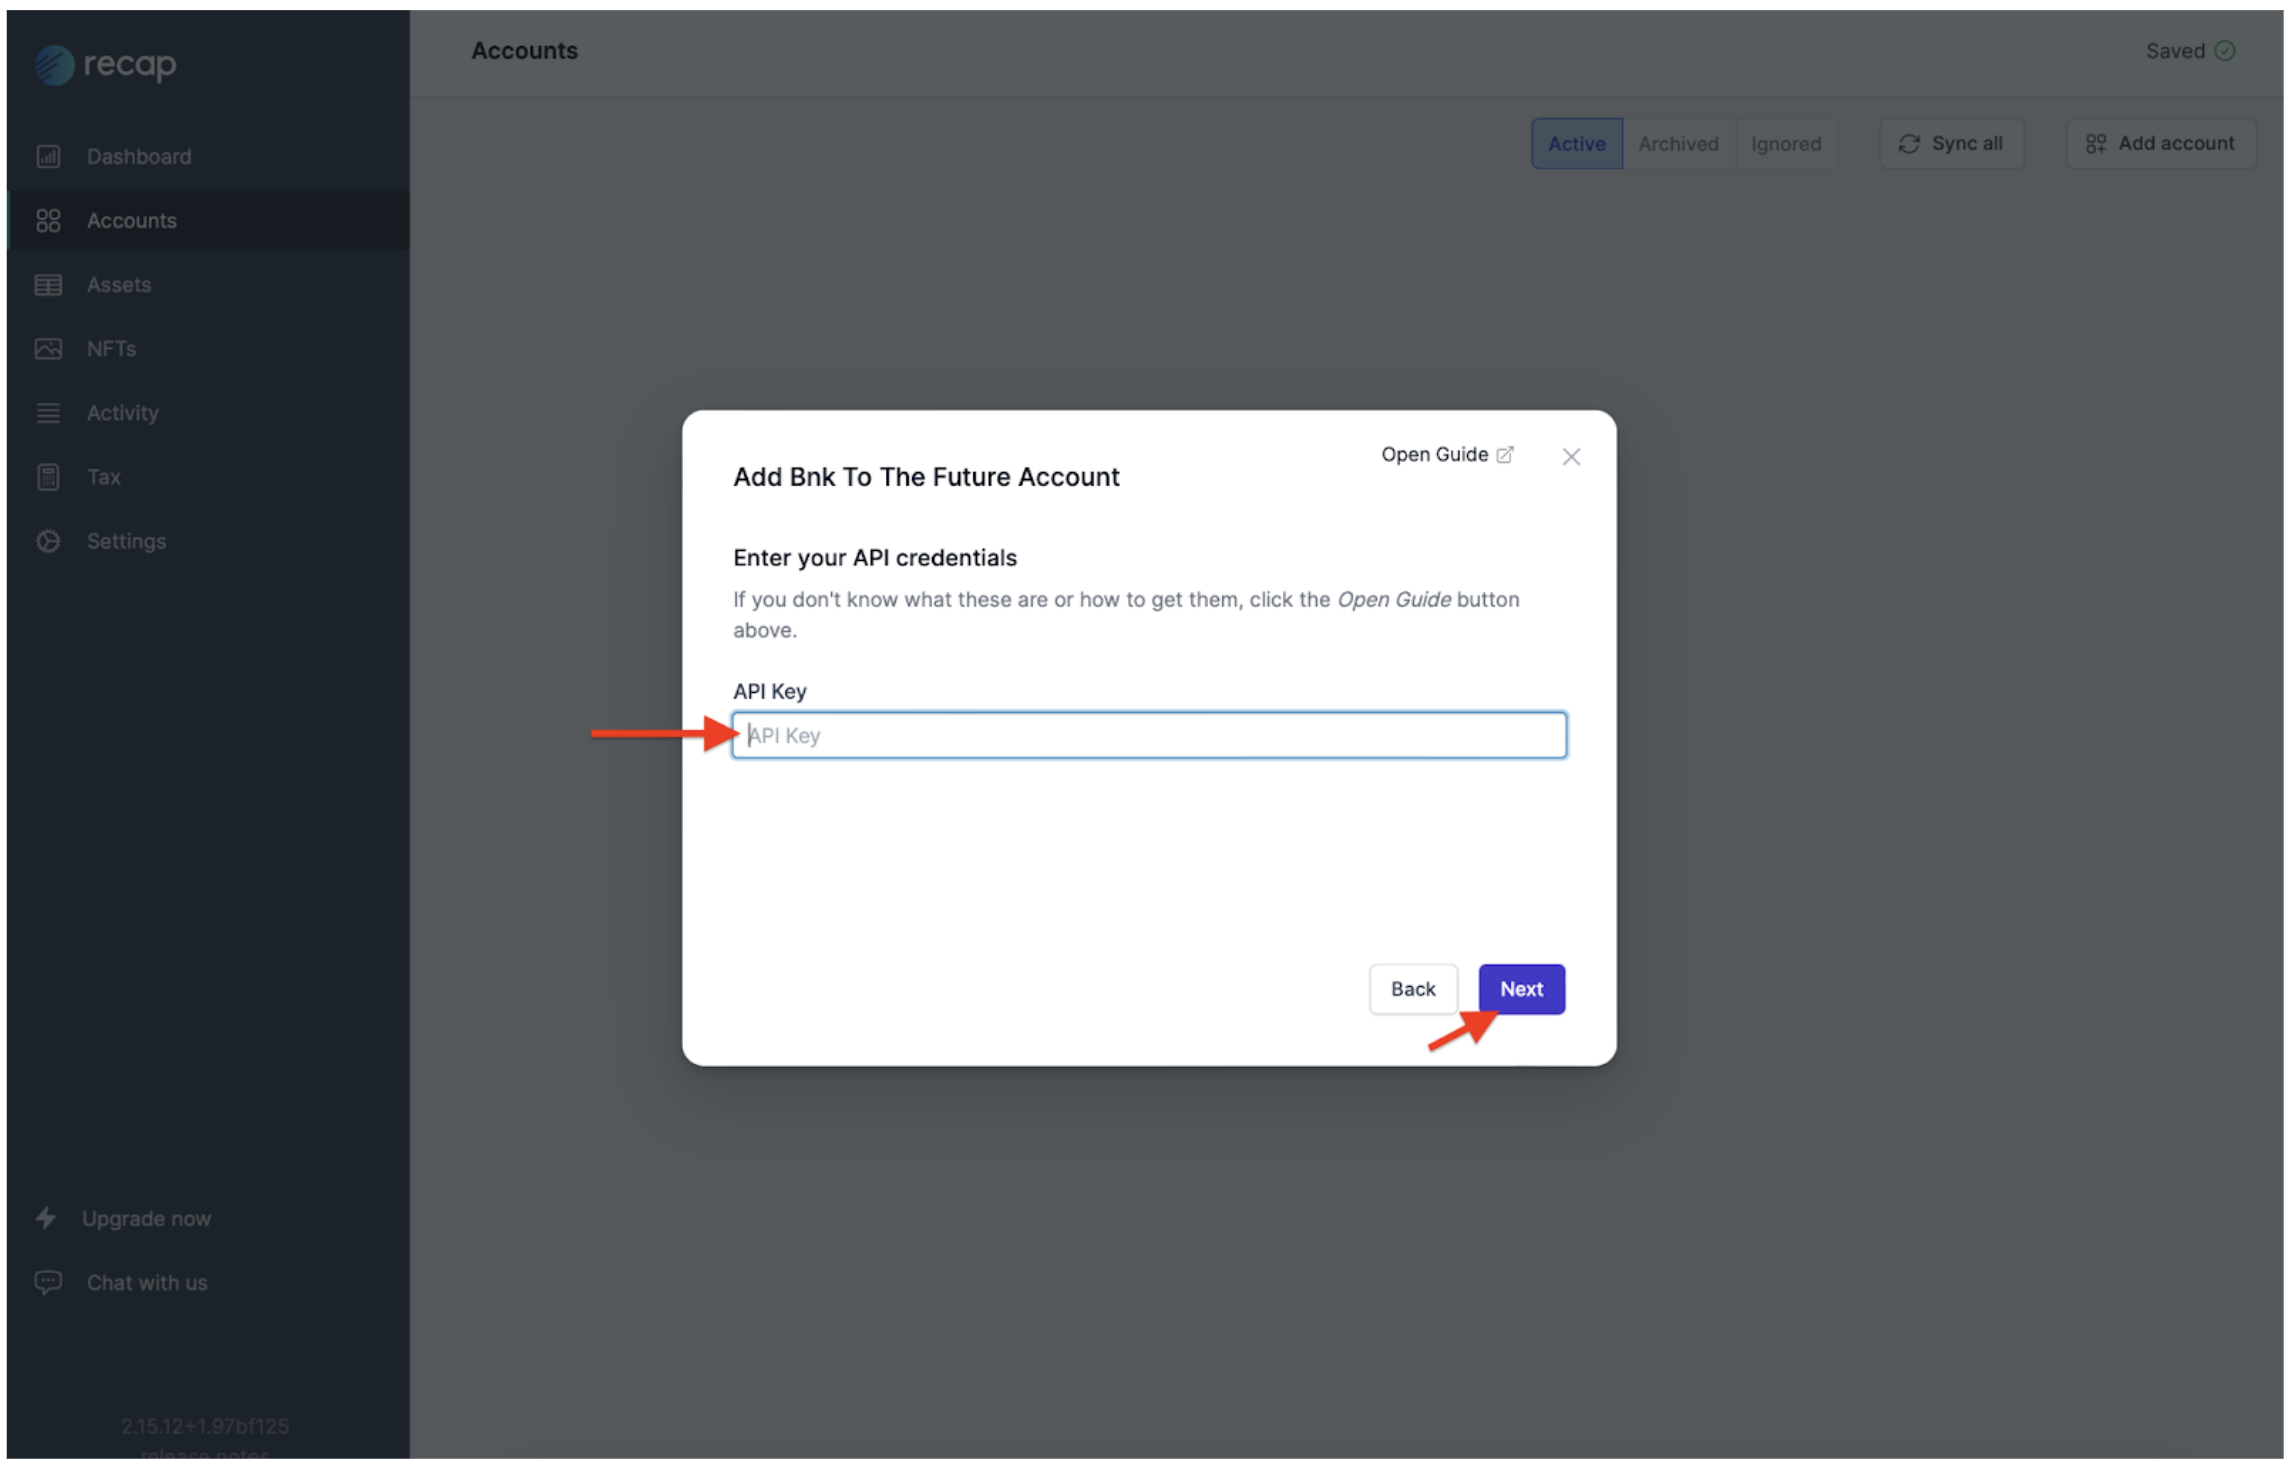
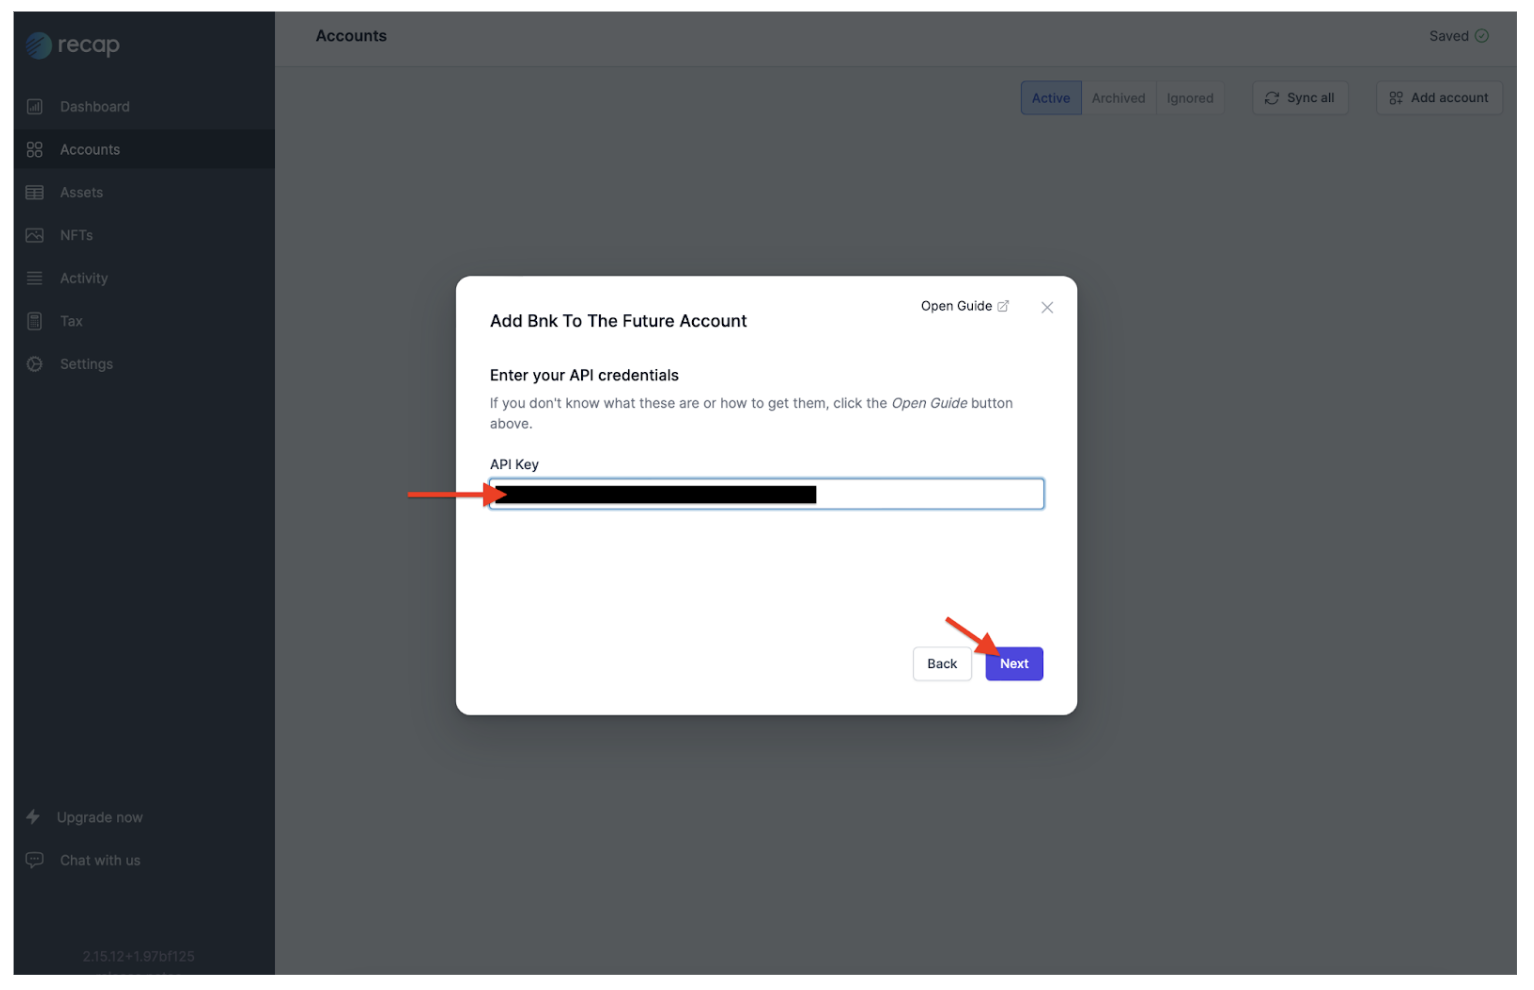
Step 15: Enter Your API Credentials.
This is the stage where you link your Recap account to your Bnk To The Future account. This connection is established by generating a Read-Only API Key on the Bnk To The Future website. It’s important to note that this API Key does not grant Recap any permission to sell or control your crypto assets on Bnk To The Future. Its sole purpose is to allow Recap to pull the accounting history from your Bnk To The Future account.
Once generated, the API Key from your Bnk To The Future account is a one-time setup. You won’t need to repeat this process in the future. When you add the API key (refer to the screenshot below), it establishes a real-time connection. This means that your Recap account will update in real-time, reflecting any transactions made on your Bnk To The Future account, with an approximate 30-second delay for each transaction.
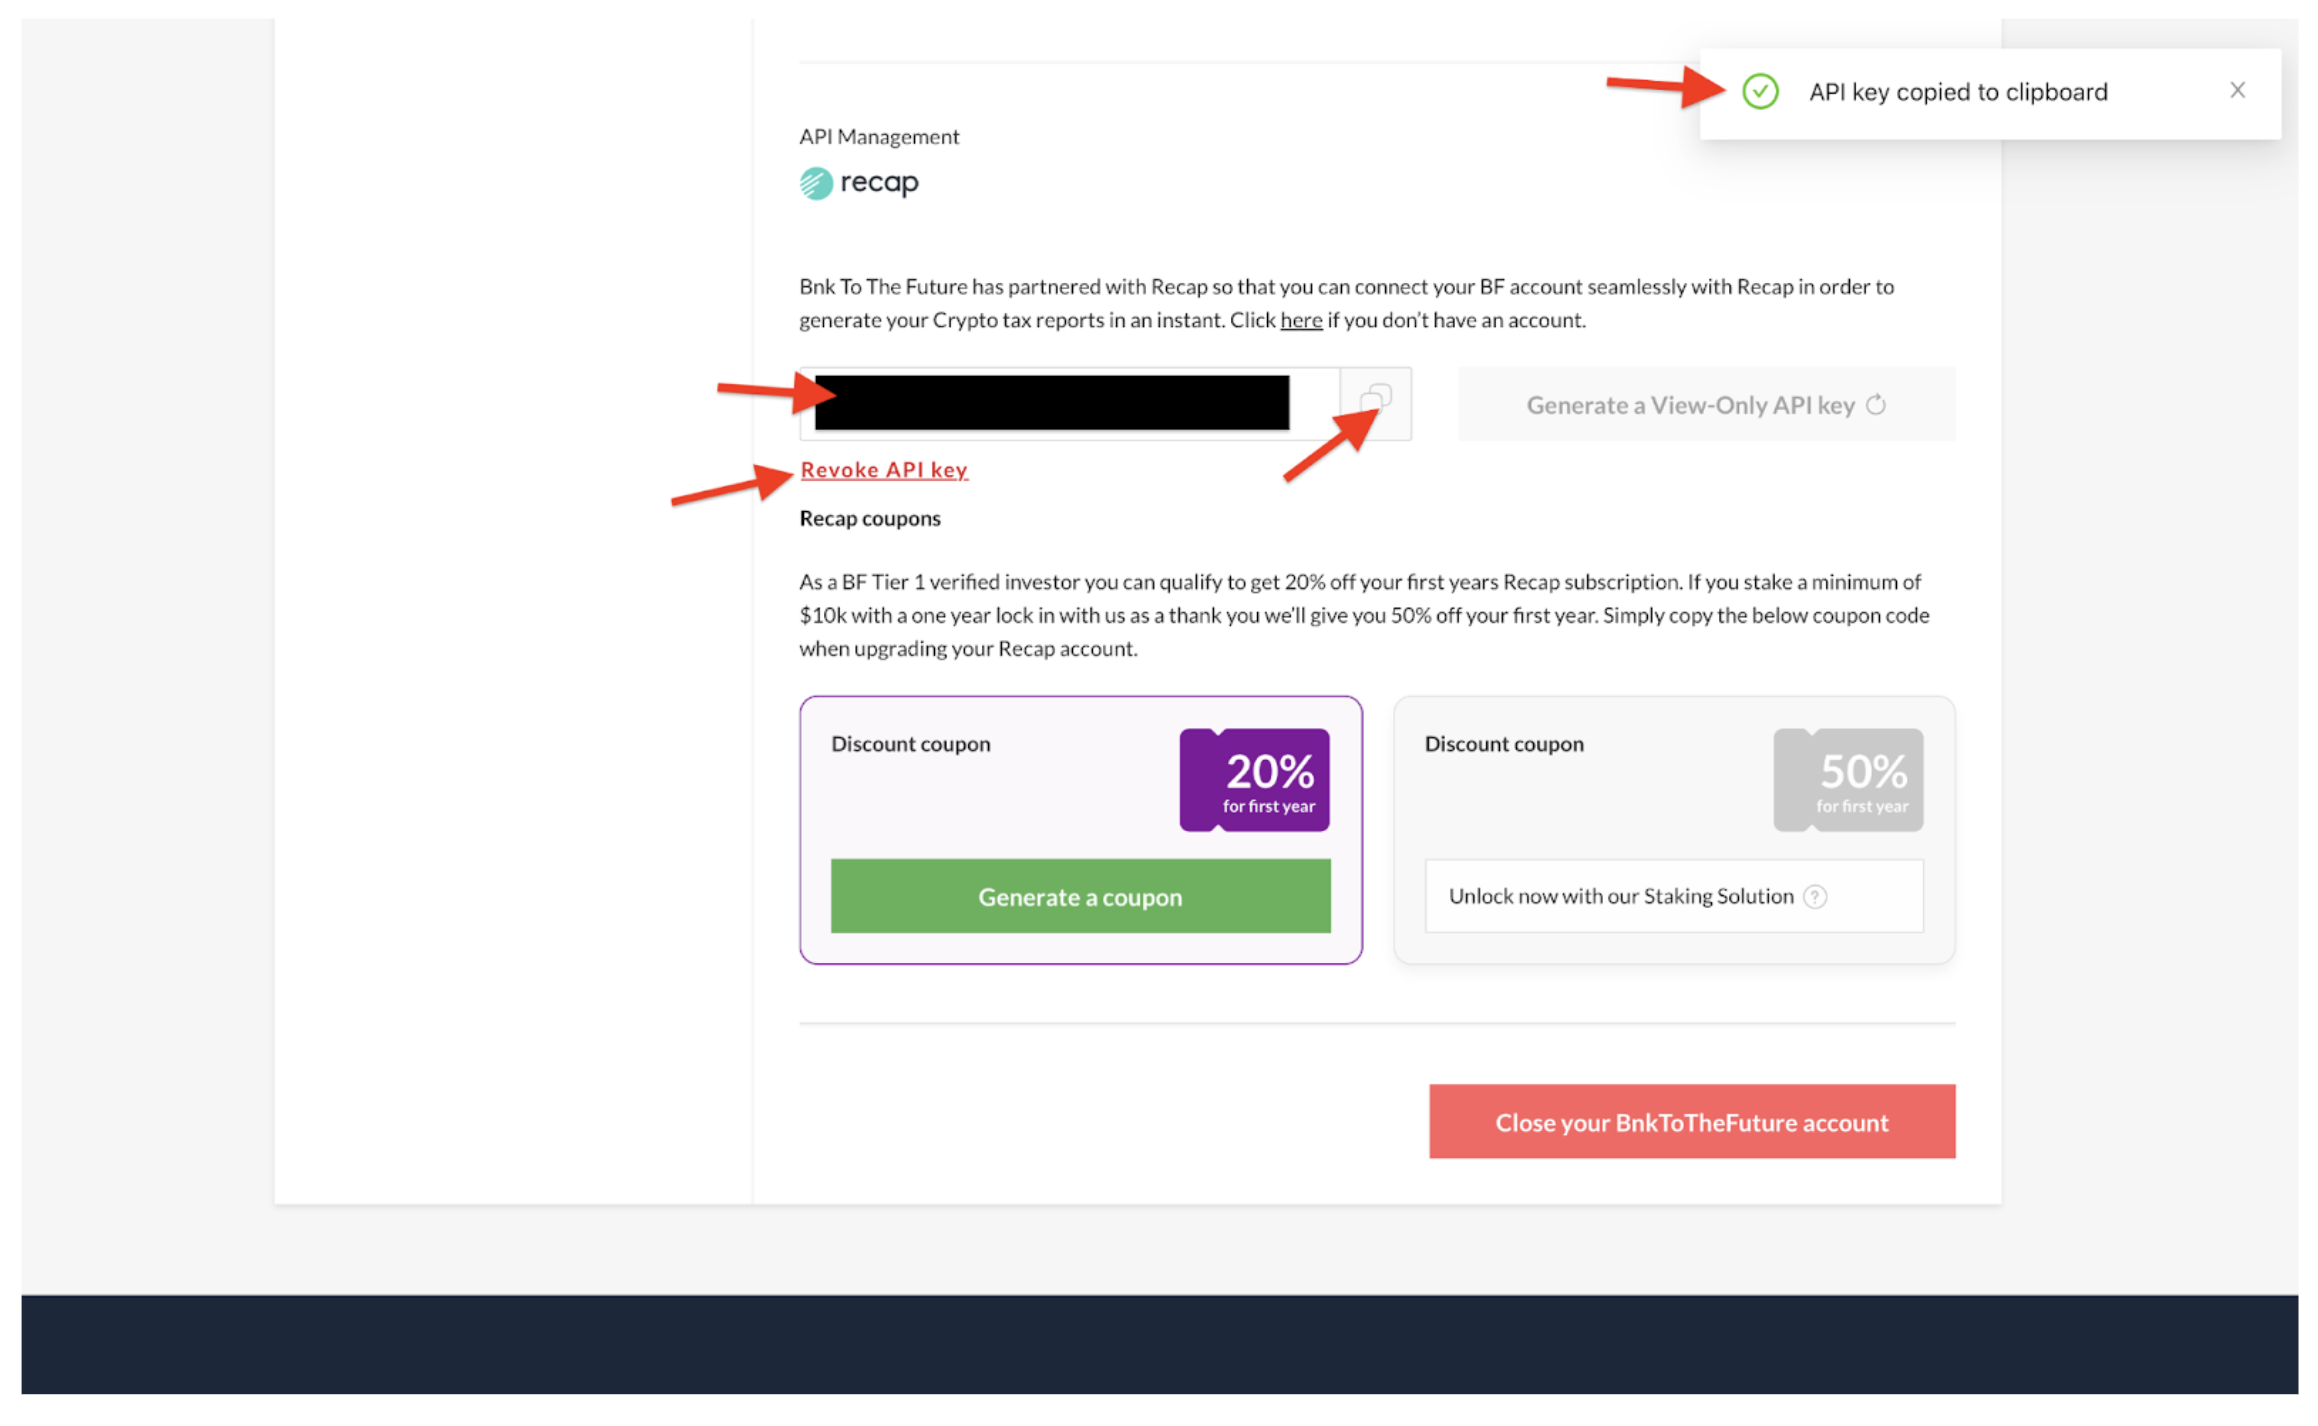
It’s crucial to keep your API key secure. Under no circumstances should you allow anyone, especially hackers, to access your API key.
Rest assured, once you’ve copied and pasted your API key into Recap, it is securely stored. If you suspect your API key has been compromised, you can revoke it within your Bnk To The Future account by clicking on the “Revoke API Key” link located underneath where the API key is generated. In such a scenario, you’ll need to generate a new API key and repeat the process.
15.1: Open a New Browser Tab and Log into Your Bnk To The Future Account to Generate an API Key.
Please open a new tab in your web browser and log into your Bnk To The Future account. From there, you’ll be able to generate an API Key.
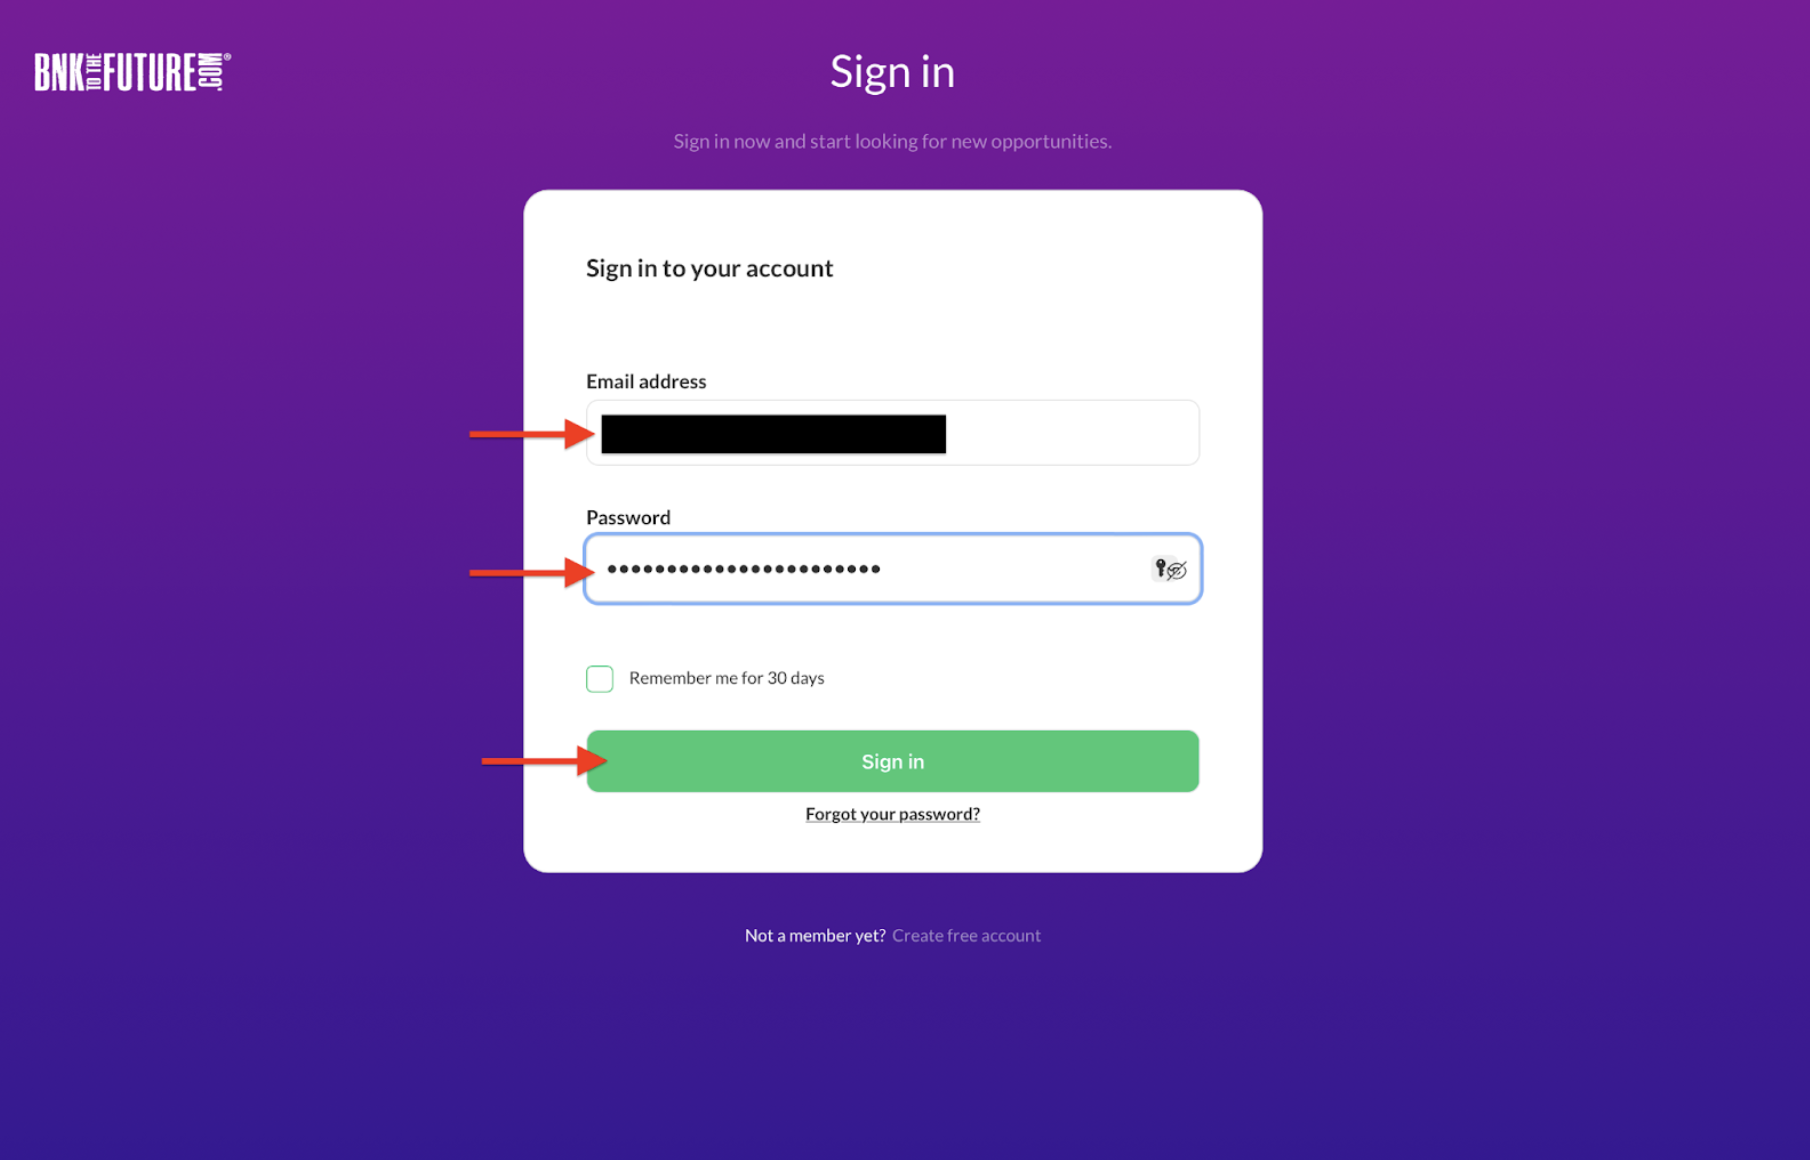
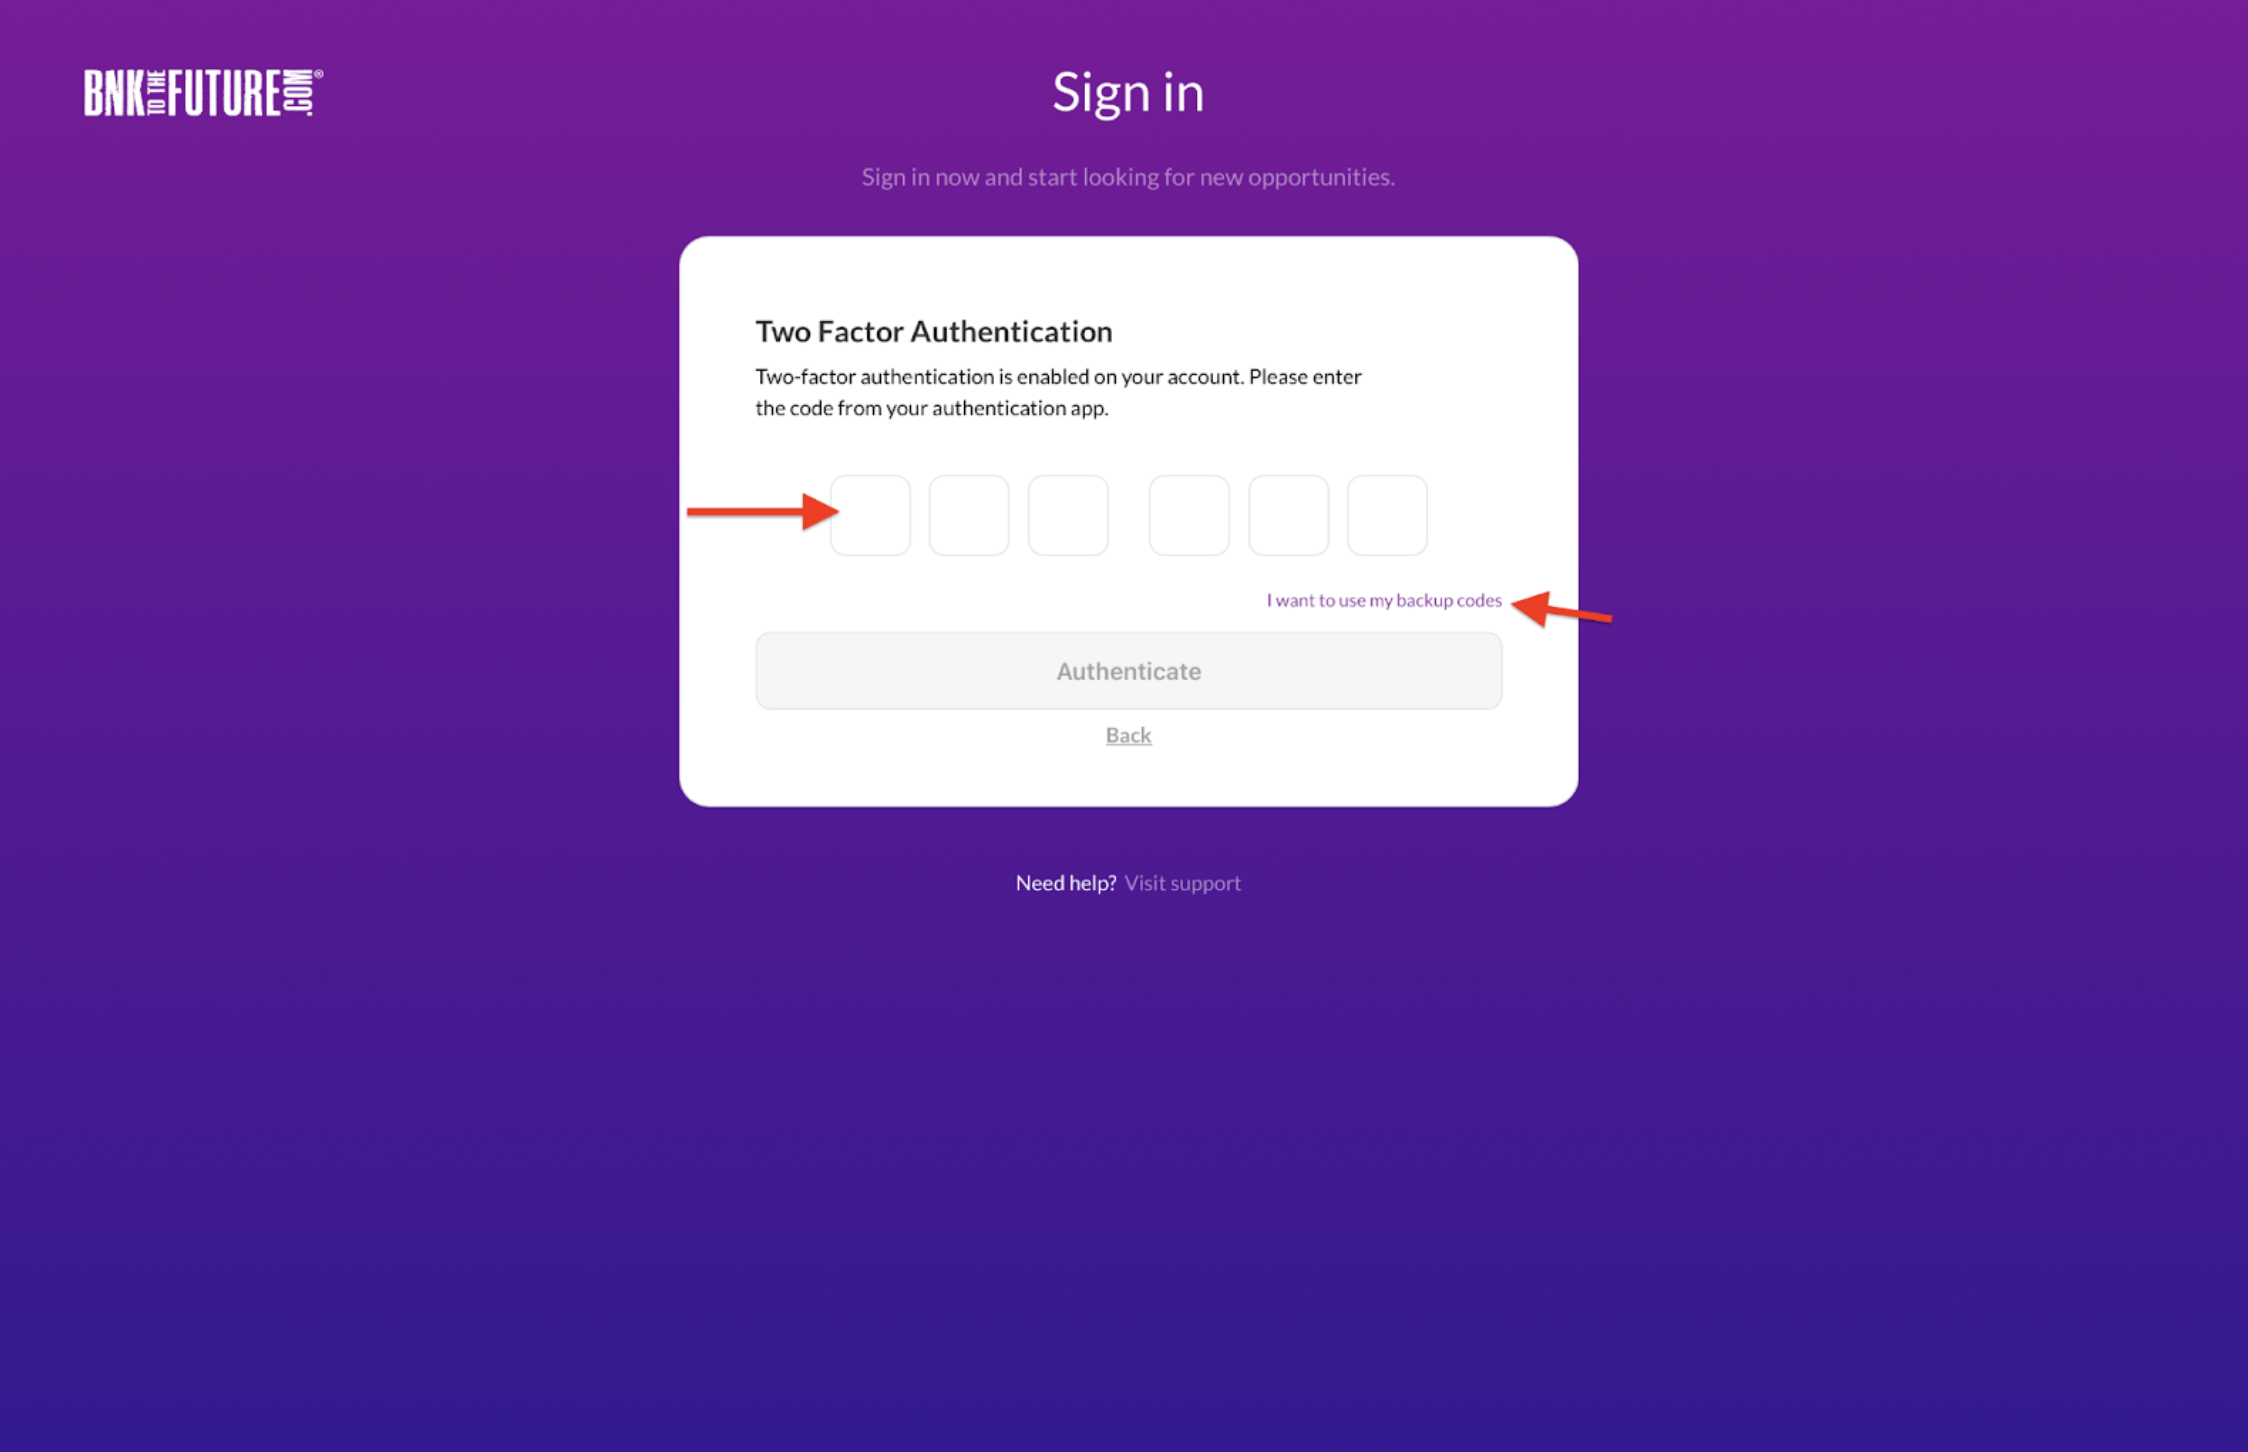
15.2: Enter your Authenticator Code.
To proceed, please ensure you have authentication apps such as Google Authenticator installed. If you haven’t set up Two-Factor Authentication (2FA) on your Bnk To The Future account, you’ll need to do so by navigating to the security tab of your account and configuring 2FA. Alternatively, you can use your backup codes (refer to the link provided in the screenshot below).
15.3 After logging into your Bnk To The Future account, navigate to the “Account” tab (refer to the screenshot below).

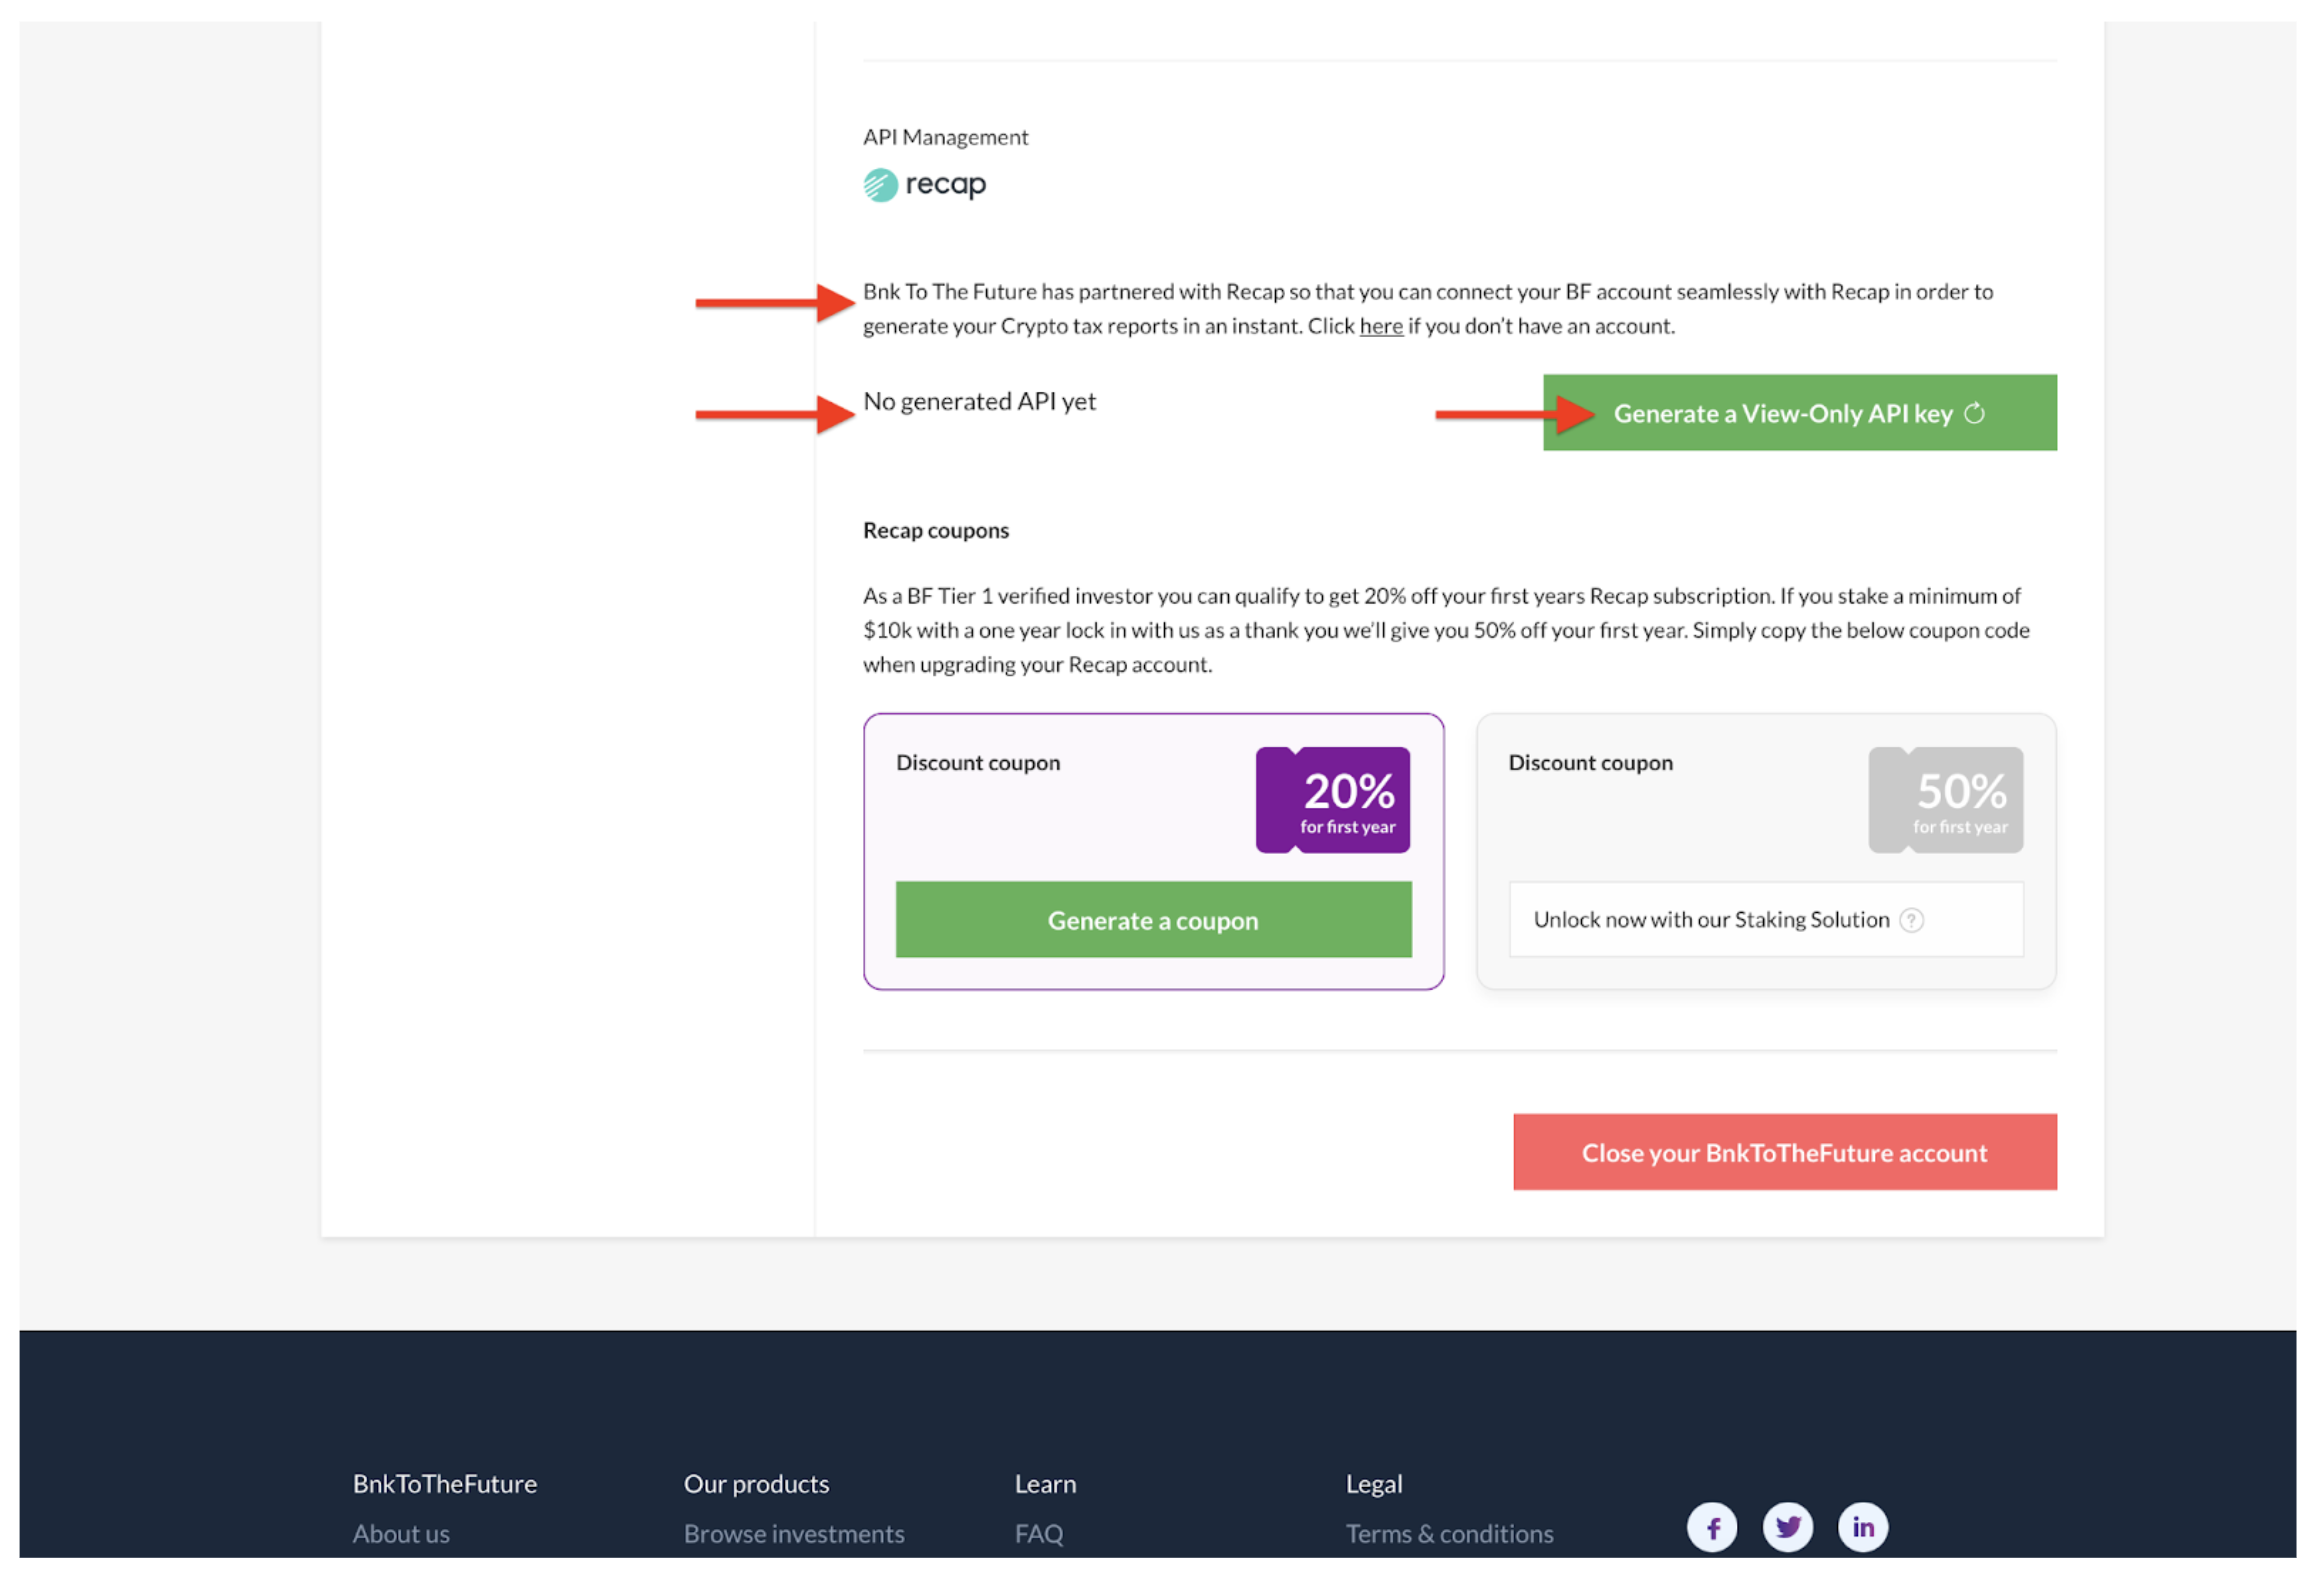
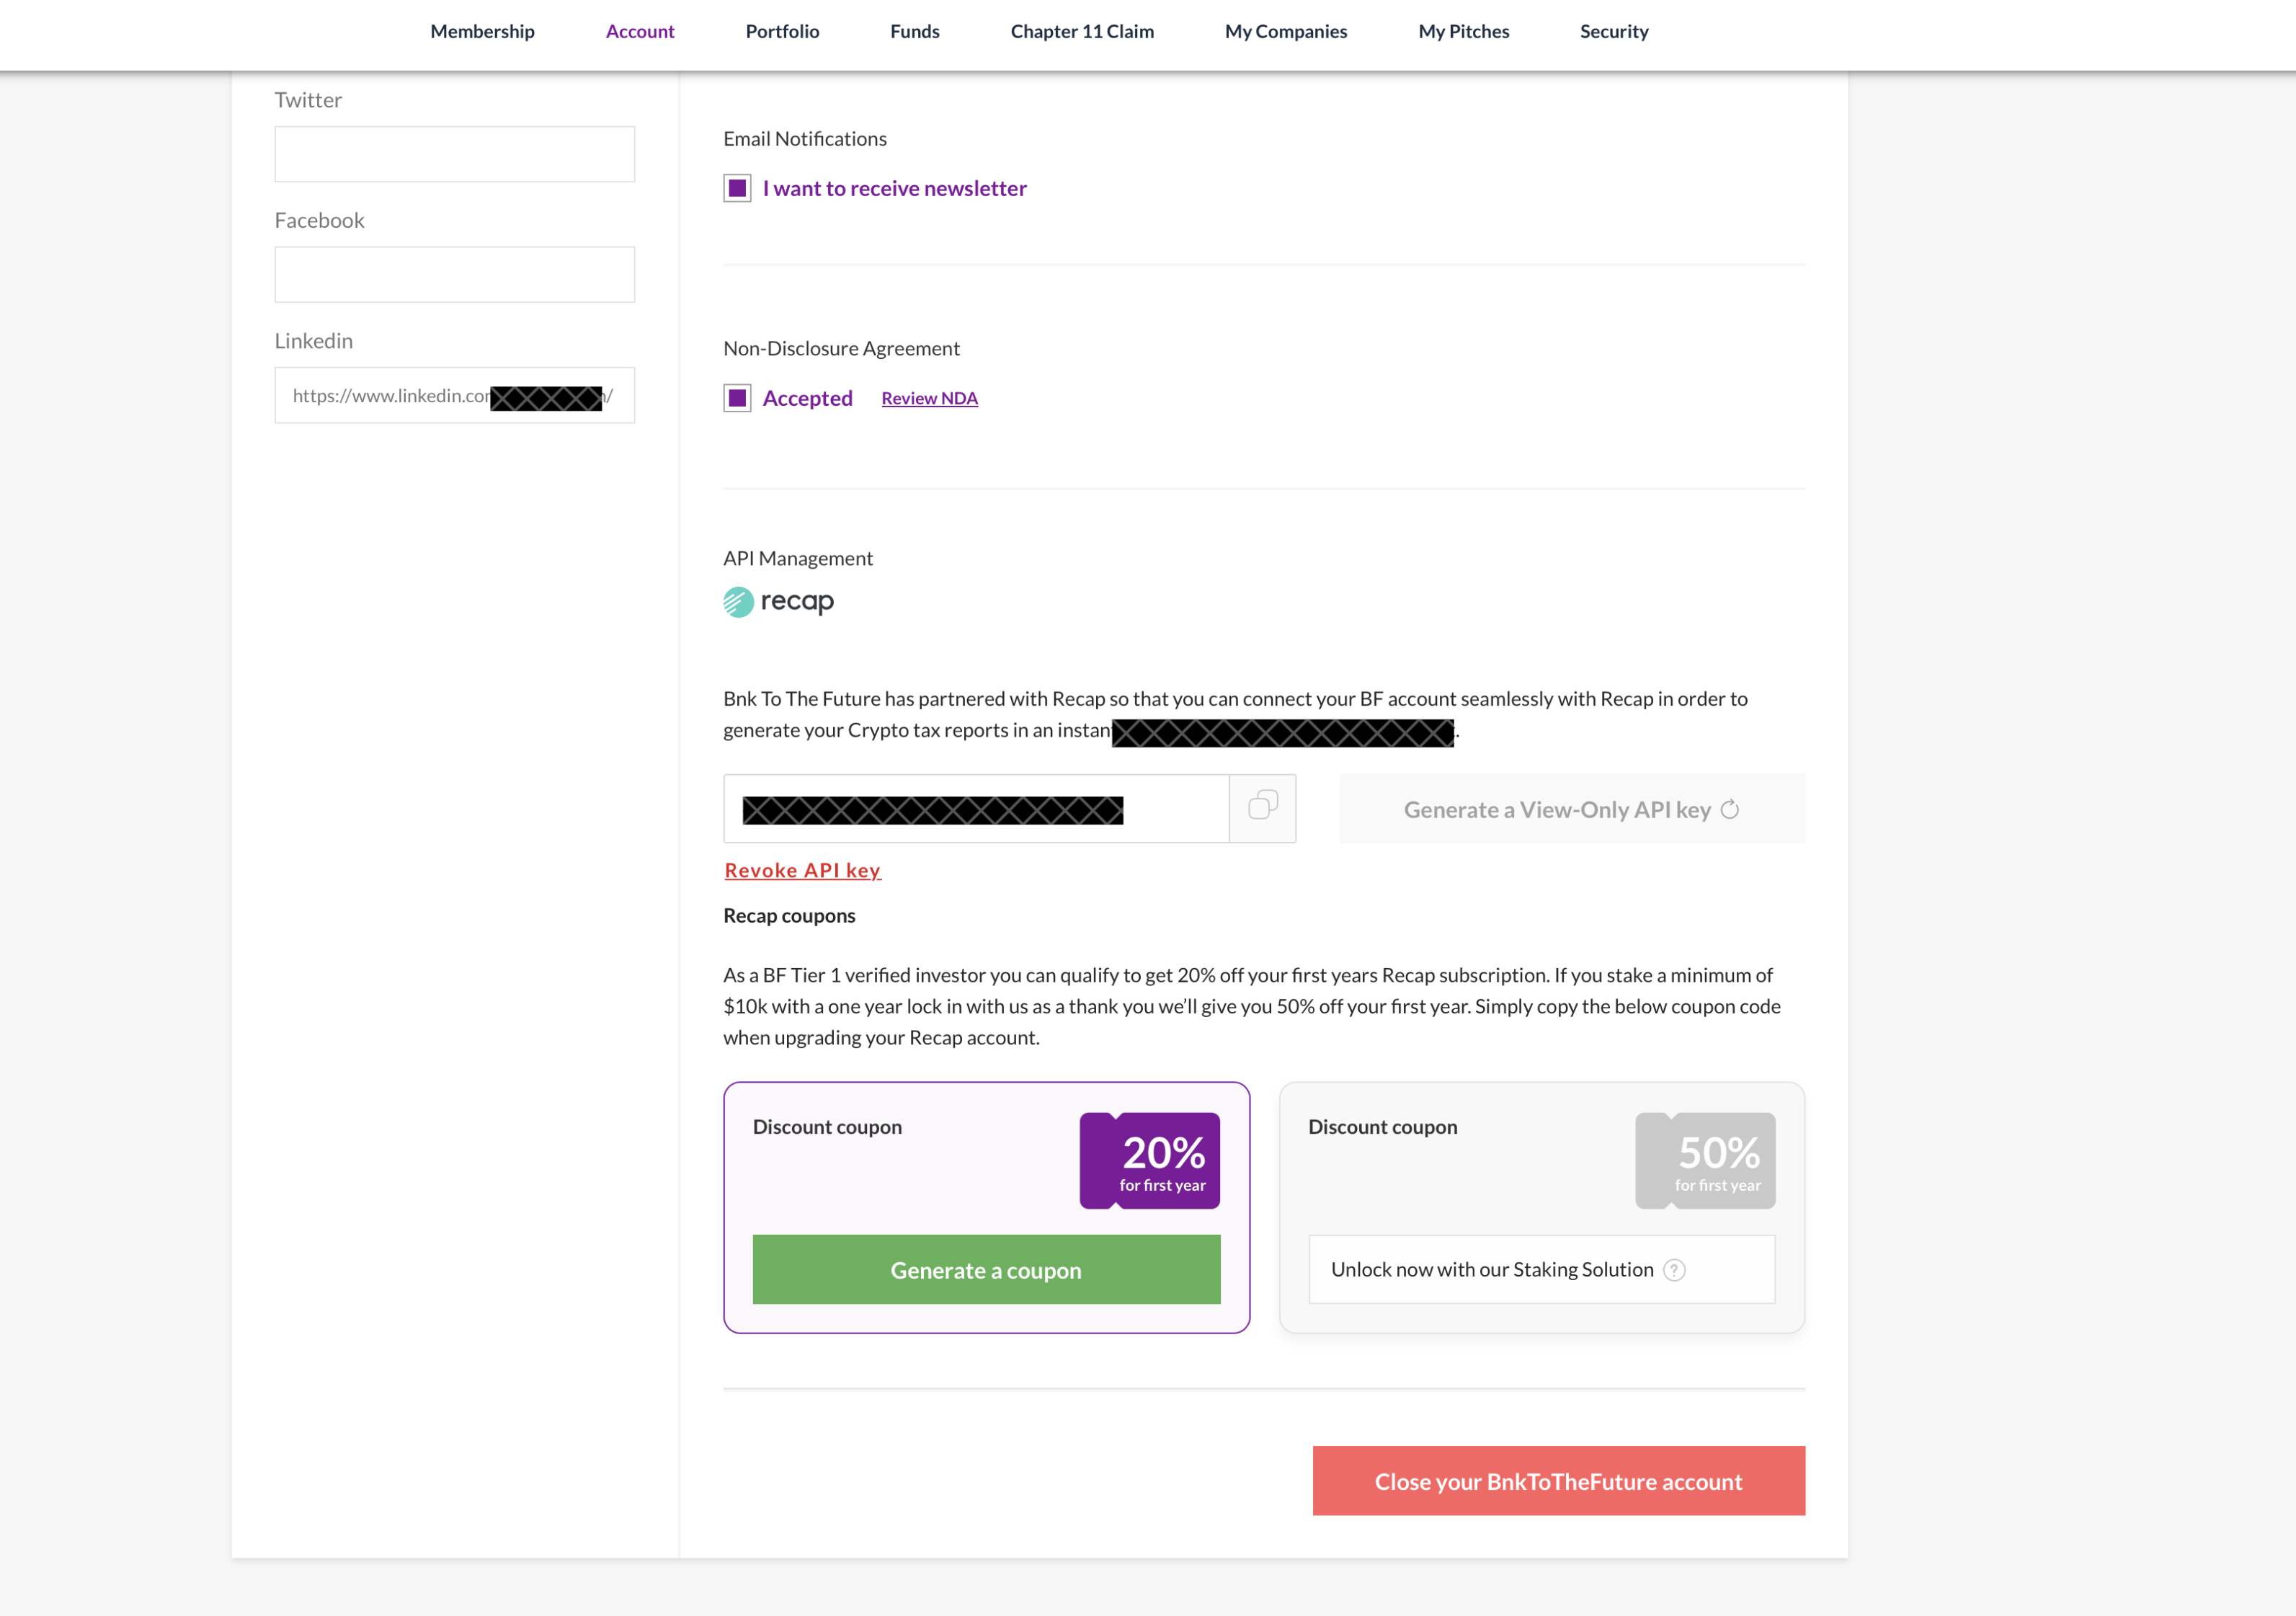
15.4 Scroll down to API Management and hit the button “Generate a View only API key”.
When you are in the Account tab section of your Bnk To The Future account, scroll down to the API management section where you will be able to see a Generate a View only API key button.
You will notice Recap’s logo and a bit of information which reads: Bnk To The Future has partnered with Recap so that you can connect your BF account seamlessly with Recap in order to generate your Crypto tax reports in an instant. Click here if you don’t have an account.
If you’ve never generated an API key you will notice to the left of the button (Generate a View only API Key) that it reads: No Generated API yet. This will change the minute you hit the Generate a View only API key button.
15.5 Copy the API key to Clipboard.
After clicking the “Generate a View-Only API Key” button, the API Key will be instantly generated and displayed to the left of the button. For security reasons, the API key will be hidden as sensitive information. The button will be grayed out, indicating that you cannot generate another key unless you revoke the current API key (see arrow pointing towards the link in the screenshot below).
To copy the API key to the clipboard, you have two options:
Click the copy button (see arrow pointing towards the button in the screenshot below).
Alternatively, you can simply highlight the API Read-Only generated key within the field to the left of the button (see screenshot below).
15.6 Paste the Generated API Key into Recap.
Return to your Recap tab in your browser. Paste the Read-Only Generated API Key into the designated API Key field (refer to the screenshot below). Once done, click the “Next” button to proceed.
Step 16: Please wait while Recap pulls in your accounting data into your Recap account.
Please wait while Recap pulls in your accounting data into your Recap account. This process may be as quick as 30 seconds.
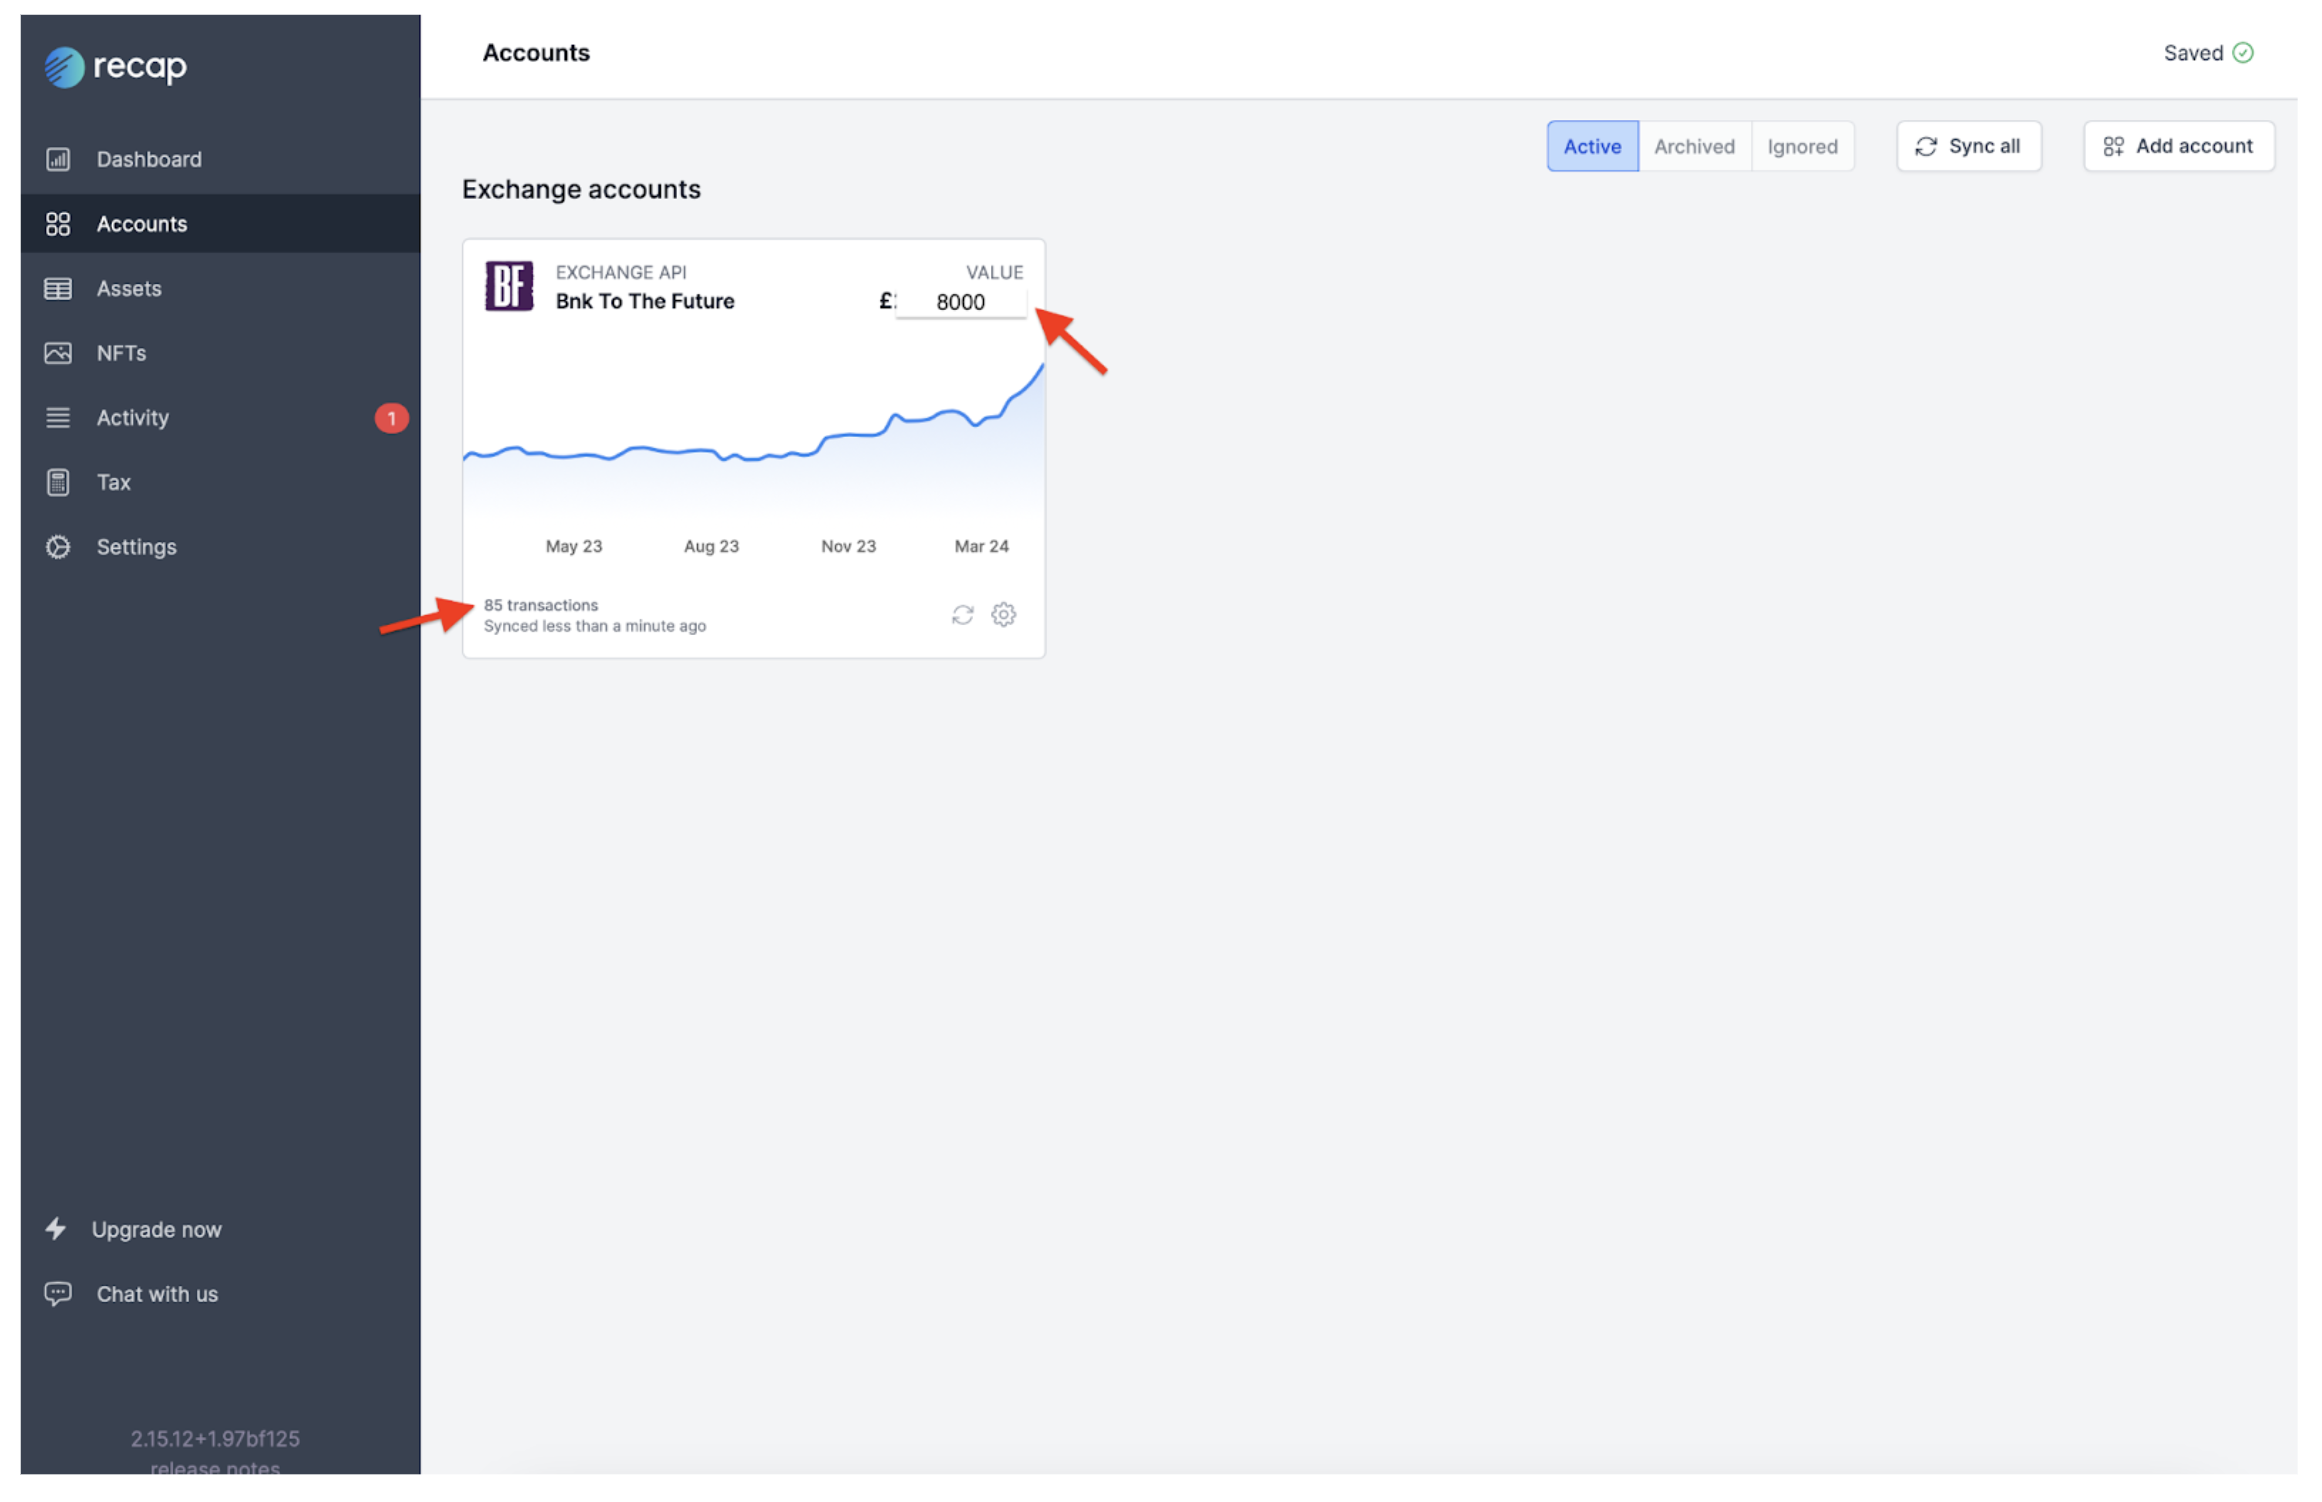
Under the “Account” tab in Recap, you should now see the connected account listed as “Bnk To The Future.”
Recap is currently syncing the accounting data, indicated by the value showing as £0.00 and the status message “Syncing now.” You’ll also notice a spinning circle symbol indicating the syncing process. At the bottom right corner of your screen, a notification should pop up confirming “Successfully added exchange account: Bnk To the Future.”

Step 17: Your Bnk To The Future Account is Now Linked to Your Recap Account.
Your Bnk To The Future account is now officially connected and synced with your Recap account. Everything is up to date and updating in real-time, requiring no further action from your end.
You should now be able to view the number of transactions made since you created your Bnk To The Future account (indicated by the arrow pointing to transactions). Additionally, you’ll see the current value of your Bnk To The Future account.
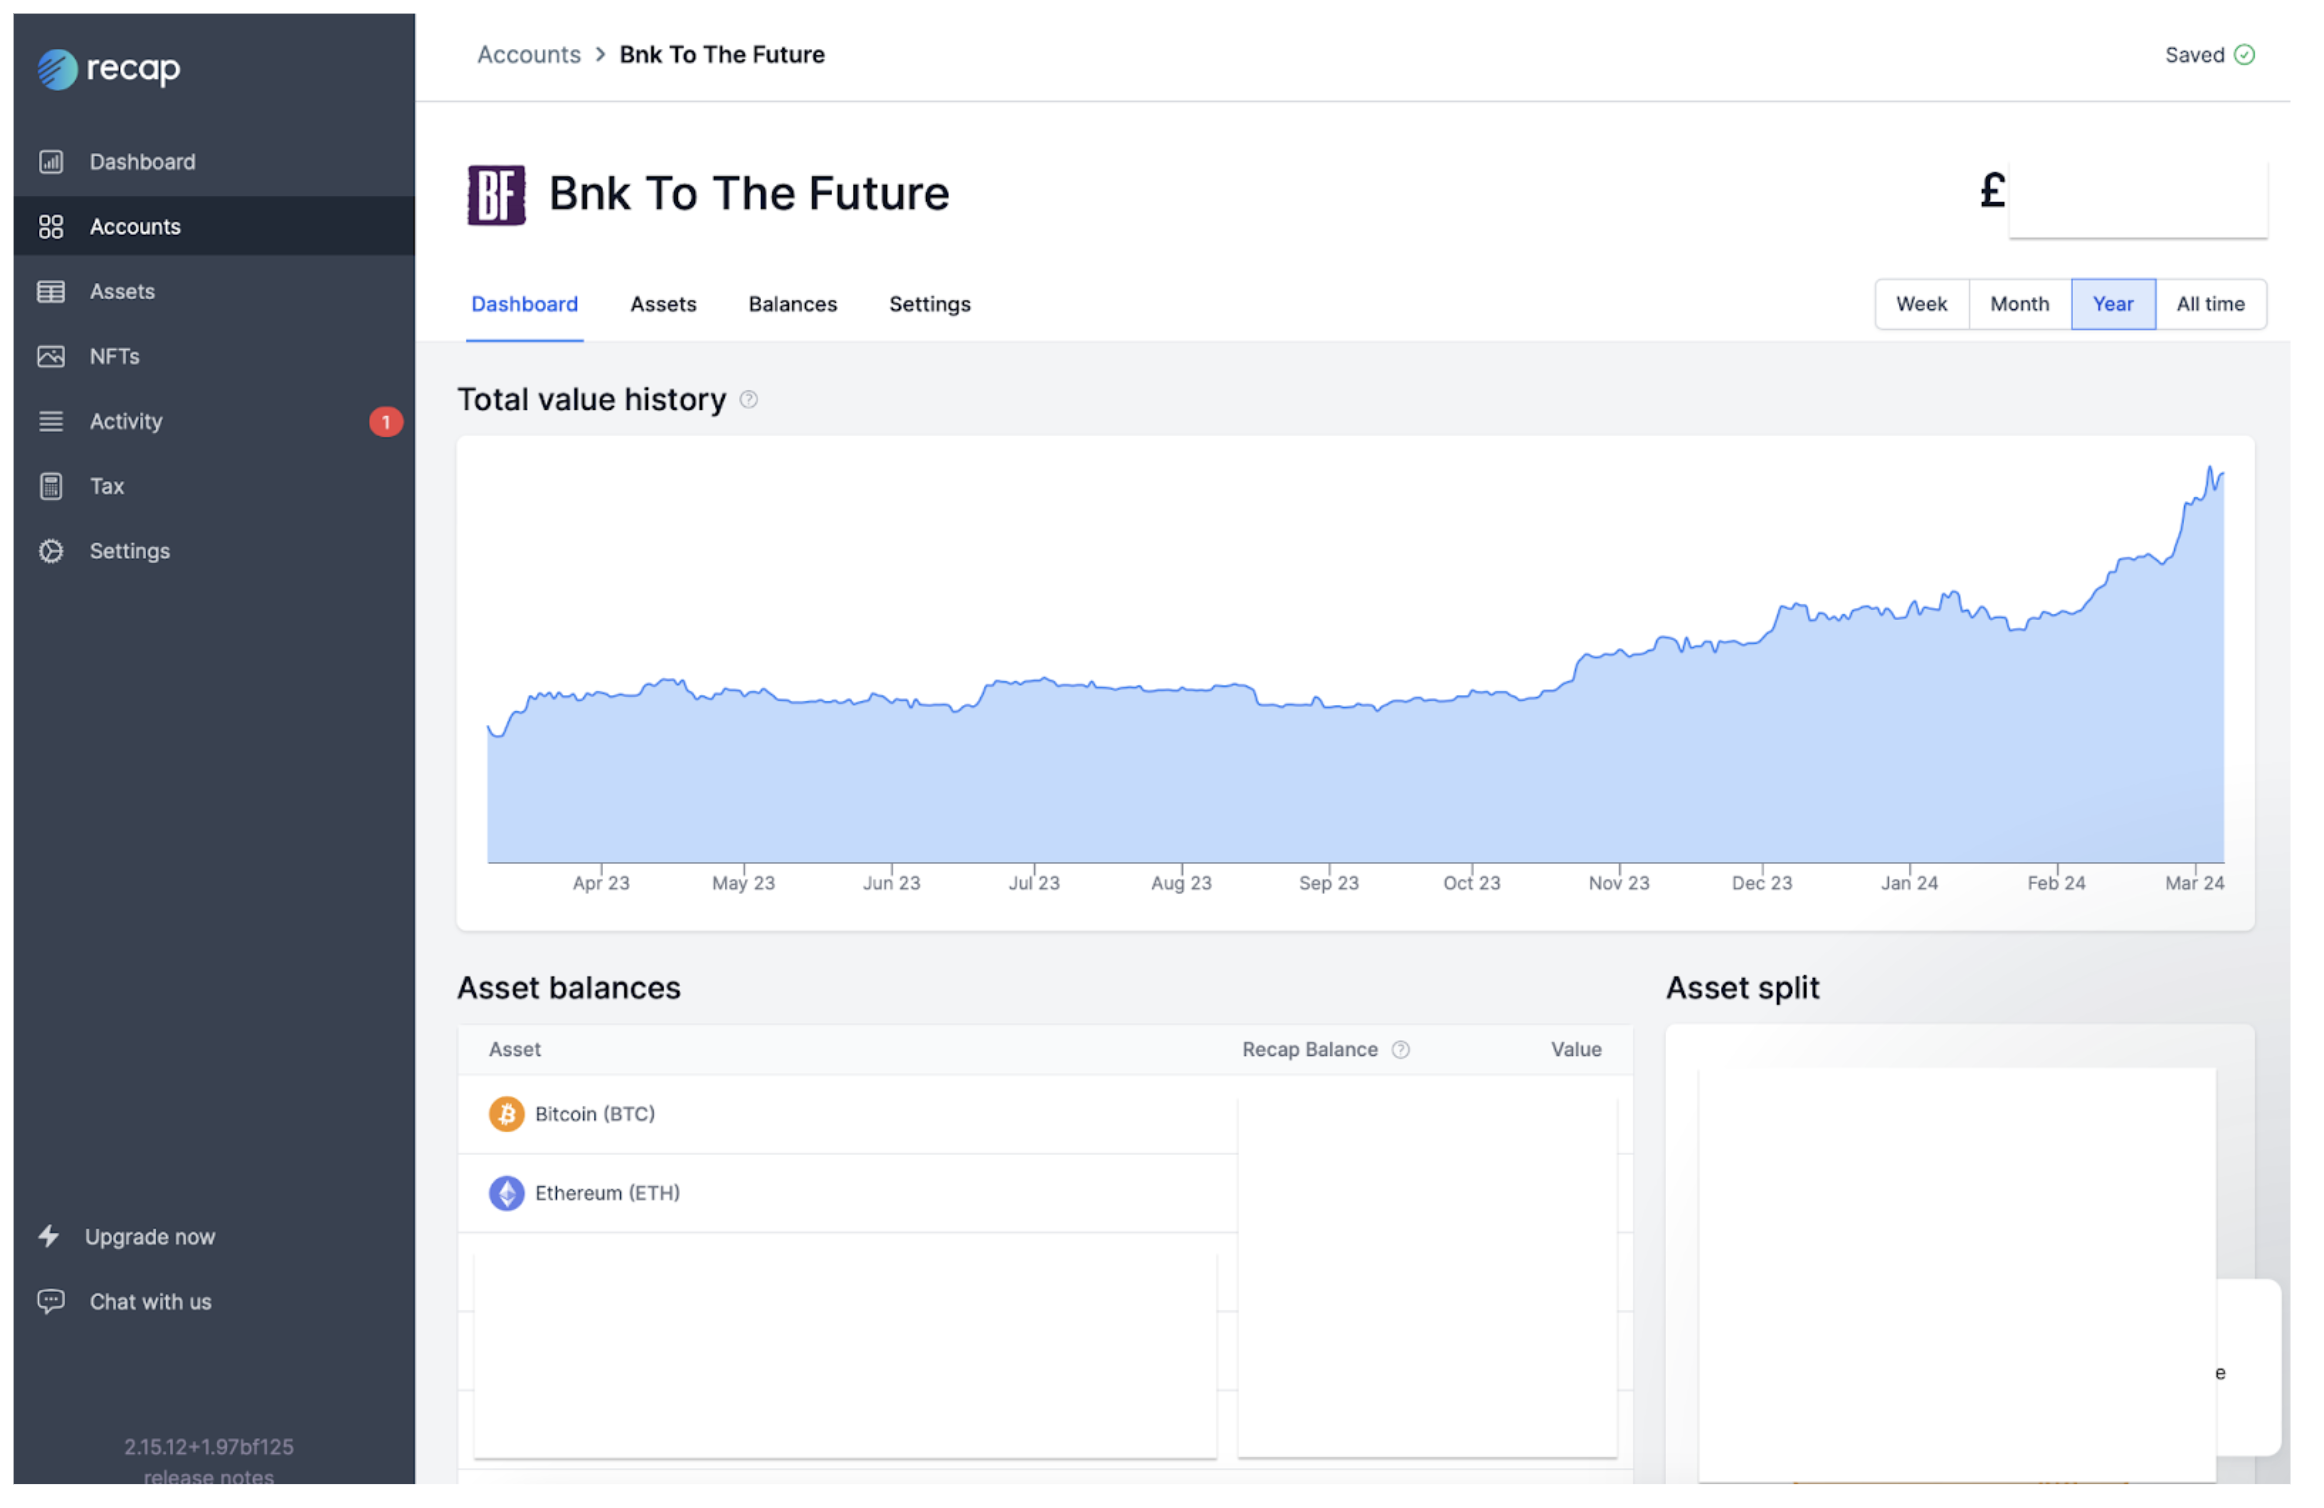
For detailed information regarding your Bnk To The Future account, simply click on the connected exchange account, “Bnk To The Future.”
Step 18: Take A Moment To Review Your Bnk To The Future Accounting Data In Your Recap Account.
Take a moment to review your past investments and any virtual assets you may own, such as Bitcoin and ETH. Congratulations! You’ve successfully linked your Recap account to your Bnk To The Future account.
When upgrading your Recap account for tax reporting, remember to utilize the coupon code found beneath your API key within your Bnk To The Future account. Additionally, if you time-lock stake your ETH on Bnk To The Future, you can unlock a more significant discount coupon code.
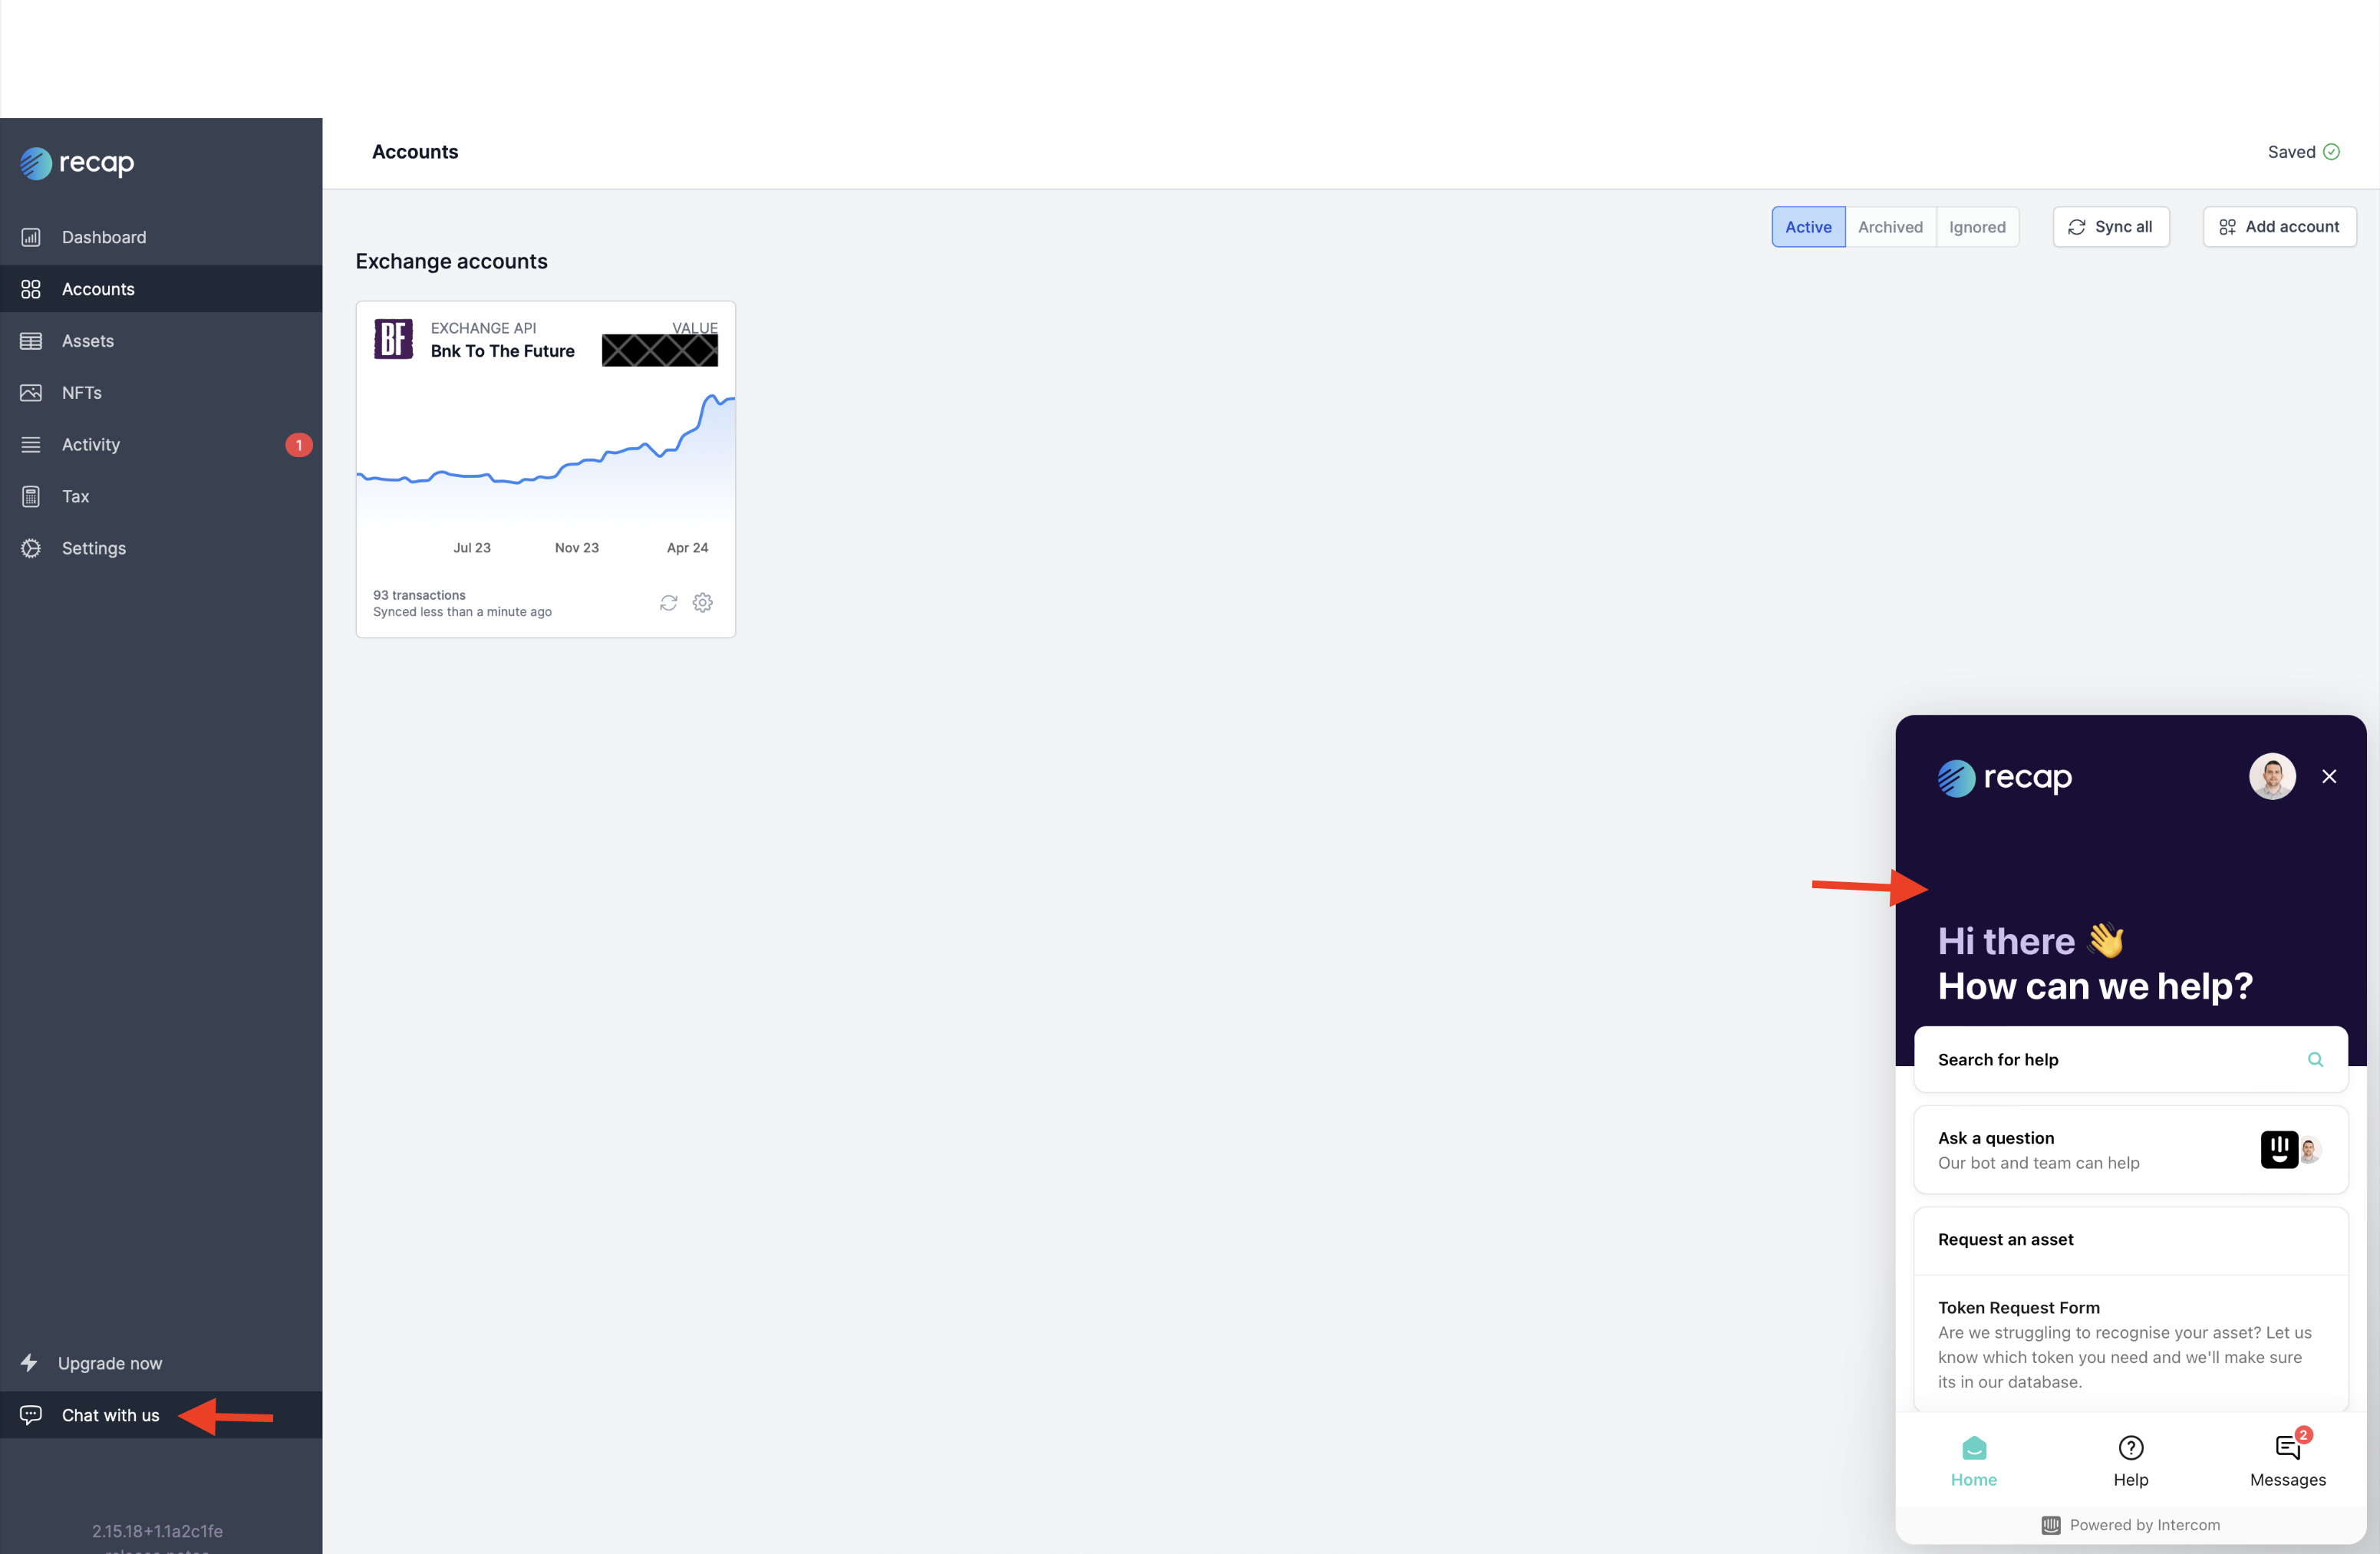
If you wish to discuss upgrading your Recap account or any Recap account support related issues, please log into your Recap account. Click on the “Chat with us” option located at the bottom left of your Recap dashboard. A chat feature will appear in the bottom right corner of your screen, allowing you to connect with the Recap support team and receive assistance promptly. If you’re unable to locate the chat option, please refer to the screenshot provided for visual guidance.